JWT Authentication in .NET: Building a Real OAuth 2.0 Authorization Server: Client Registration


In the previous article we finally turned our demo authorisation server into something that feels like a real OAuth 2.0 implementation.
We consolidated the token and refresh endpoints into a single /token endpoint that dispatches on the official grant_type parameter. We switched to standard OAuth conventions: snake_case, application/x-www-form-urlencoded content type and the scope parameter. In addition, we introduced proper JWT scope handling.
The OAuth 2.1 draft (which is already widely adopted in practice) has three main flows left standing: Authorization Code, Client Credentials, and Refresh Token.
So far in this series I’ve deliberately kept things simple so you could clearly see how JWT authentication works under the hood. But now it’s time to make the server production-grade.
Because this blog is focused on JWTs in ASP.NET Core APIs, machine-to-machine authorisation is our priority. That means the Client Credentials Grant.
Right now our demo still uses a human-style /register endpoint that creates a fake “user” and hands back a userId. That was fine for early demos, but it’s not how real OAuth 2.0 works. There is no person registering or logging in. Instead, each client application is pre-registered with the authorisation server and authenticates using a client_id and client_secret.
In this article we’re going to rip out the old user-centric registration and replace it with proper OAuth 2.0 client registration: A real client_id and hashed client_secret, and a clean validator inside the TokenService. We’ll also finish the shift we started last time by moving from roles to proper scopes.
It’s a bigger refactoring than I originally planned, but once it’s done our authorisation server will finally feel like the real thing.

The old user registration approach has to go
Alright, so the first things we're going to do are remove the /{role}/register endpoint from the "Server" API and we're going to remove the UserRepository and UserEntity from the project too, as we don't need that stuff anymore.
Then we're going to refactor the /token endpoint a little bit with the correct credentials for the Client Credentials grant. What we had before was:
app.MapPost("/token", async
   ([FromForm(Name = "refresh_token")] string? refreshToken,
    [FromForm(Name = "grant_type")] string grantType,
    [FromForm(Name = "client_id")] Guid? userId,
    [FromForm(Name = "scope")] string? scope,
    TokenService tokenService) => { ... });
And now we'll have this:
app.MapPost("/token", async
   ([FromForm(Name = "grant_type")] string grantType,
    [FromForm(Name = "refresh_token")] string? refreshToken,
    [FromForm(Name = "client_secret")] string? clientSecret,
    [FromForm(Name = "client_id")] string? clientId,
    [FromForm(Name = "scope")] string? scope,
    TokenService tokenService) => { ... });
So you can see, instead of a Guid userId, we now have a string? clientId and a string? clientSecret. That now conforms to the OAuth 2.1 specification.
Of course that also means that the TokenService needs to receive and validate the clientId and clientSecret, so that's what we'll do here:
public async Task<TokenResult> HandleAccessTokenRequestAsync(string? clientId, string? clientSecret, string? scope) { ... }However, next we need to validate the credentials, which is going to take us off on a slight tangent...

Generating secure client secrets
The "Client" API will have its own client_id and client_secret stored in configuration and the authorisation server API will have a collection of client_id and hashed client_secret to facilitate validation.
So, to do that we're going to create a whole new console project called KeyGen, which we're going to use to generate those credentials.
In the "Client" and "Server" projects, we'll need to install the Nuget package:
BCrypt.Net-Next v4.1.0+This package has some nice helper methods to hash and verify the client secret.
So, in the Program.cs for our new "KeyGen" console app, the code is simply:
using System.Security.Cryptography;
using System.Buffers.Text;

var secret = Base64Url.EncodeToString(RandomNumberGenerator.GetBytes(48));
var hashed = BCrypt.Net.BCrypt.HashPassword(secret);

Console.WriteLine($"secret: {secret}");
Console.WriteLine($"hash: {hashed}");
When we run that, we'll get a secret which we'll store in the "Client" API and a hash which we'll store in the "Server" API:
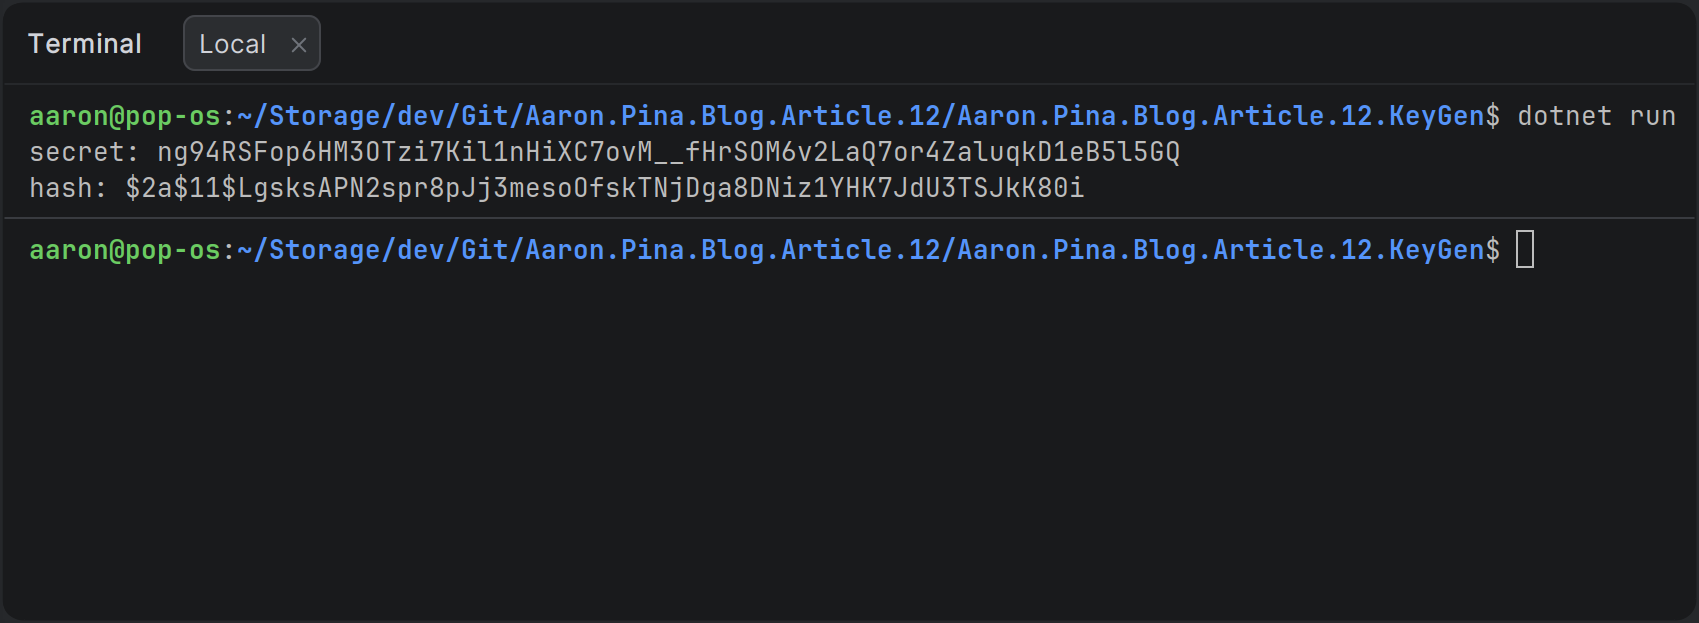
Obviously the values you generate are going to be different to mine! But what do we do with them?

Storing credentials safely with .NET User Secrets
To securely store the credentials, we're going to put them in .NET User Secrets. This is perfect for development. It's stored locally on your machine and isn't part of your repository, so it won't accidentally get committed and pushed to your source code repository.
In a containerised scenario, you'd want to put them in a .env file and refer to the values in that file from your docker-compose.yaml file.
In production, you'd want to use Azure Key Vault or the equivalent.
I use JetBrains Rider, so I'll show you how to add .NET User Secrets in that IDE:

That's going to open up a secrets.json file and we'll create a JSON object like this:
{
  "Credentials": {
    "ClientId": "client",
    "ClientSecret": "<PASTE YOUR secret HERE>"
  }
}
Then we'll do exactly the same thing on the "Server" API, except the JSON will look a bit different:
{
  "ClientCredentials": {
    "Credentials": [
      {
        "ClientId": "client",
        "ClientSecretHash": "<PASTE YOUR hash HERE>"
      }
    ]
  }
}
So that will be our collection of client credentials. We only have one client API right now, but if we were to create several client APIs, we would add each one to this collection.
Once we've done that, we're going to have to create the configuration objects to put those into, so we can use the options pattern to inject them into our services:
public class Credentials
{
    public string ClientId     { get; init; } = string.Empty;
    public string ClientSecret { get; init; } = string.Empty;
}
In the "Client" API, we'll register that with dependency injection:
builder.Services.Configure<Credentials>(builder.Configuration.GetSection(nameof(Credentials)));And in the Server project, we'll create these two configuration objects:
public class HashedCredentials
{
    public string ClientId         { get; init; } = string.Empty;
    public string ClientSecretHash { get; init; } = string.Empty;
}
public class ClientCredentials
{
public List<HashedCredentials> Credentials { get; init; } = [];
}And we'll register the latter with dependency injection:
builder.Services.Configure<ClientCredentials>(builder.Configuration.GetSection(nameof(ClientCredentials)));Great! Now those client credentials will be available in the ASP.NET dependency injection collection and we can get them injected into our services. Now, we're going to go back to the TokenService and see what changed there.

Validating client credentials
In the last article, we left the TokenService constructor looking like this:
public class TokenService(
    UserRepository userRepo,
    TokenRepository tokenRepo,
    JwksKeyManager keyManager,
    IOptionsSnapshot<TokenConfig> config) { ... }
But having deleted the UserRepository earlier in this article, we can get rid of that from the constructor change it to this:
public class TokenService(
    TokenRepository tokenRepo,
    JwksKeyManager keyManager,
    IOptionsSnapshot<TokenConfig> config,
    CredentialsValidator credentialsValidator) { ... }
Ah! But what's the CredentialsValidator? I'm glad you asked.
public class CredentialsValidator(IOptionsSnapshot<ClientCredentials> snapshot)
{
    public bool TryValidateCredentials(string? clientId, string? clientSecret)
    {
        if (string.IsNullOrEmpty(clientId)) return false;
        var storedCredentials = snapshot.Value.Credentials.FirstOrDefault(credential =>
            credential.ClientId == clientId);
        if (storedCredentials is null) return false;
        if (string.IsNullOrEmpty(clientSecret)) return false;
        return BCrypt.Net.BCrypt.Verify(clientSecret, storedCredentials.ClientSecretHash);
    }
}
You shouldn't have any trouble understanding what this does, but I'll quickly run through it, following the happy path:
- We validate that the
ClientIdactually has a value. - We try to get a
HashedCredentialsfrom configuration for the client whose key matches with the credential'sclientId. - If we find it, we validate that the
clientSecrethas a value. - We use BCrypt to validate that the
ClientSecretHashis the same value as the hashedclientSecret.
Then we just need to use the validator in the TokenService to validate the client credentials. It'll look like this:
if (!credentialsValidator.TryValidateCredentials(clientId, clientSecret)) return TokenResult.Fail("Invalid credentials");
Extracting audience and scopes
Since we removed the /{role}/register endpoint and the UserRepository, we're not using the concept of roles for authorisation anymore. Instead, as we talked about in the previous article, we're going to use scopes, which are commonly specified in the format audience.permission.
That means, if our "Client" API wants to access any of the endpoints on the authorisation server, it's going to need a JWT with a server.admin scope. The "Client" API will send that scope with its credentials to the /token endpoint. But an API requesting a token can request any number of scopes, as long as they're for the same audience, so whatever the client sends in the scope parameter needs to be parsed to also extract all of the required scopes.
For that purpose, we're going to rename the AudienceExtractor helper class to ScopeParser, because that what's it's really doing, and we're going to rename the TryExtractAudience function to TryExtractValues, because now we want it to give us an audience that we can use to set the JWT aud claim and we need a collection of scopes, so we can set the scope claim. So this is what the refactoring looks like:
public static class ScopeParser
{
    public static bool TryExtractValues(string scope, out string audience, out string[] scopes)
    {
        scopes = [];
        audience = string.Empty;
        if (string.IsNullOrEmpty(scope)) return false;
        scopes = ExtractScopes(scope);
        var audiences = ExtractAudiences(scopes);
        if (audiences.Length != 1) return false;
        audience = audiences.Single();
        return true;
    }

    public static string[] ExtractScopes(string scope) =>
        scope.Split(' ', RemoveEmptyEntries | TrimEntries);

    public static string[] ExtractAudiences(IEnumerable<string> scopes) =>
        scopes.Select(s => s.Split('.', 2))
              .Where(p => p.Length == 2)
              .Select(p => p.First())
              .Distinct(StringComparer.Ordinal)
              .ToArray();

    public static string[] ExtractPermissions(IEnumerable<string> scopes) =>
        scopes.Select(s => s.Split('.', 2))
              .Where(p => p.Length == 2)
              .Select(p => p.Last())
              .Distinct(StringComparer.Ordinal)
              .ToArray();
}
You can see I extracted ExtractAudiences into its own function, for no other reason than to make TryExtractValues tidier. However, functionally, the only thing we changed is to also send out the scopes if the function successfully extracts a single audience from the input.
I also added a couple of extra helper functions too: ExtractScopes, because we'll need it in the HandleRefreshTokenRequestAsync function and ExtractPermissions, because we'll need it for the /user endpoint on the "Other" API.
It makes sense to keep the class DRY, so I also refactored the TryExtractValues function to use the ExtractScopes function in the appropriate place.

Token generation Gotchas
Okay, so back to the TokenService. We use the ScopeParser thus:
if (!ScopeParser.TryExtractValues(scope, out var audience, out var scopes)) return TokenResult.Fail("Invalid scope");And then if everything went right, we have an audience and one or more scopes.
The last thing we need to do in the refactoring of the client_credentials grant is to change the TokenGenerator to remove the role claim and properly accept the scopes.
Here's the old TokenGenerator.GenerateToken function:
public static string GenerateToken(
    RsaSecurityKey rsaKey,
    Guid jti,
    Guid userId,
    string role,
    string audience,
    string scope,
    DateTime now,
    TimeSpan expiresIn)
{
    var tokenDescriptor = new SecurityTokenDescriptor
    {
        IssuedAt = now,
        Audience = audience,
        Expires = now.Add(expiresIn),
        Issuer = Api.UrlFor(Api.Audience.Server.Name),
        Subject = new ClaimsIdentity([
            new Claim("role", role),
            new Claim("scope", scope),
            new Claim("jti", jti.ToString()),
            new Claim("sub", userId.ToString())
        ]),
        SigningCredentials = new SigningCredentials(rsaKey, SecurityAlgorithms.RsaSha256)
    };
    var handler = new JwtSecurityTokenHandler();
    var token = handler.CreateToken(tokenDescriptor);
    return handler.WriteToken(token);
}
And here's the new TokenGenerator.GenerateToken function:
public static string GenerateToken(
    RsaSecurityKey rsaKey,
    Guid jti,
    string clientId,
    string audience,
    string[] scopes,
    DateTime now,
    TimeSpan expiresIn)
{
    List<Claim> claims = [
        new("sub", clientId),
        new("jti", jti.ToString())
    ];
    claims.AddRange(scopes.Select(scope => new Claim("scope", scope)));
    var tokenDescriptor = new SecurityTokenDescriptor
    {
        IssuedAt = now,
        Audience = audience,
        Expires = now.Add(expiresIn),
        Subject = new ClaimsIdentity(claims),
        Issuer = Api.UrlFor(Api.Audience.Server.Name),
        SigningCredentials = new SigningCredentials(rsaKey, SecurityAlgorithms.RsaSha256)
    };
    var handler = new JwtSecurityTokenHandler();
    var token = handler.CreateToken(tokenDescriptor);
    return handler.WriteToken(token);
}
Obviously the parameters have changed. We replaced userId with clientId, we removed role and we replaced a single scope with an array of scopes.
Because of the way the ASP.NET Core JWT Bearer implementation works, for each scope you have, a duplicate "scope": "audience.permission" claim is going to be added. I'll generate a JWT and show you what it looks like if we paste it into jwt.io:
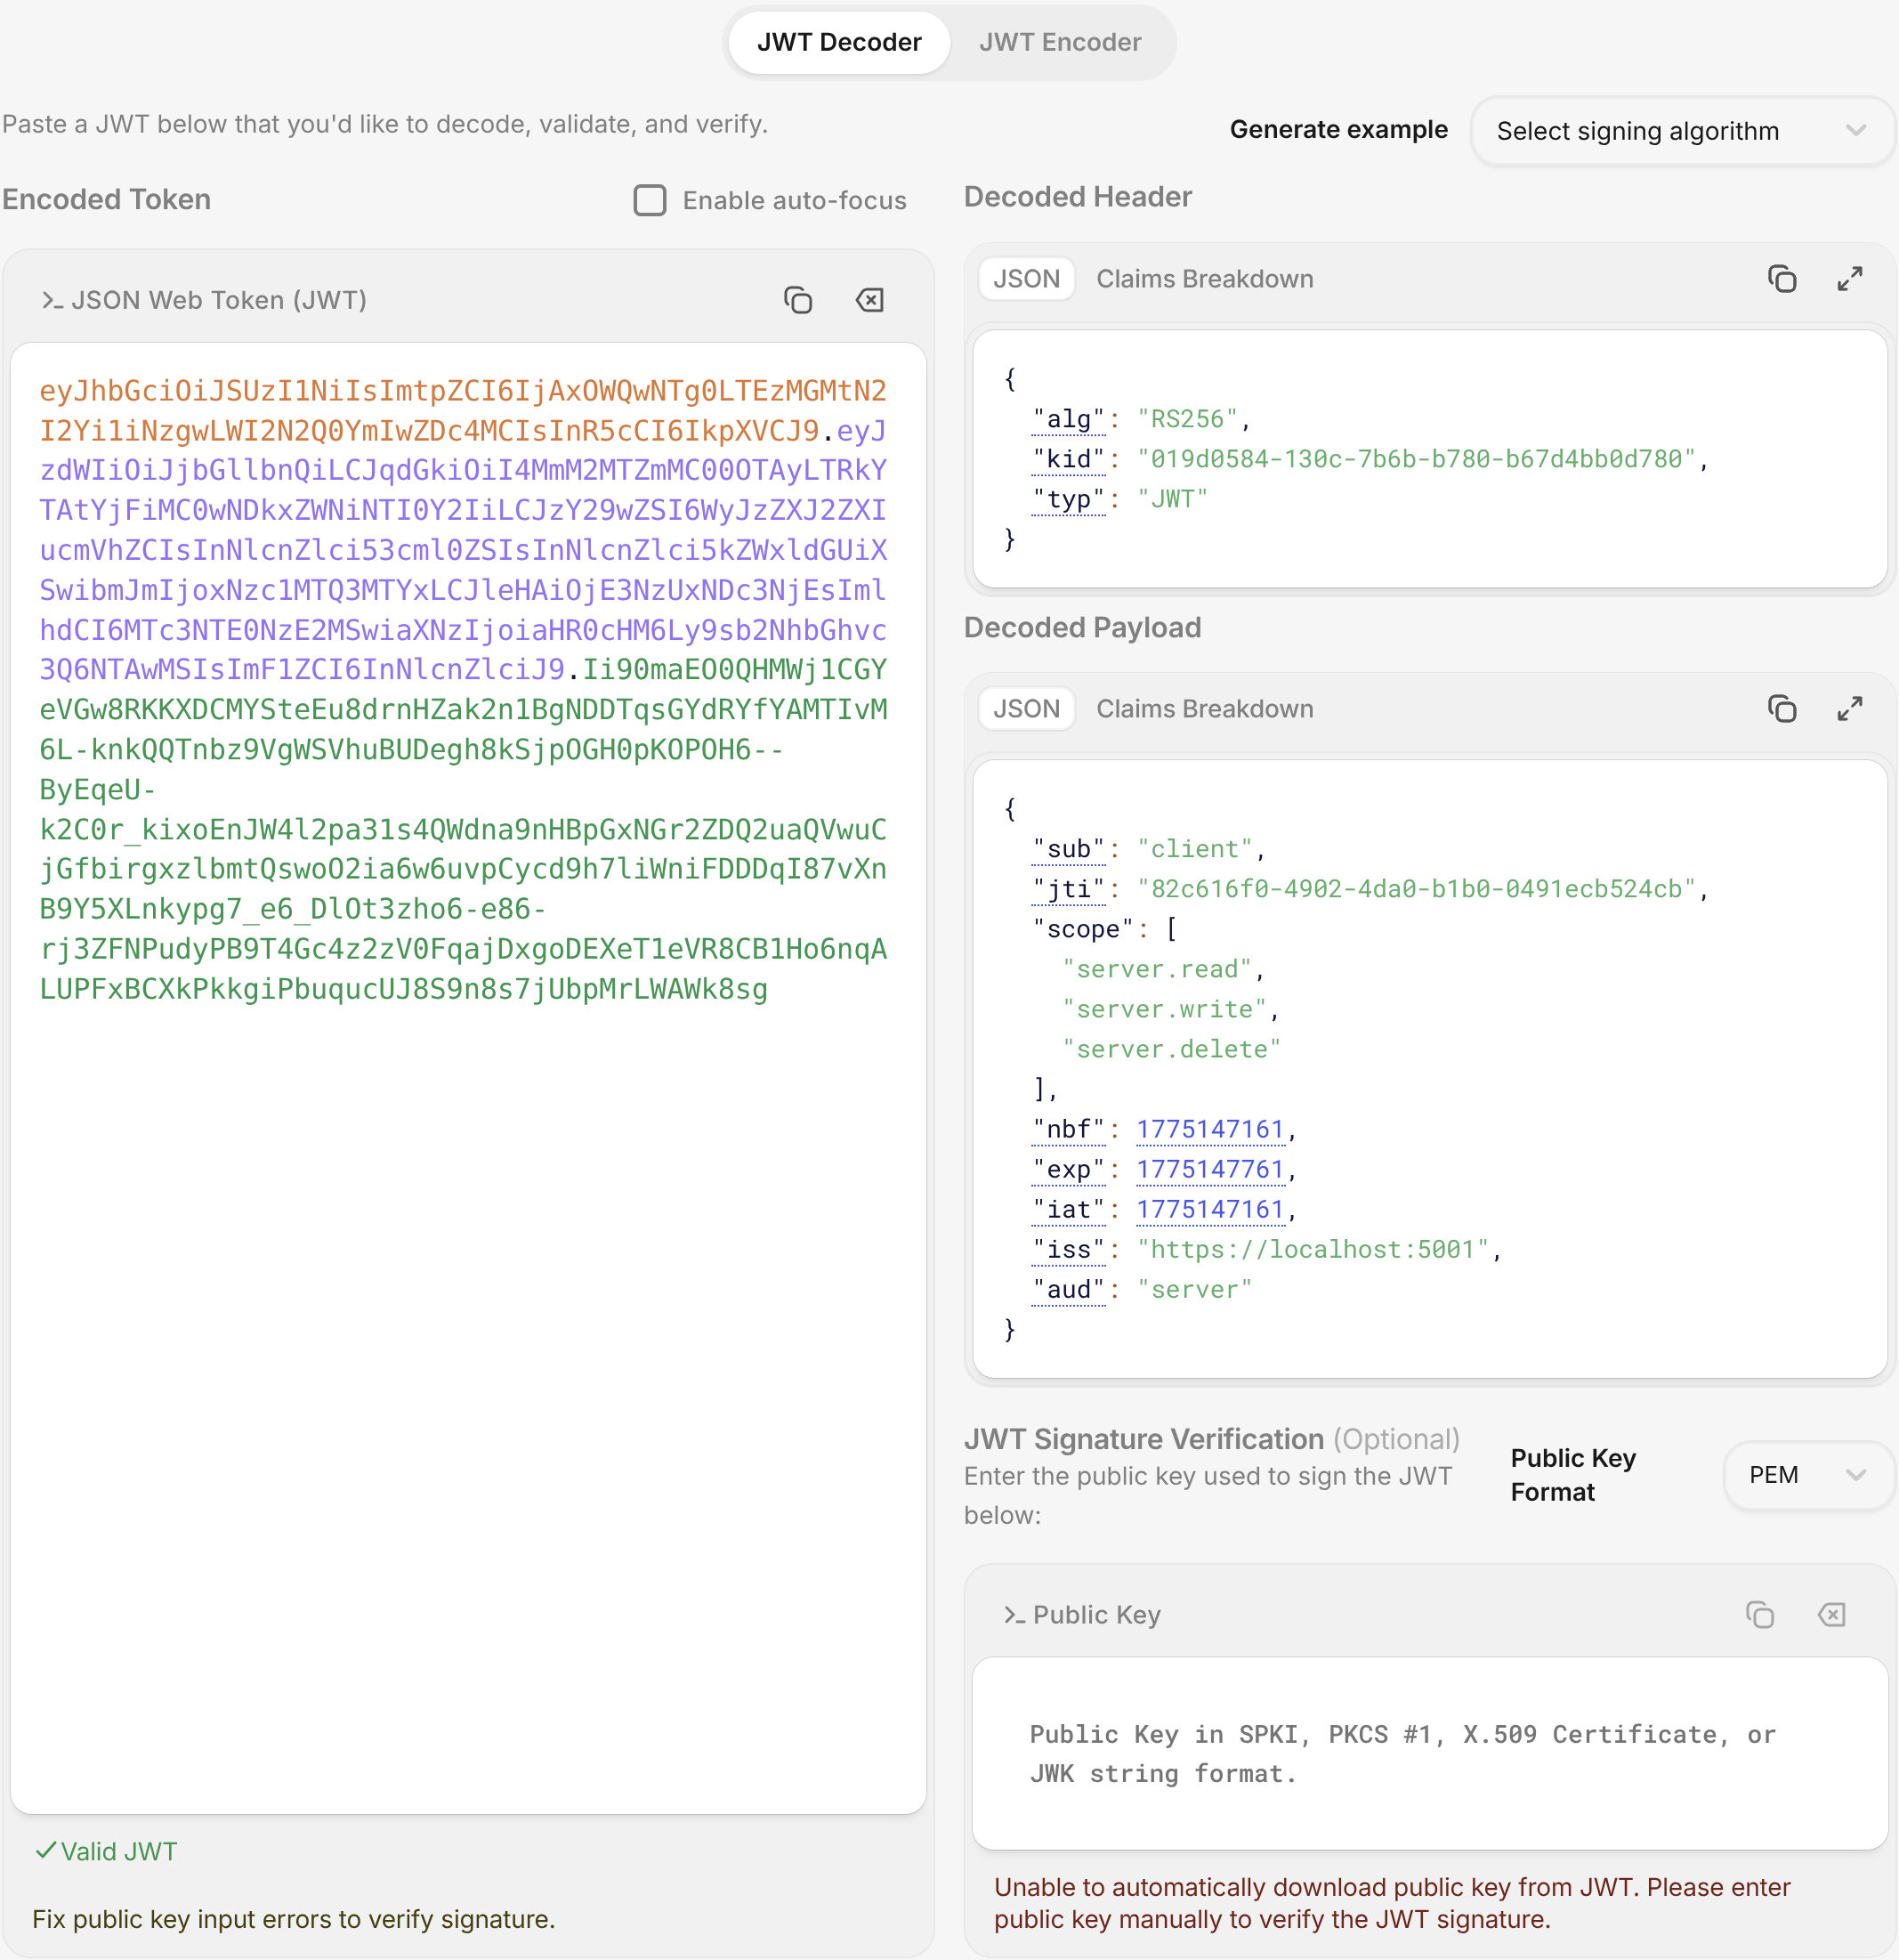
You can see that despite us creating duplicate scopes in ASP.NET Core, once the payload is translated into JSON, it has become an array. I'm not sure why Microsoft implemented it this way, but it's something that you need to be aware of!

Cleaning up
Alright, now that the refactoring of the client_credentials grant is complete, we just need to clean up everything else that was broken by those changes. The first thing that needs to be fixed is the TokenService.HandleRefreshTokenRequestAsync function.
It was getting the role from the UserRepository, but we don't need that anymore, so we can just get rid of that code. What we actually want are the scopes, which we extract from the token record stored in the database every time we create a token.
This is what the function looks like now:
public async Task<TokenResult> HandleRefreshTokenRequestAsync(string? refreshToken)
{
    // validate refreshToken
    // get token from database
    // create new refresh token
    var scopes = ScopeParser.ExtractScopes(token.Scope);
    var accessToken = TokenGenerator.GenerateToken(
        signingKey, jti, token.ClientId, token.Audience, scopes, now, config.Value.AccessTokenLifetime);
    // create response
    // update database
    return TokenResult.Success(response);
}
I replaced the stuff that hasn't changed with comments for brevity, but you can see how much cleaner it has become because of the changes.
The last thing we want to do on the "Server" API, is to change the policy that we created; the one that ensures only admin users can access the restricted /revoke-key, /rotate-key and /blacklist endpoints:
public static void Options(AuthorizationOptions options)
{
    options.AddPolicy("admin", policy =>
        policy.RequireAuthenticatedUser()
              .RequireClaim("scope", "server.admin"));
}
As you can see, now the policy requires that the JWT has a scope claim with the value server.admin; so the JWT is intended for the server API (our authorisation server) and it endows the admin permission.

Fixing the resource API
Now that we're not using roles, the whole /user endpoint that we created on the "Other" API gets screwed up. It currently looks like this:
app.MapGet("/user", (HttpContext context) =>
    {
        var role = context.User.FindFirstValue("role");
        if (role is null) return Results.Unauthorized();
        var sub = context.User.FindFirstValue("sub");
        var parsed = Guid.TryParse(sub, out var userId);
        if (!parsed) return Results.Unauthorized();
        return Results.Ok(new UserResponse(userId, role));
    })
   .RequireAuthorization();
Obviously the role claim isn't there anymore and the userId was replaced with a clientId, which is now a string and not a Guid, so we basically need to rewrite the whole endpoint like this:
app.MapGet("/user", (HttpContext context) =>
    {
        var clientId = context.User.FindFirstValue("sub");
        if (string.IsNullOrEmpty(clientId)) return Results.BadRequest("No client id found");
        var scope = context.User.FindFirstValue("scope");
        if (string.IsNullOrEmpty(scope)) return Results.BadRequest("No scope found");
        var permissions = ScopeParser.ExtractPermissions(scope);
        return Results.Ok(new UserResponse(clientId, string.Join(',', permissions)));
    })
   .RequireAuthorization();
Note that we're using ScopeParser.ExtractPermissions, so we can show what permissions the "user" has.
That means the UserResponse needs an overhaul too. So, now it looks like this:
public record UserResponse(string ClientId, string Permissions);Alright, so the whole article that was just a big long refactoring exercise, but hopefully you can see how a proper OAuth 2.0 / 2.1 implementation should look like now.
Don't worry if everything wasn't totally clear. I'll show you the testing of the endpoints with CURL and give you the actual commands, so you can see the values we send in the requests.

Testing the new Client Credentials flow
Okay, I opened up the terminal in Rider and ran a few CURL commands to demonstrate that the refactoring that we did gives the results we expect. Here's the screenshot:
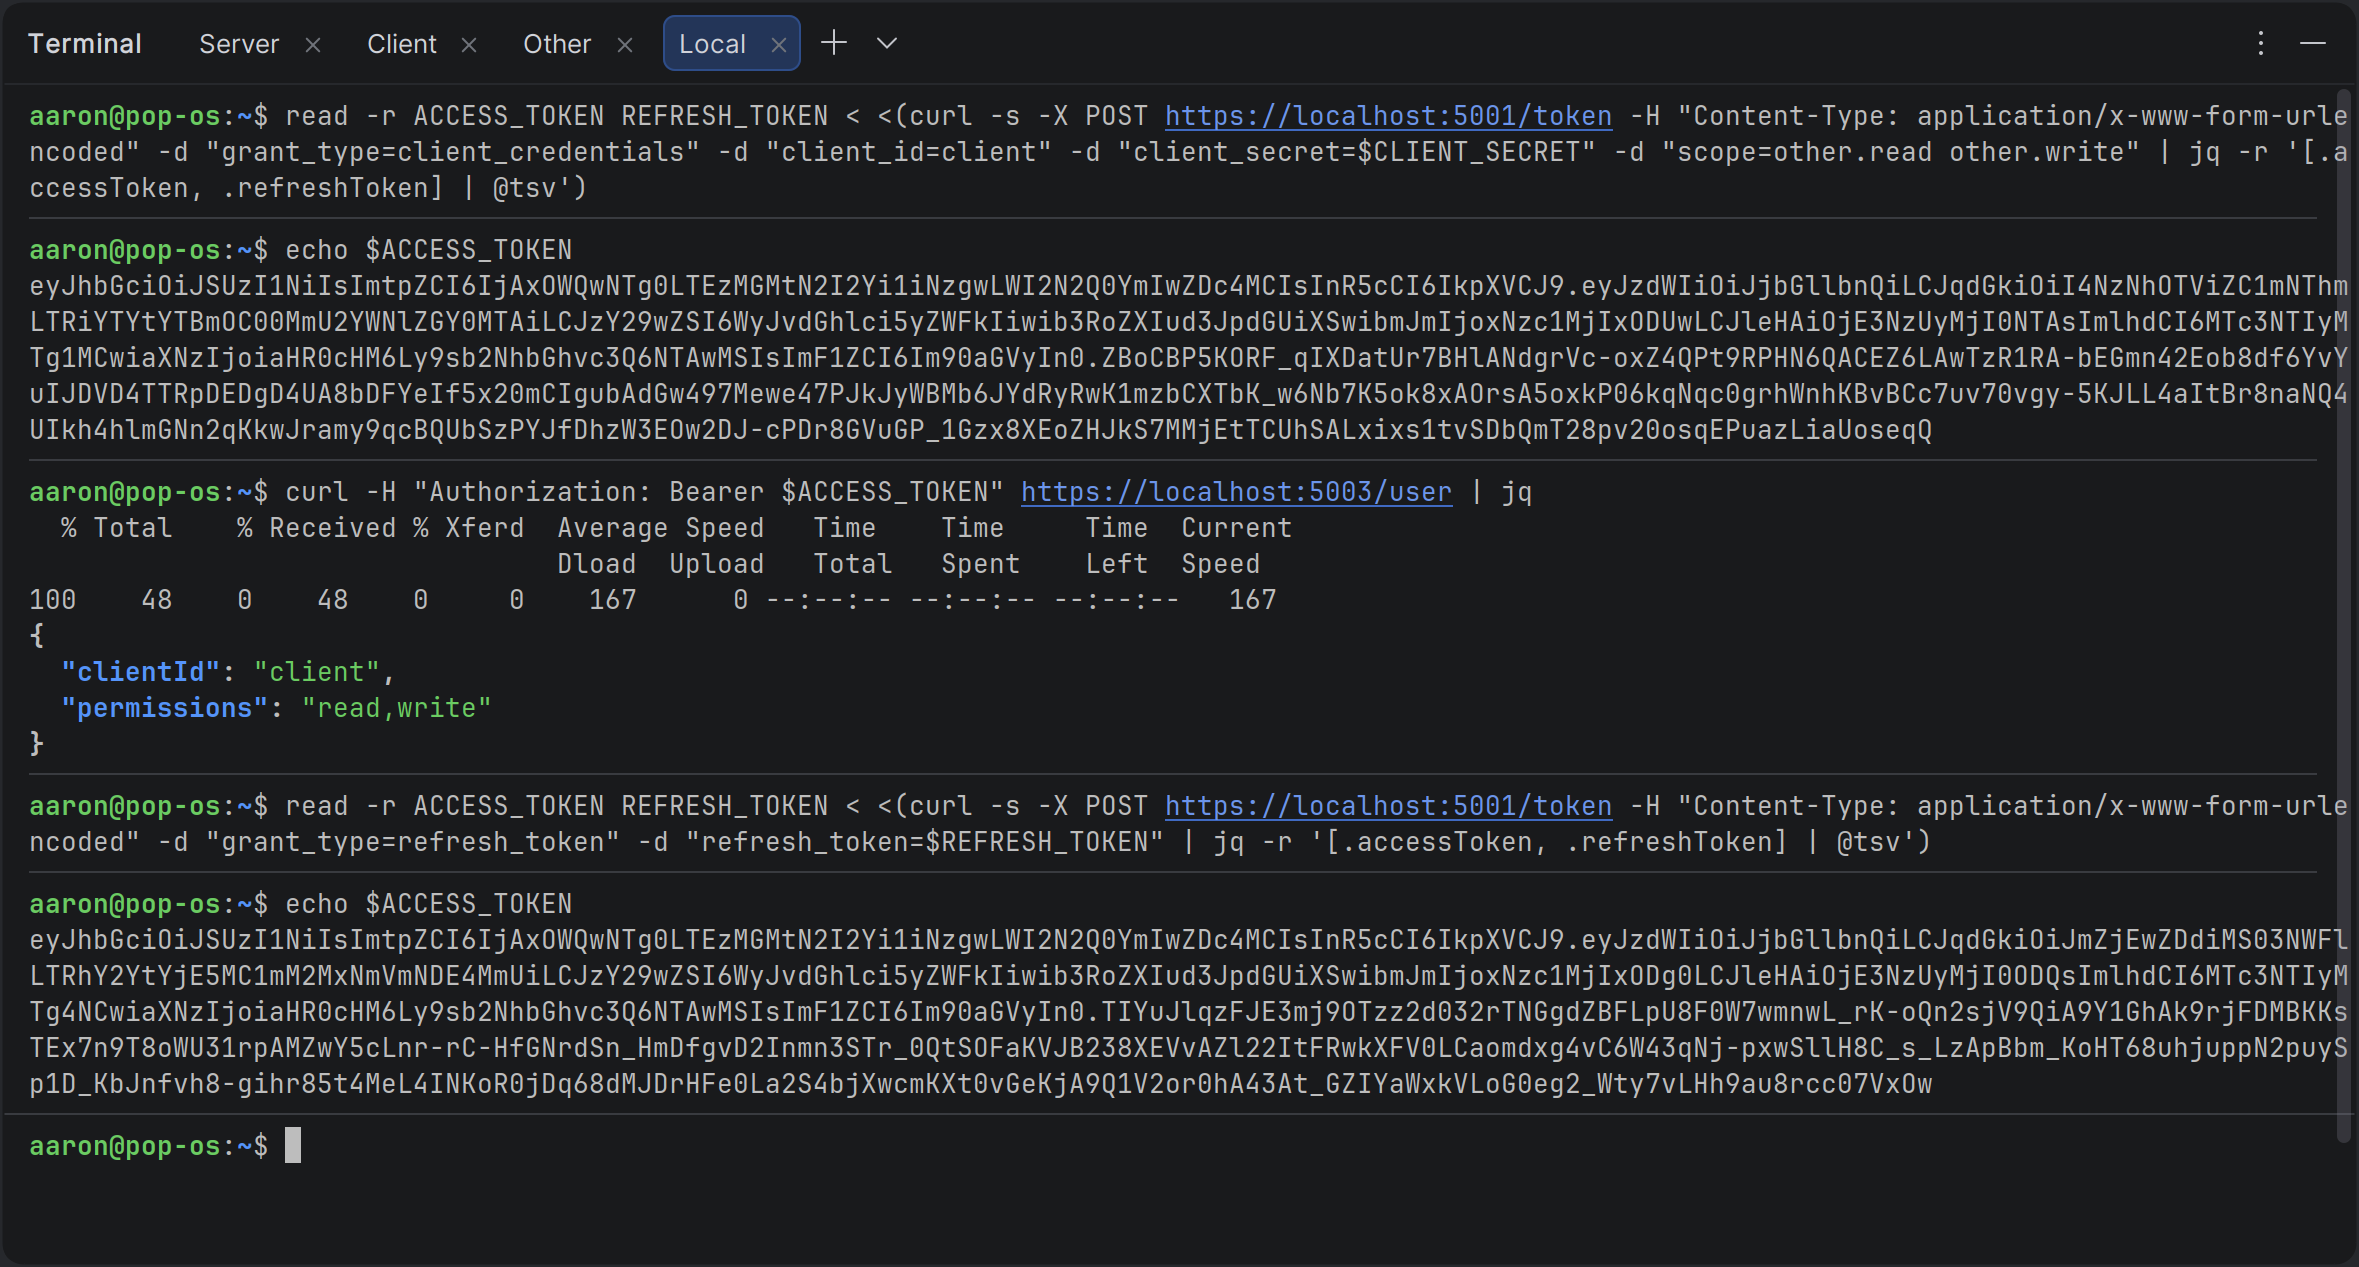
You can click on the image to zoom in, however I've also pasted the exact commands I used below. First we copy the client_secret that we generated using the KeyGen project and paste it into a CLIENT_SECRET variable:
CLIENT_SECRET="<CLIENT SECRET>"Then we use almost the exact same CURL command that we used in the previous article to get tokens, except this time we specify the client_id and client_secret along with a couple of scopes that define the other API as the audience of the JWT:
read -r ACCESS_TOKEN REFRESH_TOKEN < <(curl -s -X POST https://localhost:5001/token -H "Content-Type: application/x-www-form-urlencoded" -d "grant_type=client_credentials" -d "client_id=client" -d "client_secret=$CLIENT_SECRET" -d "scope=other.read other.write" | jq -r '[.accessToken, .refreshToken] | @tsv')We display the access token, so we can compare it below:
echo $ACCESS_TOKENWe access the new /user endpoint on the "Other" API and we can see from the result in the screenshot, that it's the client API that requested access and it has read and write permissions on the "Other" API:
curl -H "Authorization: Bearer $ACCESS_TOKEN" https://localhost:5003/user | jqThen we refresh our tokens using the refresh_token grant. We don't need to send any credentials or scopes, because the authorisation server gets these from its database:
read -r ACCESS_TOKEN REFRESH_TOKEN < <(curl -s -X POST https://localhost:5001/token -H "Content-Type: application/x-www-form-urlencoded" -d "grant_type=refresh_token" -d "refresh_token=$REFRESH_TOKEN" | jq -r '[.accessToken, .refreshToken] | @tsv')And we display the access token again and see that it doesn't match the previous one:
echo $ACCESS_TOKENGreat, so everything is working as expected and now the /token endpoint implements the OAuth 2.0 and 2.1 specifications exactly.
Of course, there are changes to the "Client" API too, since it calls the various other APIs, but I'll leave those changes to you as a coding exercise. If you just want to see what changed, you can do so by cloning the repository for this article, which you can find here:

Conclusion
With these changes our authorisation server has crossed an important milestone. We have moved away from the simplified, human-style /register endpoint and the fake userId model we used in the earlier articles.
In their place we now have proper OAuth 2.0 client registration: unique client_id values, securely hashed client_secret values, and a clean validator inside the TokenService.
The server no longer pretends that clients are users; it treats them as trusted machine-to-machine applications, exactly as the OAuth 2.1 draft requires for the client_credentials grant.
The refactoring was bigger than I originally planned, but it was the right move.
Our code is now more secure, more maintainable, and far closer to a real production authorisation server. Scopes are handled the way the specification expects, the JWT payload is cleaner, and the entire token-issuance path is focused and extensible.
Most importantly, the foundation we have built here will make adding the Authorization Code flow with PKCE in the next article much simpler. We're no longer bolting OAuth-like behaviour onto a demo, we're building something you could actually trust in a real system.
Key Takeaways
- Real OAuth 2.0 confidential clients must be pre-registered with a
client_idand aclient_secret. The old/registerendpoint that created “users” was only ever a temporary teaching aid and had to be replaced. - Client secrets should never be stored in plain-text. Always hash them with a strong, adaptive algorithm such as BCrypt (work factor 11 or higher) and store only the hash.
- Keep secrets out of source control. Use .NET User Secrets for local development, environment variables (or
.envfiles) in Docker, and a proper secrets manager like Azure Key Vault in production. - Emitting scopes as multiple separate scope claims (instead of a single space-separated string) makes ASP.NET Core authorization policies dramatically simpler and more natural.
- The
TokenServiceshould be the single place responsible for client authentication, scope validation, and token issuance. This keeps your Minimal API endpoints thin and focused. - The Client Credentials grant is the correct flow for machine-to-machine (service-to-service) communication. It is simple, secure, and now fully supported in our server.
- A dedicated Client repository and EF Core entity gives you a clean, extensible place to store registration details, allowed grant types, and allowed scopes.
- The
AudienceExtractorpattern we introduced earlier continues to work perfectly with the newscopearray and theaudience.permissionconvention. - Thorough end-to-end testing with CURL (or Postman) is essential after any authentication refactoring. Always verify both the initial token request and the refresh-token path.
- Refactoring toward the real OAuth specification takes time and can feel like “just moving code around,” but it is exactly how you turn a working demo into production-ready infrastructure.
- Everything we did in this article was in service of one goal: making our JWT-based authorisation server behave like a genuine OAuth 2.0 authorisation server. We are now much closer to that goal.
Enjoyed this hands-on deep dive?
Subscribe (for free) for the full series. Code-heavy guides straight to your inbox.
Questions or your own JWT experiments?
Comment below or connect on LinkedIn / X. Let's master secure .NET APIs together.