Build a Secure .NET Minimal API with JWT Authentication – Step by Step


In the previous article, I discussed the structure of a JWT, how to construct one manually in code and the principles behind each step of the process.
In this article I'm going to take that knowledge and show you how to build a working ASP.NET Minimal API in .NET 10 with JWT authentication.
But first, I'd like to give a short explanation as to why we should use JWT for authentication in the first place.

Why use JWT for authentication?
The old way of authenticating used to be that you'd send a username and password with every request you made, but that's slow and requires you to call your database every time.
Cookies work well for traditional web apps, but they struggle with cross-domain, mobile, and microservices scenarios.
JWT solves these problems: it's stateless (there's no server-side session), compact (it's easy to send in headers), self-contained (it carries claims like roles / identity), and secure when signed properly.
That's why JWT is the modern standard for API authentication and today, I'll show you how .NET makes it simple and secure with built-in tools.

Let's get started
The first thing to do is to create a .NET 10 Web API project in C#.
If you're using an IDE like Visual Studio or Rider, don't worry about options asking you whether you want to add authentication or not, because we're going to be doing it ourselves!
All modern Web API templates in C# use Minimal API's rather than MVC with controllers, so I'm going to be writing the code in this article from that perspective.
You can get rid of most of the boilerplate code that comes with the template, because we're going to be starting from scratch.
You can copy and paste all of the code below into your Program.cs file and everything should work fine. Alternatively, you can clone this GitHub repository I made and have a fully working version:
https://github.com/aaroncpina/Aaron.Pina.Blog.Article.03
To get it working, you may need to add a developer certificate, as the project defaults to using HTTPS.
The CLI command is: dotnet dev-certs https --trust
Alternatively, you can modify the launchSettings.json file so that HTTP comes before HTTPS in the JSON.

Do I need to install some Nuget packages?
Yes, you need the following three Nuget packages. Either install them via your IDE's package manager or via the command line using dotnet add package.
I'm using .NET 10 right now, so the packages indicated below are the latest available versions at the time of writing this article.
Microsoft.AspNetCore.Authentication.JwtBearer v10.0.1Microsoft.IdentityModel.Tokens v8.15.0System.IdentityModel.Tokens.Jwt v8.15.0
If you just install the first two packages, System.IdentityModel.Tokens.Jwt will also be installed as a dependency of Microsoft.IdentityModel.Tokens but it will install a low 8.x.x version which will cause internal exceptions because the lower versions don't have the necessary functions to Base 64 URL decode the header and payload during validation.

Using the RSA SHA256 algorithm for signing and validating a JWT
Everything is going to be done in one project in one Program.cs file, so the whole API, with the /login endpoint (to give a JWT) and the /protected endpoint (to accept a JWT) will be in one file.
Obviously we wouldn't do that in a proper production API, but here I'm presenting the minimum viable code required to demonstrate the concept of building a JWT authenticated API in .NET.
So firstly, we need to create an RSA object like we did in the previous article.
using Microsoft.IdentityModel.Tokens;
using System.Security.Cryptography;
using var rsa = RSA.Create(2048);
var rsaKey = new RsaSecurityKey(rsa);
var rsaPublicKey = new RsaSecurityKey(rsa.ExportParameters(false));
Normally the default number of bits used in the creation of the RSA is 1024 and for demonstration purposes that's fine, but I'd prefer that you get into the habit of defining a 2048 bit key.
A 2048 bit key provides a higher level of protection against current and near-future attacks. Anything smaller, like 1024 bits, is considered vulnerable to advances in computing power, including threats from quantum computing that lie on the horizon.
We create an rsaKey which contains the public and private key and will use the private key to sign the JWT when we log in. We also create an rsaPublicKey which will be used to validate the JWT we receive at the protected endpoint.
rsa.ExportParameters(false) doesn't include the private key.

Adding JWT authentication
Next we'll create the web application builder and add JWT authentication.
using Microsoft.AspNetCore.Authentication.JwtBearer;
var builder = WebApplication.CreateBuilder(args);
builder.Services.AddAuthentication(JwtBearerDefaults.AuthenticationScheme)
                .AddJwtBearer(options =>
{
    options.TokenValidationParameters = new TokenValidationParameters
    {
        ValidateIssuer = true,
        ValidIssuer = "https://localhost",
        ValidateAudience = true,
        ValidAudience = "https://localhost",
        ValidateLifetime = true,
        ValidateIssuerSigningKey = true,
        IssuerSigningKey = rsaPublicKey
    };
});
builder.Services.AddAuthorization();
Order of play
We always need to ensure that we AddAuthentication() before AddAuthorization() because the request-response pipeline runs services in the order that they're added.
Authentication reads the token, cookie and headers and sets the HttpContext.User (the ClaimsPrincipal). Authorisation then reads the ClaimsPrincipal to check the policies, roles etc that it has. So if you get them the wrong way round, you're going to have problems.
Authentication scheme names
The constant JwtBearerDefaults.AuthenticationScheme string that we're using to define the default authentication scheme (more on schemes in a later article) is just defined as "Bearer". This is the recommended naming scheme, but you can set it to whatever you like, as long as you also set it as the first parameter in .AddJwtBearer; so for example:
builder.Services.AddAuthentication("jwt).AddJwtBearer("jwt", options => ...);If you just define the scheme name as JwtBearerDefaults.AuthenticationScheme and don't set it in .AddJwtBearer, the JWT bearer scheme name defaults to JwtBearerDefaults.AuthenticationScheme in the internal Microsoft code (check the implementation if you like).
Token validation parameters
When you go to a protected endpoint, as I'll show you later in the article, you can validate the token by checking that the different parts of its structure conform to our expectations. That's why we're adding TokenValidationParameters to the JWT bearer authentication options.
The ASP.NET authentication framework will check the token that's passed to the protected endpoint against each of the things that you specify here.
The ValidateIssuer and ValidIssuer parameters are used to check against the iss claim that I described in the previous article. This is checking that the URL specified in the iss (issuer) claim of the JWT payload is the same as the one we're specifying here. It's basically saying who we are when we're in the role of a JWT token issuing authority.
When we issue the token, we usually specify the place(s) that we expect the token to be used, also known as the audience. In the JWT payload, that claim is called aud and that's what we're checking with ValidateAudience and ValidAudience.
Then we're checking that the token hasn't yet expired with ValidateLifetime.
Lastly, we're checking that the JWT is signed by that same RSA public / private key pair that we've defined here. So we're saying "Yes, do it!" to ValidateIssuerSigningKey and we're passing the public key to validate it with in the IssuerSigningKey parameter.
Building the web app and adding middleware
Next we build the application and add the middleware to be used in the pipeline. Note that authentication comes before authorisation like before.
var app = builder.Build();
app.UseAuthentication();
app.UseAuthorization();
Protected and unprotected endpoints
In this section I'm going to show you how we set up the two endpoints we're going to use in this API. A protected endpoint at /protected and an unprotected endpoint at /login.
The protected endpoint
The first endpoint we're going to map is the protected endpoint that we won't be able to access until we've logged in and received our JWT.
app.MapGet("/protected", () => "Secret data!")
   .RequireAuthorization();
It's pretty simple isn't it? If we call the /protected endpoint without passing a valid JWT in the header, we should get a 401 response, meaning we're not authenticated. If we do pass the token and it checks out, we'll get a 200 response and the message "Secret data!". I'll show you examples of this later in the article.
As you can see, we're using a .RequireAuthorization() extension method call on our GET endpoint. There's no such thing as a .RequireAuthentication() extension method.
Since we haven't specified any custom authorisation policy (we'll cover policies in a later article), .RequireAuthorization() does the authentication and simply requires the user to be authenticated via the JWT bearer scheme that we set up earlier.
The unprotected endpoint
This endpoint is the one where we tell ASP.NET what claims we're adding to the JWT payload and defining the key that we're going to use to sign it. It's quite a bit longer than the other one, but I'll explain everything in detail.
using System.IdentityModel.Tokens.Jwt;
using System.Security.Claims;
app.MapGet("/login", () =>
{
    var now = DateTime.UtcNow;

    var claims = new[]
    {
        new Claim(JwtRegisteredClaimNames.Sub, Guid.NewGuid().ToString()),
        new Claim(JwtRegisteredClaimNames.Name, "Aaron Pina")
    };

    var tokenDescriptor = new SecurityTokenDescriptor
    {
        IssuedAt = now,
        Expires = now.AddMinutes(30),
        Issuer = "https://localhost",
        Audience = "https://localhost",
        Subject = new ClaimsIdentity(claims),
        SigningCredentials = new SigningCredentials(rsaKey, SecurityAlgorithms.RsaSha256)
    };

    var handler = new JwtSecurityTokenHandler();
    var token = handler.CreateToken(tokenDescriptor);

    return Results.Ok(new { Token = handler.WriteToken(token) });
})
.AllowAnonymous();
The first thing I need to mention is that this is a GET endpoint and that's only because we're not sending any information with the request.
Normally when you want to login or register with an API, it will be a POST endpoint, because you need to send some sort of credentials like a password and username in the body of the request.
In this case, to make things as simple as possible, we're not going to be sending any information, we'll just call the /login endpoint and get back a JWT.
As with the previous article, there is a sub (subject) claim to identify the ClaimsPrincipal and I also added a name claim to give some extra data.
Sometimes all you need is a sub claim to identify the ClaimsPrincipal (the user) but depending on your use-case, you can put any amount of data in there that you like, often just to avoid having to call the database to get it.
Obviously don't put sensitive data in there though, because the payload can be decoded and read by anybody.
The SecurityTokenDescriptor takes all the claims that don't have to do with the UserPrincipal, such as the issuer of the token (iss), the intended audience of the token (aud).
We get the current UTC date and we use that to set the iat and the exp claims, which as I explained in the last article, mean when the token was issued at and its expiration time.
When we were manually creating the JWT in the previous article, we created an anonymous object and just set the keys to the claims as they're specified in RFC 7519.
However in the System.IdentityModel.Tokens.Jwt namespace, we have these string constants in JwtRegisteredClaimNames that correspond to the names of the standard claims, so it's easy to use those to make sure we don't make a mistake in the naming.
Lastly in the SecurityTokenDescriptor, we have the SigningCredentials which are used to sign the token. We pass the public / private key to it and it uses the private key to do the signing.
To create the token, we create a JwtTokenHandler and pass the SecurityTokenDescriptor that we created to its CreateToken method in order to create the JWT.
All of the work that we did in the last article is now just magic that ASP.NET does in the background. If you hadn't had a grounding on how this is actually done, it would probably still be a mystery to you.
The last step is to use the WriteToken method on the JwtTokenhandler to get the token as a string and then we create an anonymous object which specifies that we're sending a token.
Normally it's best to be clear what you're sending by structuring your response object explicitly like this, because in a future article I'll be talking about refresh tokens and we actually send the token and the refresh token together in the response, so it's important that the recipient knows which one is which.
The penultimate thing I want to mention in this already over-long section is the .AllowAnonymous() extension method on the end of the .MapGet function. We need this on there so that anybody can access the /login endpoint without having to authenticate, otherwise we'd be in a bit of a Catch-22 situation.
The last thing in our Progam.cs is:
app.Run();Obviously, this will do as it says and run the web application.

Let's try it out
Okay, now you should be able to fire up the API with dotnet run and have a go. You can go hardcore and use CURL on the command line to call the API endpoints if you're that kind of developer, or you can use Postman or Insomnia. I'll use the latter.
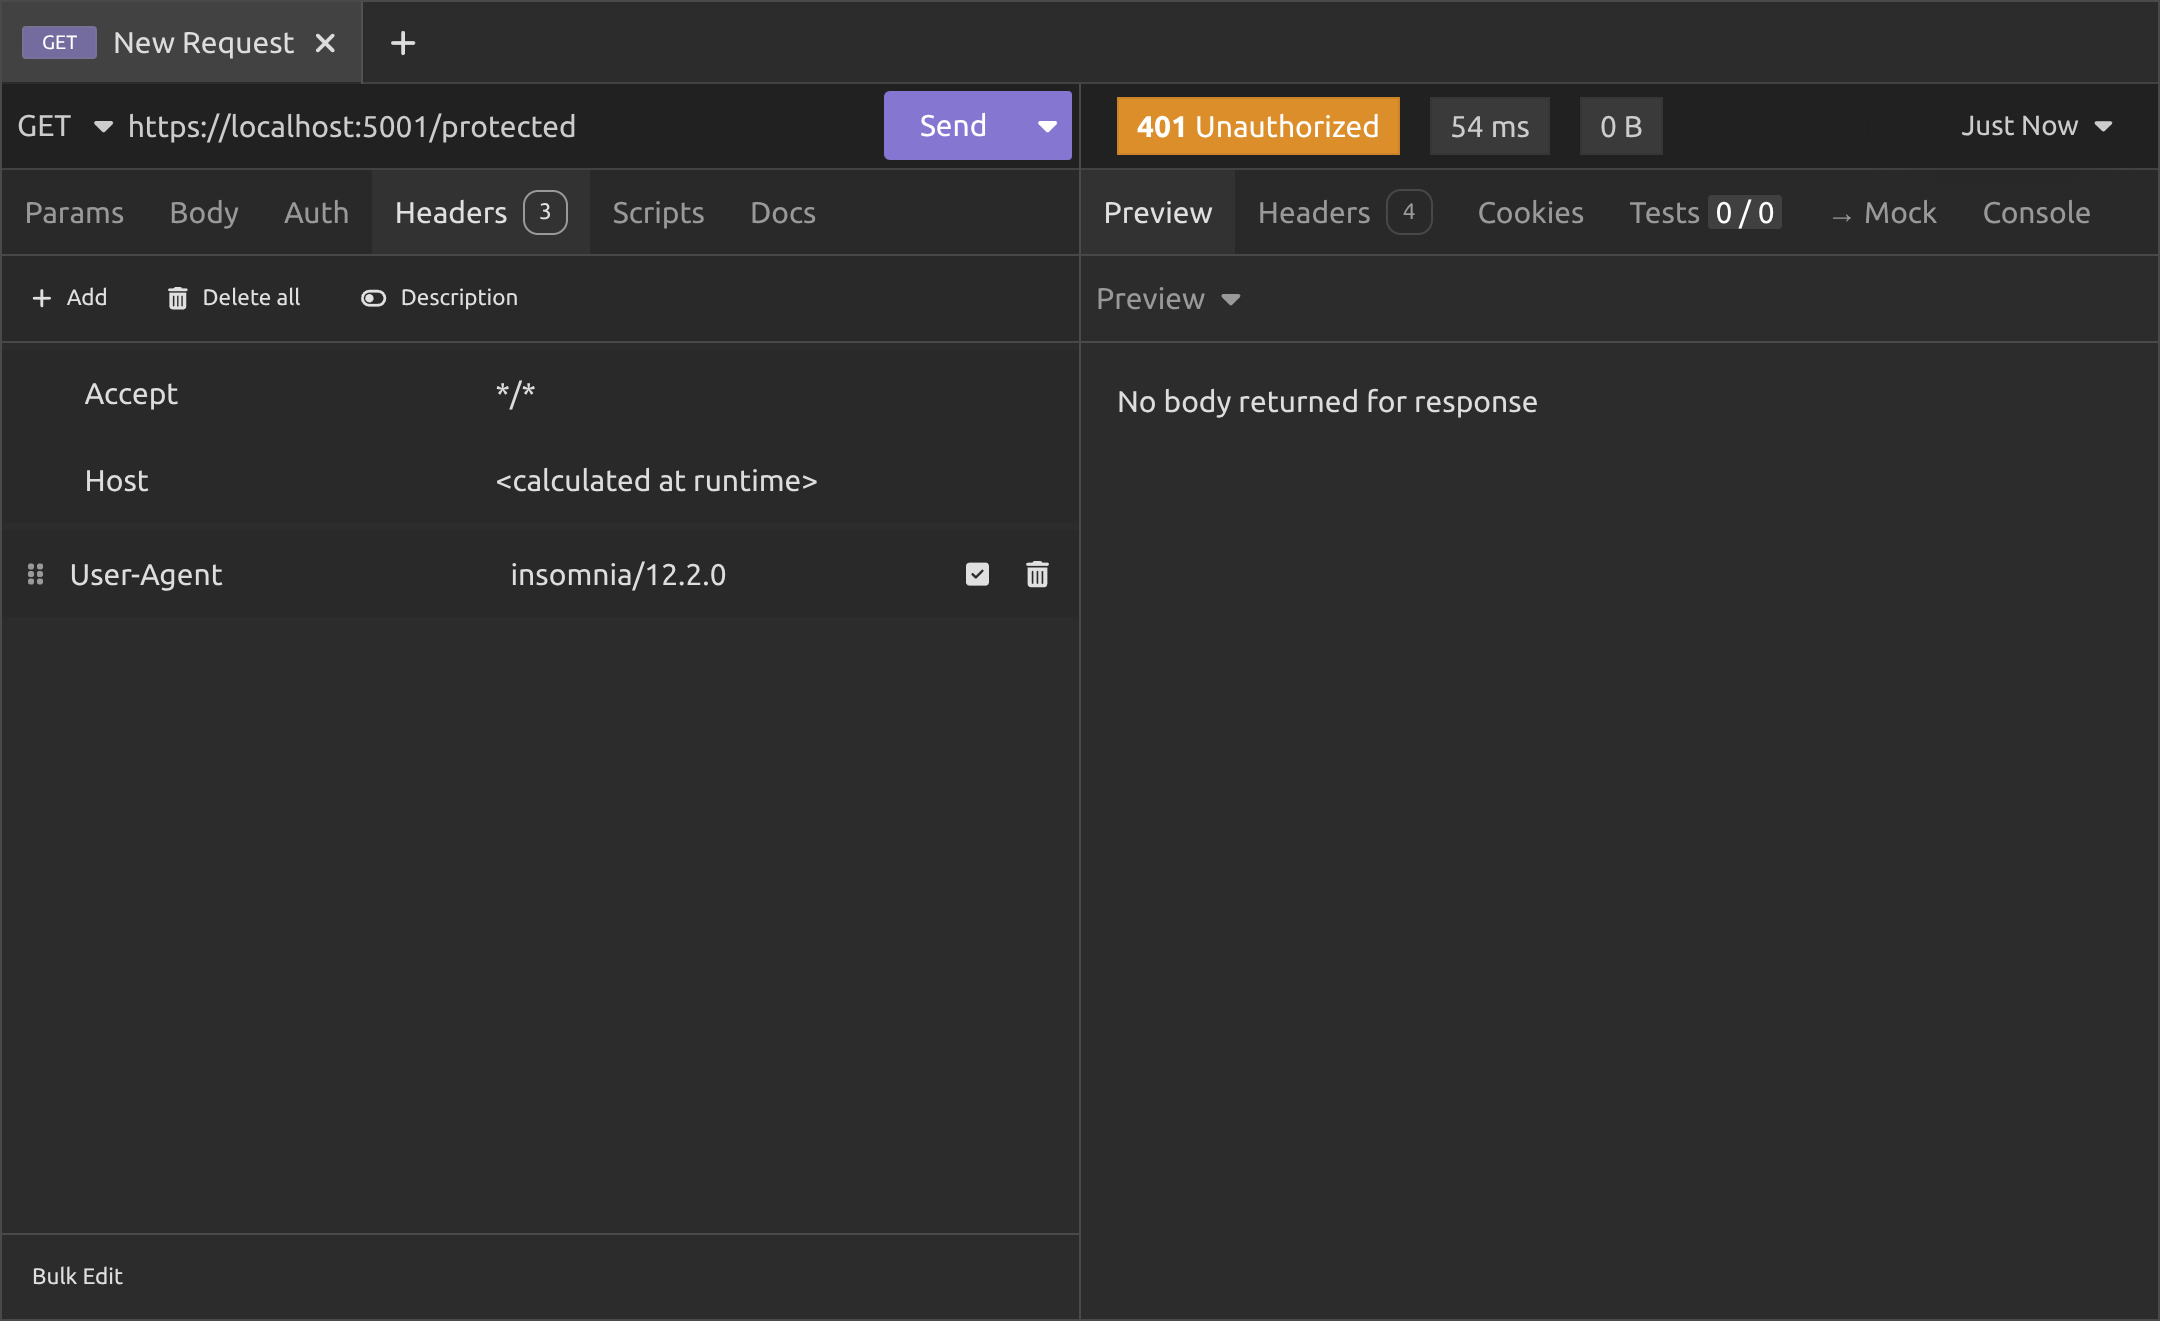
As you can see, if you try to access the /protected endpoint without passing a JWT, you'll get a 401 Unauthorized response (which actually means unauthenticated).
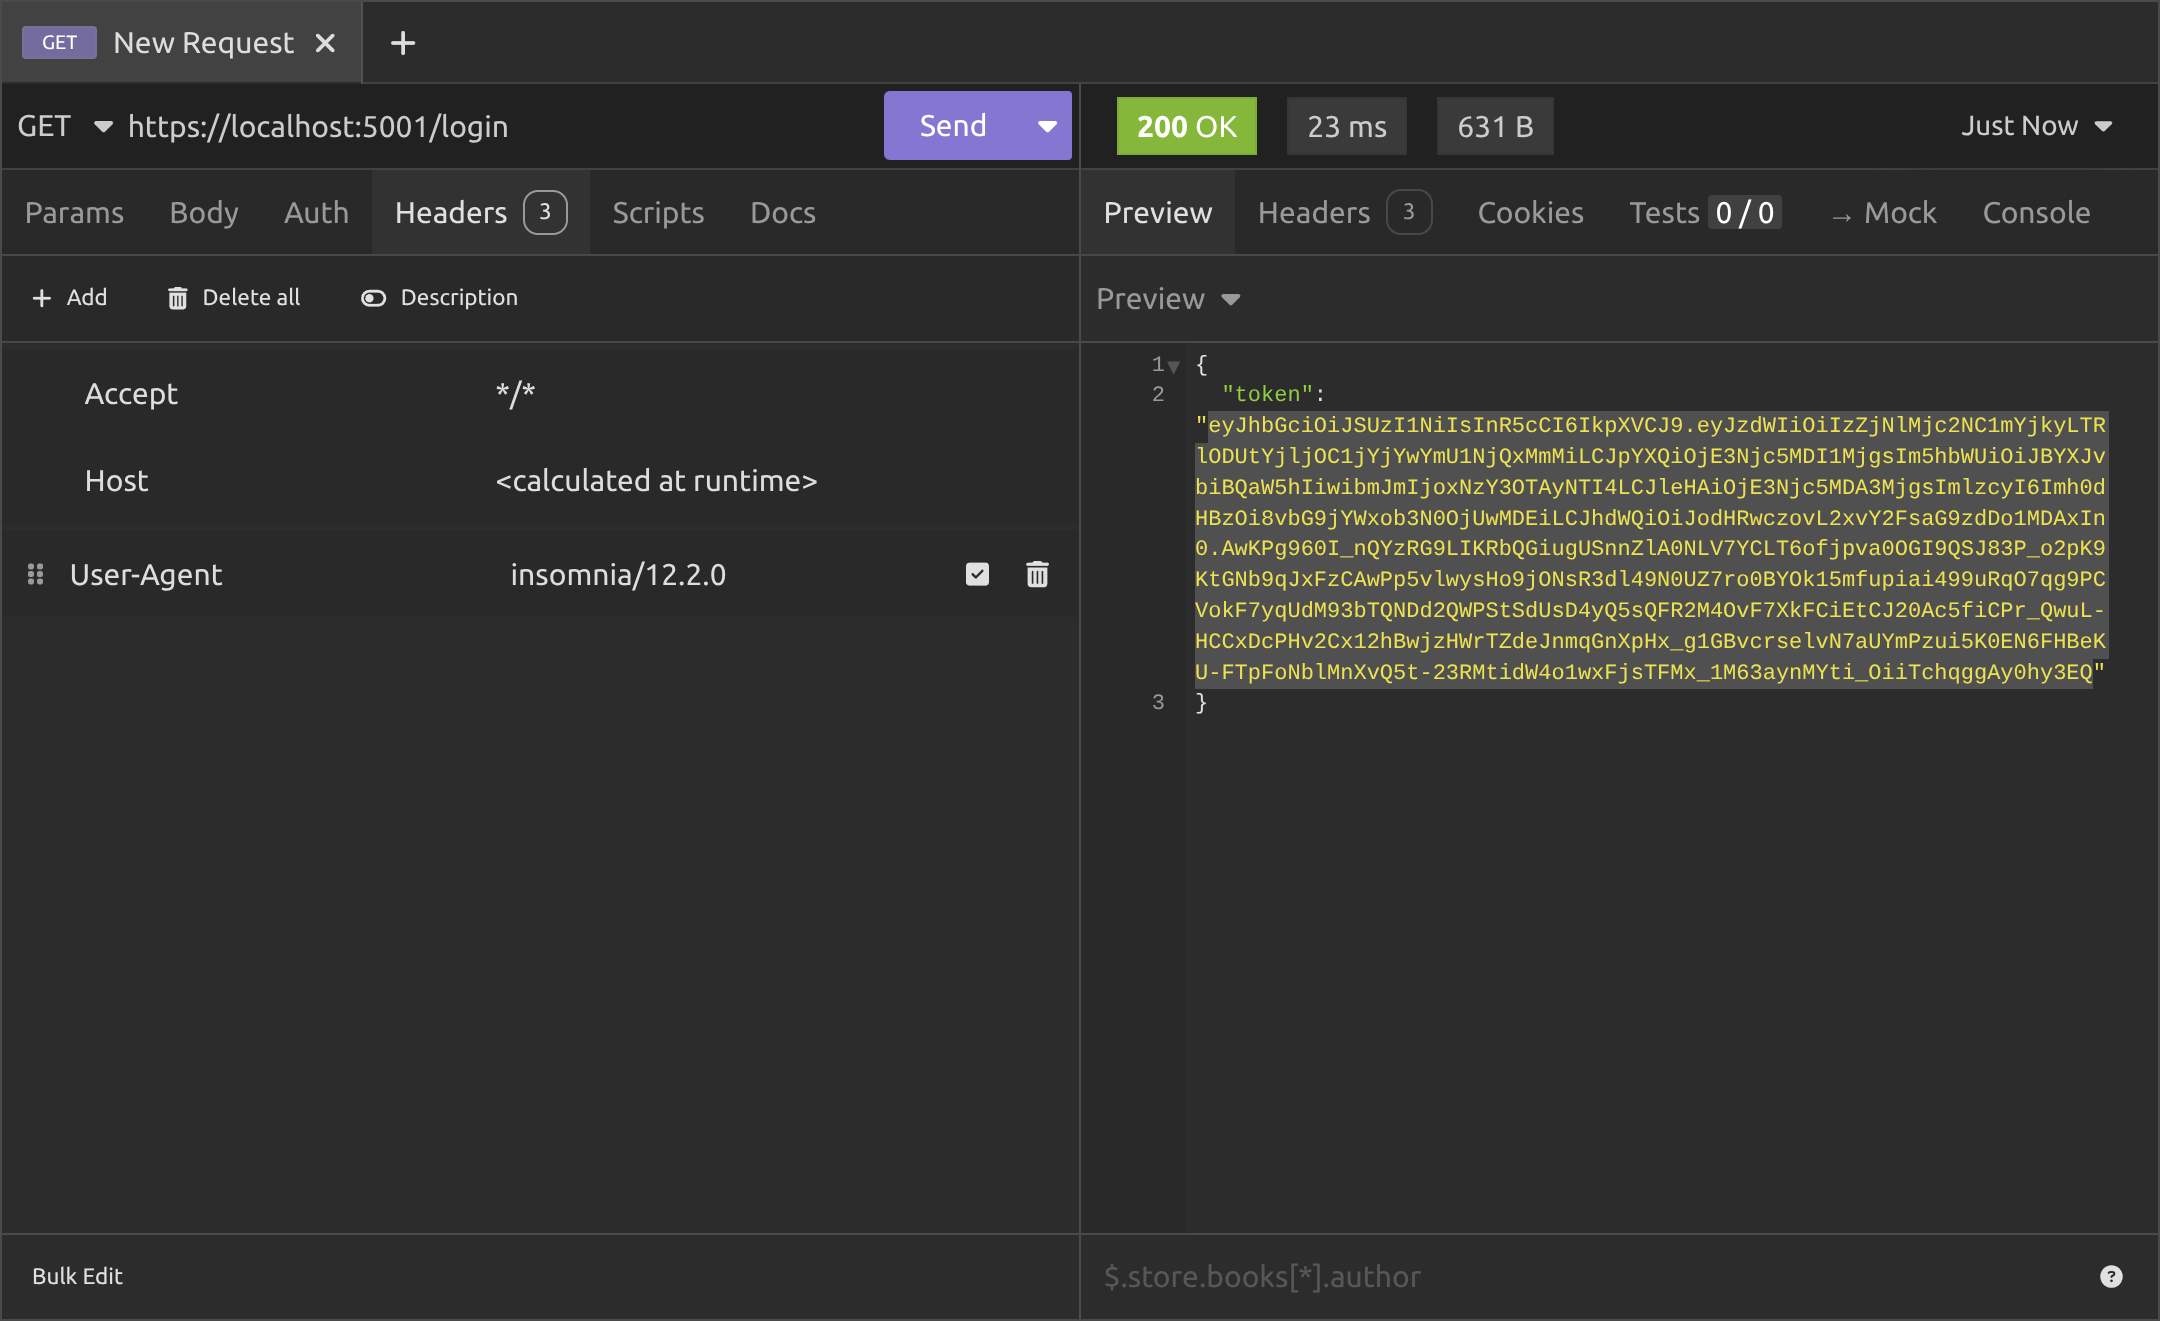
So instead, we need to call the /login endpoint and you can see that it generated a JWT for us with a 200 OK response. Copy it to clipboard, go back to the /protected endpoint and use it there.
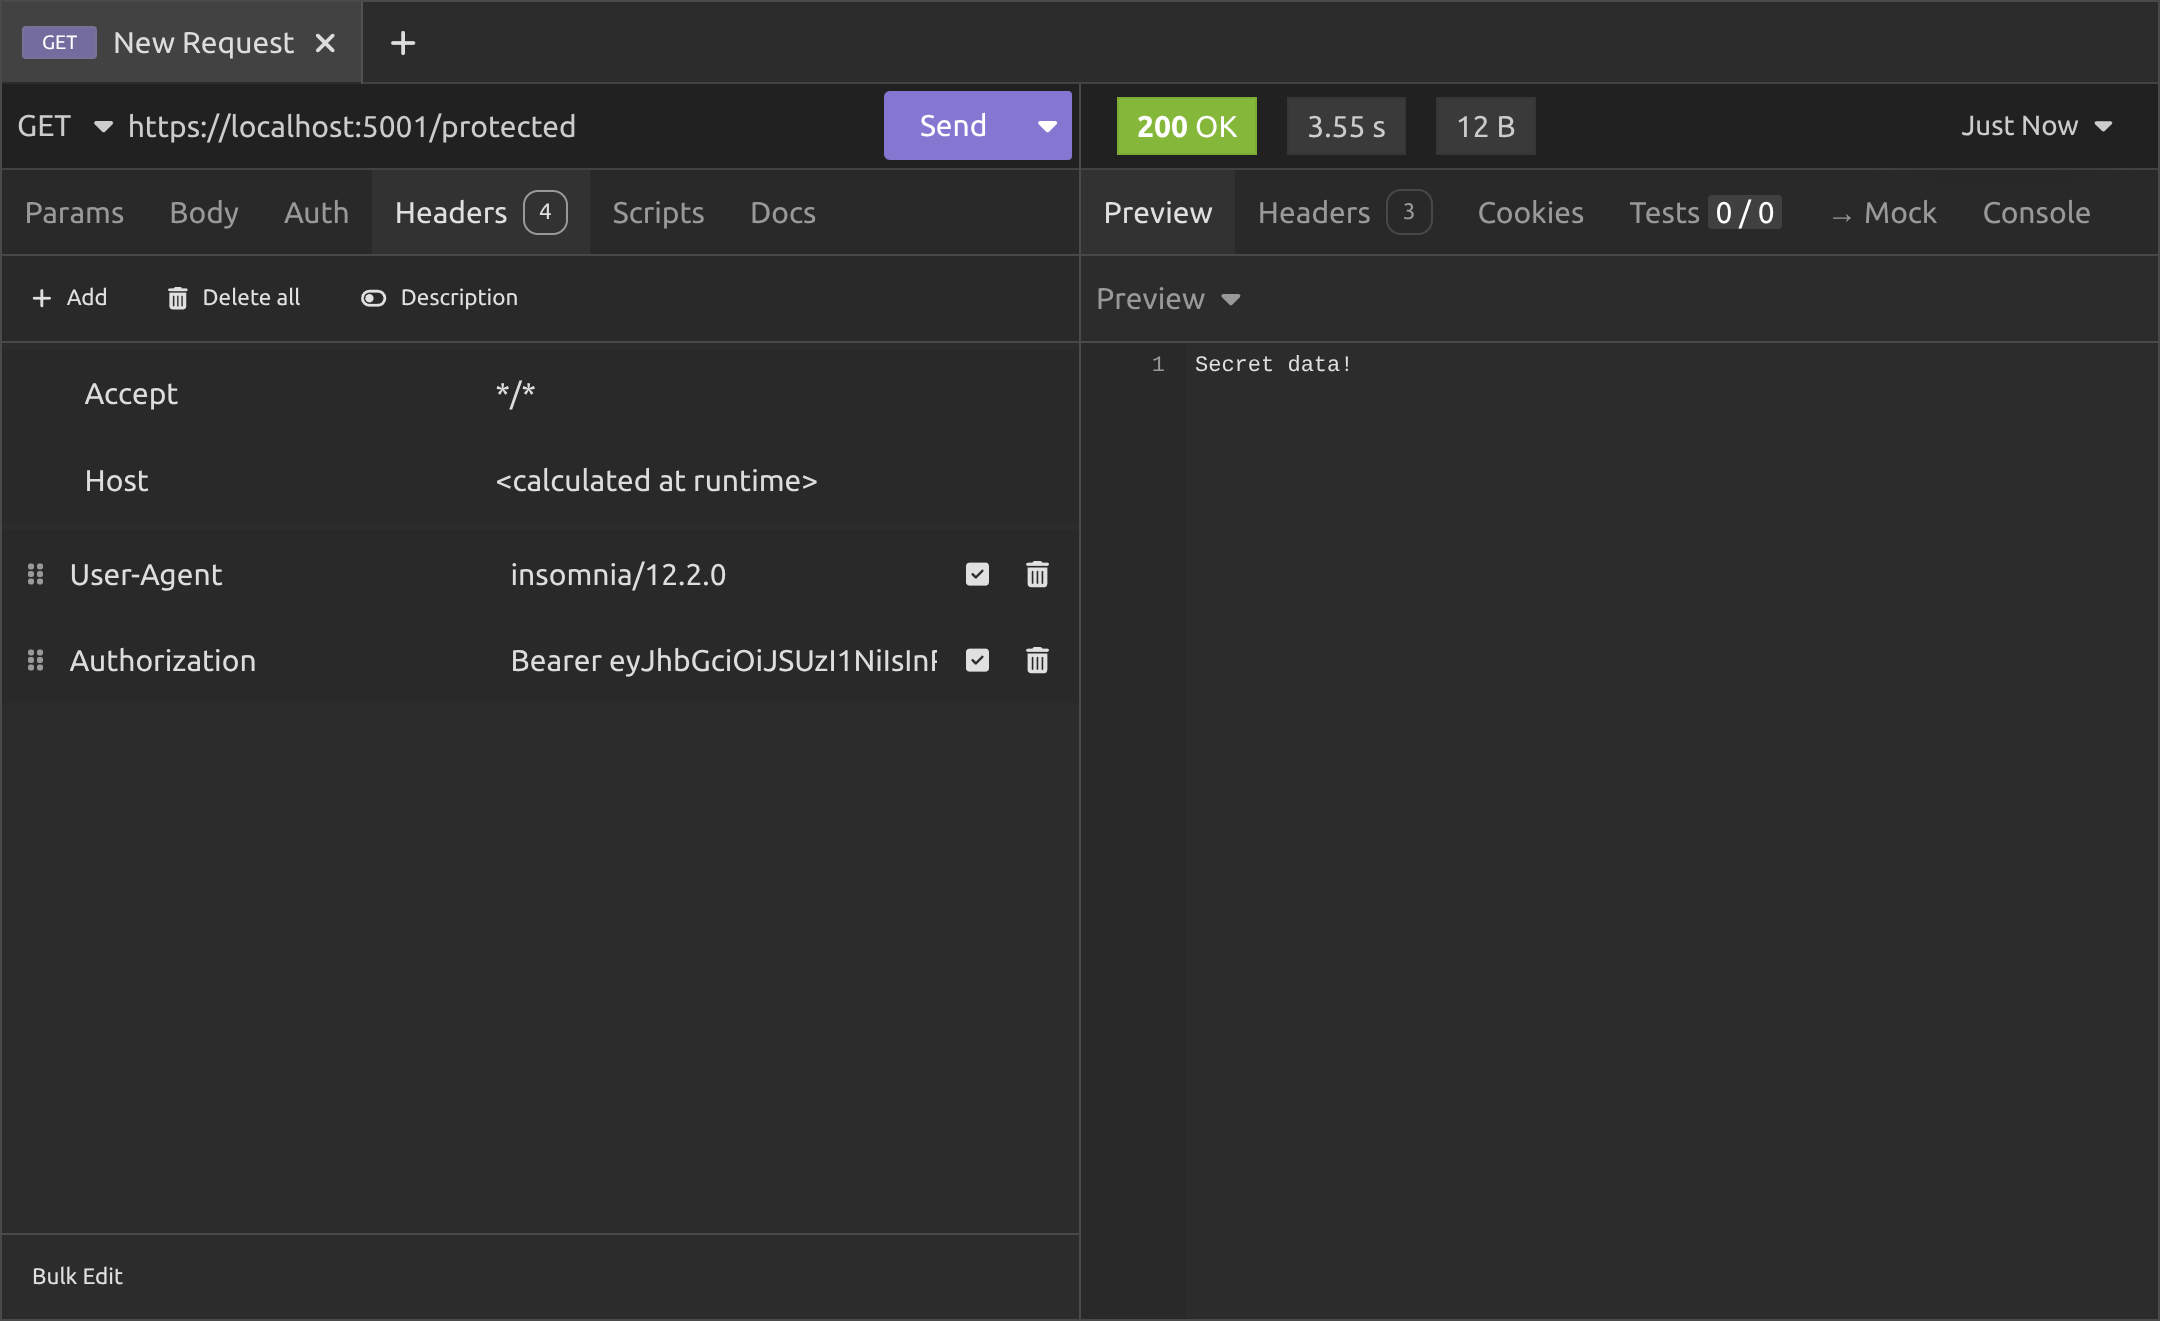
Okay, go to the headers and add a header with the key Authorization and for the value, we don't just paste the JWT in, we have to enter Bearer and a space and then paste in the JWT, as you can see in the above image.
The reason we use the Bearer prefix is to say "This is a JWT". It's specified in RFC 6750, which is to do with OAuth 2.0, but that is a subject I'll cover in another article. Anyway, there are other prefixes that can be used for the Authorization header like Basic, Digest, etc. but when we're talking about a JWT, we need to use Bearer.
Conclusion
We've now built a real .NET Minimal API together that issues and validates JWTs securely, with simple /login and /protected endpoints.
Key takeaways
- Use
AddJwtBearerto validate tokens with issuer, audience, lifetime, and signing key checks. - Issue tokens with
SecurityTokenDescriptorfor clean control. - Always send tokens in Authorization: Bearer (with a space!)
- Add
UseAuthentication()andUseAuthorization()in the right order.
This is production-ready basics. In future posts, we'll cover refresh tokens, revocation, asymmetric keys, and more.
Enjoyed this hands-on deep dive?
Subscribe (for free) for the full series. Code-heavy guides straight to your inbox.
Questions or your own JWT experiments?
Comment below or connect on LinkedIn / X. Let's master secure .NET APIs together.