JWT Refresh Tokens Done Right: Proactive Background Refresh + Rotation + Sliding Expiry in ASP.NET Core


In the previous article, we built out our authentication server API to include an endpoint to refresh our JWT.
We created a SQLite database to store them and we implemented a rotation policy based on the OAuth 2.1 specification.
Then we built a client API to call the authentication API and implemented a reactive token refresh strategy to update access tokens on requests that failed authentication.
In this article, I'm going to show you another strategy for refreshing tokens called the proactive background refresh strategy, I'm going to explain what refresh token rotation is and we're going to talk about refresh token expiration and handling it with a sliding expiry window.
All code can be obtained from the following GitHub repo, so you can just clone it and run it if you don't want to type the code yourself:
https://github.com/aaroncpina/Aaron.Pina.Blog.Article.05
However, as usual, I will provide snippets from the code, explain what's going on and guide you away from any common pitfalls that you might experience. All you have to do is provide the eyeballs!

The reactive refresh strategy revisited
The reactive token refresh strategy that I showed you in the previous article uses a method of discovering whether a request to a protected endpoint fails or not (typically a 401) and reacts by calling the authentication server's /refresh endpoint to get another access token, then attaching the new token to the failed request and resending it.
In the implementation that we employed, we used a DelegatingHandler that sits in the HttpClient pipeline, added to a named HttpClient we created specifically for calls to the authentication server.
I personally like this method because it follows Microsoft's design philosophy and you also have a CancellationToken passed to the SendAsync method of the handler. That means you can pass a cancellation token all the way down through your HTTP pipeline to internal database calls and cancel all of them.
For brevity's sake, I skipped adding cancellation tokens to endpoint parameters, but in production code you definitely should do. Add the cancellation token to all asynchronous operations that follow and you can save system resources by not leaving unrequired processes running when you can just signal them to stop.
I also tried Polly to handle the retry logic for the reactive token refresh strategy. It's a very powerful and well loved resilience library for this use case. Microsoft even integrated it into one of their own Nuget packages: Microsoft.Extensions.Http.Polly, but I found it trickier to propagate the cancellation token cleanly through the retry callback, so I decided to use the DelegatingHandler approach instead.
Just a heads up if you decide to go that route!

The proactive background refresh strategy
This strategy is in effect, a background service that checks your token store for access tokens that are shortly to expire and proactively calls the authentication server /refresh endpoint to get a new one before it does.
You have to strike a balance between how often you loop through the process and how long before the token is due to expire before you get a new a token. Often you'll find that the best approach is to use a combination of the reactive and proactive token refresh strategies, but you'll have to work out what you want to do based on your requirements. Here's the code:
public class TokenRefresherService(
    IHttpClientFactory factory,
    IServiceProvider serviceProvider,
    ILogger<TokenRefresherService> logger) : BackgroundService
{
    protected override async Task ExecuteAsync(CancellationToken stoppingToken)
    {
        while (!stoppingToken.IsCancellationRequested)
        {
            await Task.Delay(TimeSpan.FromMinutes(1), stoppingToken);
            try
            {
                logger.LogInformation("Proactively checking expiry of tokens");
                using var scope = serviceProvider.CreateScope();
                var store = scope.ServiceProvider.GetRequiredService<TokenStore>();
                if (string.IsNullOrEmpty(store.RefreshToken)
                ||  string.IsNullOrEmpty(store.AccessToken)
                ||  store.AccessTokenExpiresAt is null)
                {
                    logger.LogInformation("Tokens still uninitialised");
                    continue;
                }
                var expiresIn = store.AccessTokenExpiresAt.Value.Subtract(DateTime.UtcNow);
                if (expiresIn > TimeSpan.FromMinutes(5))
                {
                    logger.LogInformation("Access token expires in {ExpiresIn} minutes", expiresIn.TotalMinutes);
                    continue;
                }
                var client = factory.CreateClient("server-api");
                var request = new HttpRequestMessage(HttpMethod.Post, "https://localhost:5001/refresh");
                var content = new KeyValuePair<string, string>("refresh_token", store.RefreshToken);
                request.Content = new FormUrlEncodedContent([content]);
                logger.LogInformation("Calling server to refresh tokens");
                using var response = await client.SendAsync(request, stoppingToken);
                if (!response.IsSuccessStatusCode)
                {
                    logger.LogWarning("Server refresh token response failed");
                    continue;
                }
                var tokens = await response.Content.ReadFromJsonAsync<TokenResponse>(stoppingToken);
                if (tokens is null)
                {
                    logger.LogWarning("Refresh token response content was invalid");
                    continue;
                }
                store.AccessTokenExpiresAt = DateTime.UtcNow.AddMinutes(tokens.AccessTokenExpiresIn);
                store.RefreshToken = tokens.RefreshToken;
                store.AccessToken = tokens.AccessToken;
                logger.LogInformation("Refreshed tokens");
            }
            catch (Exception exception)
            {
                logger.LogError(exception, "Unexpected error in proactive token refresh loop");
            }
        }
    }
}
I know, you might be gasping "OMG! Aaron actually used a logger!" but with background services, the best way to see what's happening is to log it. You can decide how much logging you need based on your requirements. There's no hard-and-fast rule.
Anyway, you add the background service like this:
builder.Services.AddHostedService<TokenRefresherService>();And the ASP.NET Core host will create it and call ExecuteAsync for you, so you don't have to manage it manually. I'll take you through what it's doing below:
- We're running in a loop until the host lifetime manager requests cancellation.
- We start off with a one minute delay. Set the delay to whatever is right for your system. I put the delay at the beginning of the loop because otherwise you would have to add it before each
continuestatement and that's not very DRY. - We're using the
ServiceProviderto create a scope and then using that in turn to get theTokenStorefrom services. Technically in thisTokenRefresherService, I could have injected theTokenStoreinto the constructor because it's just a mutable class with a singleton lifetime. However it's only implemented like that as a simple way of storing tokens for one API: the authentication API. In most circumstances, the client API is going to be communicating with multiple different API's and will need to store the keys for each. That means a database or cache, in which case those services are certain to be scoped. So for this reason, to be safe, always request services in a background service using a scoped lifetime. - Next we're checking if the
TokenStorehas any tokens stored and if not, we cut the loop short. Obviously there won't be any tokens stored before you call the/loginendpoint on the client to get them. - We check if the token is going to expire soon. In this case, we're checking if it has five minutes left before it expires. If not, we cut the loop short.
- If the token is soon to expire, we make a POST request to the authorisation server and pass it the existing refresh token using the appropriate content type. If that doesn't work, we cut the loop short.
- But if it does work, we grab the tokens from the response and update the
TokenStore. - The whole thing is in a
try...catchblock to ensure that the service doesn't stop if something unexpected happens. If it does, we're logging the exception, so we can diagnose the fault.
In the appsettings.json file, I've now set the access token lifetime to ten minutes:
{
  "TokenConfig": {
    "AccessTokenLifetime": 10,
    "RefreshTokenLifetime": 262980
  }
}
I'll talk about the additional refresh token lifetime and why it's a comparatively huge value below when we talk about sliding refresh token expiry windows. Alright, with all that out of the way, let's run it and see what it does!
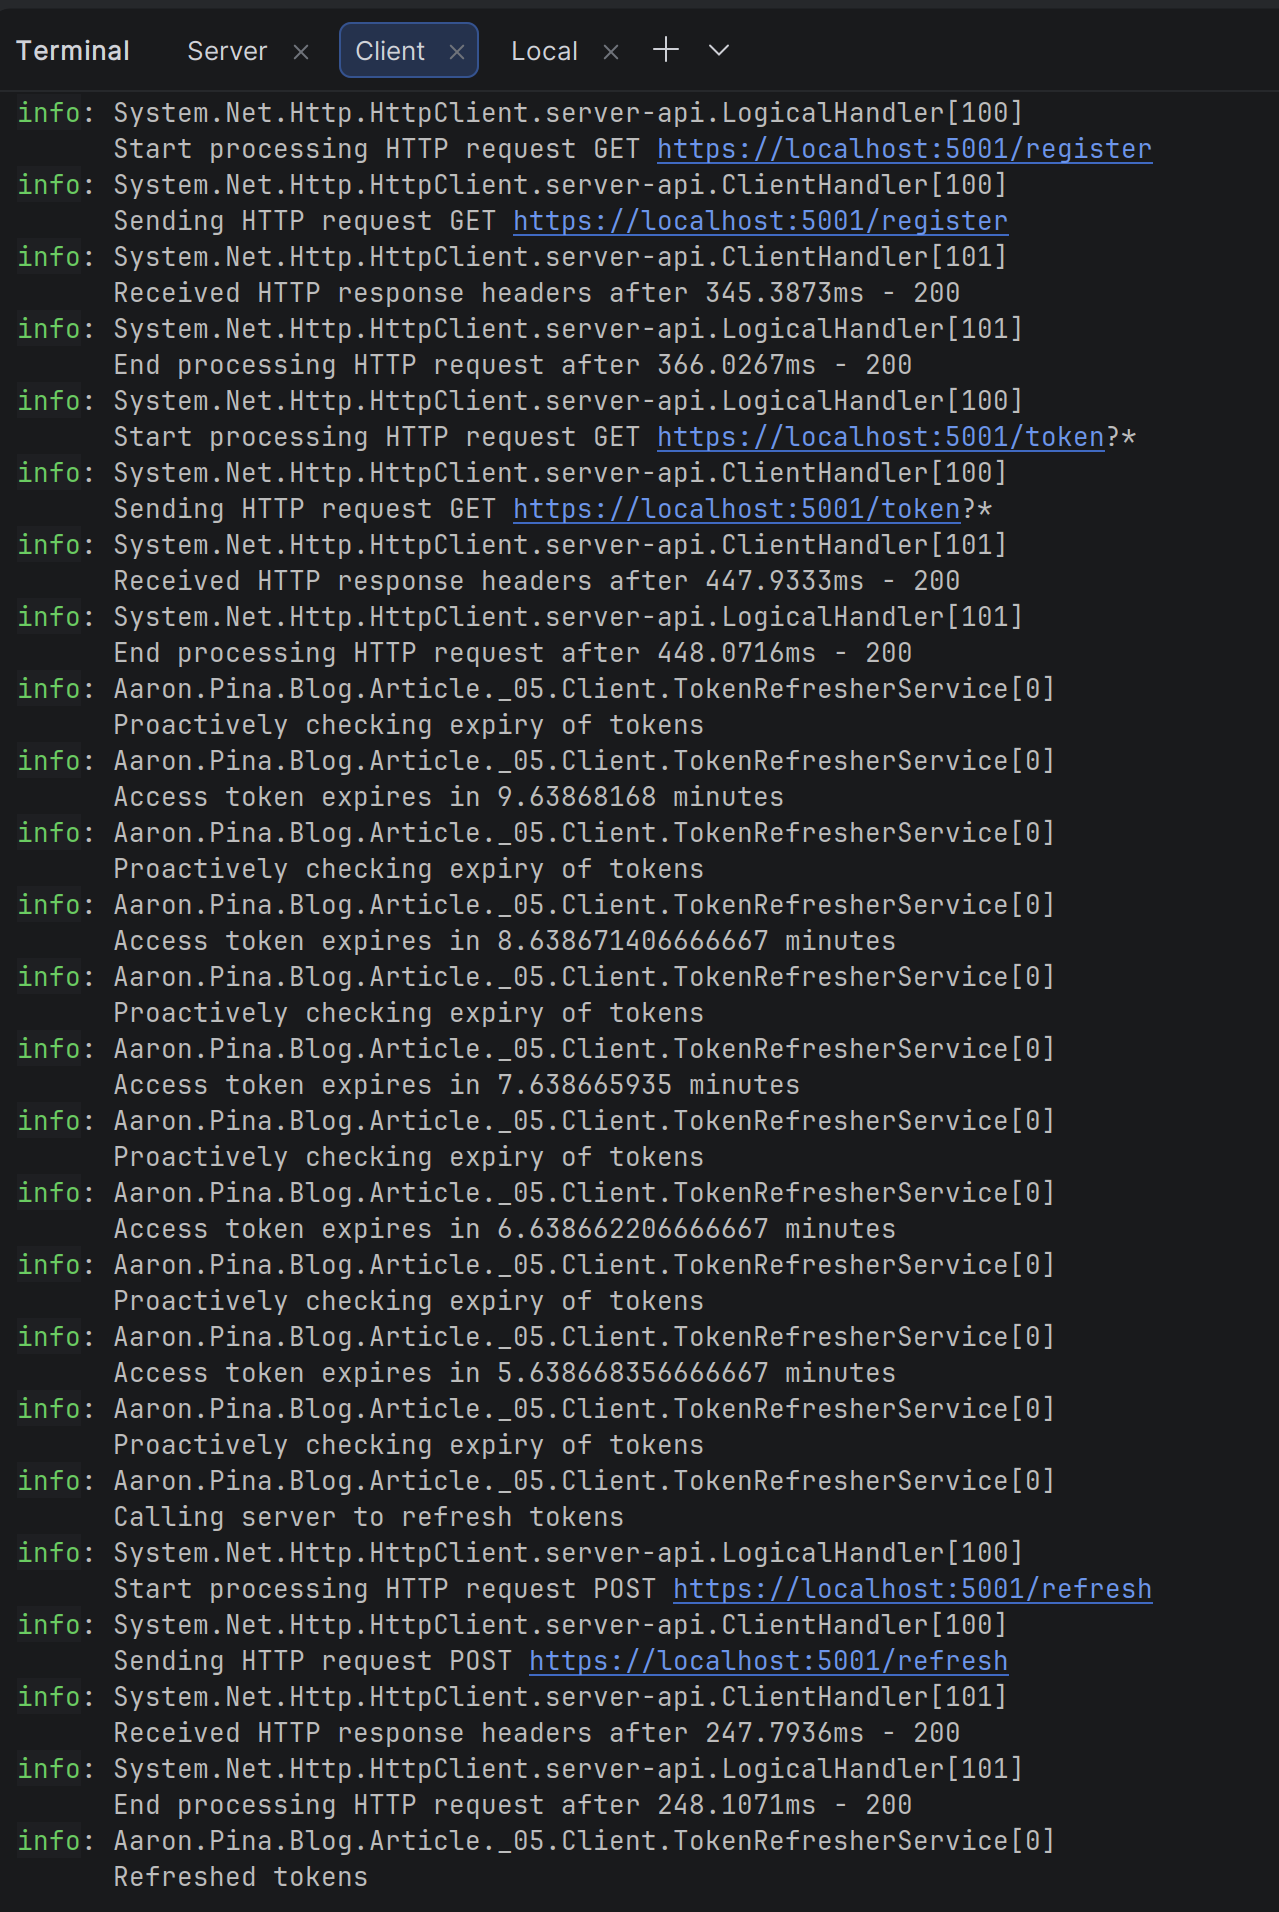
Okay, so after starting the server and client API's running, I sent a request to the client's /login endpoint, where you can see it calls the /register and /token endpoints on the authentication server, which then returns the access and refresh tokens, which in turn, the client stores locally.
Then the TokenRefresherService runs in a loop checking the access token's expiry value. When it's less that five minutes, it calls the /refresh endpoint on the authentication server with the current refresh token and receives new tokens, which it stores locally.
Brilliant! Exactly what we want. Next I'm going to talk about refresh token "rotation".

Rotating your refresh tokens
Before this point, in the previous article and this one, the refresh token has basically had an unlimited lifetime. However, in the OAuth specification, it says:
...the authorisation server could employ refresh token rotation in which a new refresh token is issued with every access token refresh response. The previous refresh token is invalidated but retained by the authorisation server.
So they're basically saying that whenever we call the /refresh endpoint to get a new access token, we should also send a new refresh token. They also say that the existing database record should be flagged as invalid and a new one created.
Regarding the last point, you could:
- Add a
bool IsInvalidflag to yourTokenEntityand when the/refreshendpoint is called, set the flag on the current token, save it, create a new token, save it and send it in the response. (This is the recommended way). - Or you could not bother adding the flag and just create a new token, save it to the database and send it in the response. This is an atomic operation. You're not doing two database operations and hoping there's no conflict at some point of the process.
Personally, I think the latter solution is better, but I'll talk about why in the next section.
Either way, for the purposes of this article and the code that comes with it, we're just going to stick with updating the existing TokenEntity with new tokens. As long as you're aware of what the agreed-upon way of doing things is, that's enough for me.
So, let's go back to the first point about sending a new refresh token whenever the /refresh endpoint is called despite the fact that refresh tokens are supposed to last for months.
On the face of it, it kind of defeats the purpose of having a long-lasting refresh token and in effect just reduces the lifetime of the refresh token to the lifetime of the access token.
And that might be true if you're just thinking of the scenario where you call the /refresh endpoint shortly before the access token is due to expire like we do in the proactive token refresh service, but there are at least two other scenarios worth considering:
- You seldom call the protected endpoint. Maybe you call it once per month, like for the end-of-month reconciliation in an accountancy service. In that case, the access token will have long-ago expired since it was distributed, so you have to refresh it before you can access the endpoint.
- You call the protected endpoint thousands of times before it expires, like for a chat endpoint in a chat server. In that case, you'll have gotten a lot of use from the access token before you have to get a new one, so relatively, your refresh token is still much more long-lived.
If the refresh token has a three month lifetime, in both scenarios it's not the same lifetime as the access token. So really, rotating the refresh token whenever a new access token is request is an acceptable policy. And obviously it's more secure too than waiting for the entire lifetime of the refresh token before requiring it to be renewed.
Anyway, I'm happy to report that all of the code that we've produced in this article and the previous article already rotates the refresh token. So we don't need to change anything!

What the hell is a sliding expiry window?
I'm glad you asked. It's fairly simple. It means that when the /refresh endpoint is called to get new tokens, the expiry date of the refresh token is also reset. So if we refresh the tokens on the 1st of January and the refresh token was set to expire on the 1st of February, but its lifetime is supposed to be six months, we reset its expiry date to be the 1st of June.
The problem is that we currently don't have an expiry date on the TokenEntity for the refresh token, so let's fix that now. Here's the new TokenEntity:
public class TokenEntity
{
    public Guid     Id                    { get; init; } = Guid.NewGuid();
    public Guid     UserId                { get; init; }
    public DateTime CreatedAt             { get; init; }
    public string   RefreshToken          { get; set;  } = string.Empty;
    public DateTime RefreshTokenExpiresAt { get; set;  }
}
So now, whenever we save or update a TokenEntity in the database, we do this:
RefreshTokenExpiresAt = now.AddMinutes(config.Value.RefreshTokenLifetime),That brings us back the addition of the RefreshTokenLifetime to the appsettings.json file that I showed earlier. It's to achieve the sliding expiry window for the refresh token. Obviously that also means we need to change the TokenConfig object, so here's the new version of that too:
public class TokenConfig
{
    public double AccessTokenLifetime  { get; init; } = 10.0;      // ten minutes
    public double RefreshTokenLifetime { get; init; } = 262_980.0; // six months
}
And that also answers the earlier question about why the RefreshTokenLifetime is so much longer than the AccessTokenLifetime. It's to enable us to have a longer time-frame (in this case six months) in which we can request new tokens, before we have to log in again.
I think it's better now, because we don't have a refresh token that lasts forever. Clearly that would have been a big security problem.
Then we change our /refresh endpoint to check if the refresh token has expired, like so:
app.MapPost("/refresh", (IOptionsSnapshot<TokenConfig> config, HttpContext context, TokenRepository repository) =>
    {
        var refreshToken = context.Request.Form["refresh_token"].FirstOrDefault();
        if (string.IsNullOrEmpty(refreshToken)) return Results.BadRequest();
        var existing = repository.TryGetTokenByRefreshToken(refreshToken);
        if (existing is null) return Results.BadRequest();
        if (existing.RefreshTokenExpiresAt < DateTime.UtcNow)
        {
            return Results.BadRequest(new
            {
                Error = "Refresh token has expired",
                Message = "Please login again to get a new token"
            });
        }
        var now = DateTime.UtcNow;
        var newRefreshToken = TokenGenerator.GenerateRefreshToken();
        var accessToken = TokenGenerator.GenerateToken(rsaKey, existing.UserId, now, config.Value.AccessTokenLifetime);
        var response = new TokenResponse(accessToken, newRefreshToken, config.Value.AccessTokenLifetime);
        existing.RefreshTokenExpiresAt = now.AddMinutes(config.Value.RefreshTokenLifetime);
        existing.RefreshToken = newRefreshToken;
        repository.UpdateToken(existing);
        return Results.Ok(response);
    })
   .AllowAnonymous();
So we're just checking if the refresh token has expired or not and responding with a 400 Bad Request if it has. However, if we're using the reactive and proactive refresh strategies, that should never happen. Either way, we've now got a much more secure authentication API!
Just to quickly go back to what I said earlier about not adding an IsInvalid flag to the TokenEntity, the reason I said that is because now we've added a RefreshTokenExpiresAt property, we can just ask the database for the record with the most recent date, which for me is a lot easier than the recommended method.
Anyway, with that loop closed, let's talk about the next thing that changed.
The access token goes missing
For those of you with eagle eyes, you may have noticed that the TokenEntity has something missing compared to the version in the previous article.
That's right! The access token is missing.
We're no longer storing it in the database on the authentication server. In actual fact, we don't need to. And that should serve as a reinforcement of our original point about the way that a JWT is constructed.
The JWT access token is supposed to be self-contained. We don't need to store it in a database and check if it's the same token that the client is sending to us to access our protected endpoints. All we need to do is to verify that the signature of the JWT was signed by us.
And to do that, we just need the public key for the signing algorithm. In our authentication server, the internal authentication service does that. We gave it the public key in the JwtBearerOptions:
public static Action<JwtBearerOptions> Options(RSA rsa) =>
    options =>
    {
        options.TokenValidationParameters = new()
        {
            ...,
            IssuerSigningKey = new RsaSecurityKey(rsa.ExportParameters(false))
        };
    };
So we don't need to save it anywhere. It was taking up too much space anyway!
Last words
For these articles, we've been creating and storing the RSA signing keys in memory in the authentication server. But that was just for simplicity and convenience while we explored the topic of JWT. In a production scenario, the keys are stored and rotated.
Also, if someone else wants to verify that our JWT is valid, they need to have our public signing key to do so. Which means we need some way to expose the keys to them.
These are all topics that I'll cover in future articles. I hope you're excited to learn more!
Conclusion
We've now extended our token refresh strategy from just reacting to failed requests, to proactively refreshing tokens before they expire.
Then we've clarified some of the concepts around refresh tokens by referring to the OAuth specification and we've made some tweaks to our previous implementation to more closely follow what it recommends.
Key takeaways
- You now know how to implement a proactive background refresh service that keeps access tokens fresh before they expire.
- Storing the access token on the server is unnecessary when using JWTs. The token is self-validating via its signature and embedded claims.
- You learned that refresh token rotation is issuing a new refresh token on every use and invalidating the old one.
- Rotating refresh tokens significantly reduces the risk of stolen refresh tokens.
- Implementing a sliding expiry window for refresh tokens extends their lifetime on every use so, active sessions stay alive indefinitely without forcing a re-login.
- There are trade-offs between reactive (on 401) and proactive (background) refresh strategies. You choose one over the other depending on call frequency and latency requirements.
- Refresh tokens should remain opaque to the client. The client only carries them; the server decides what they mean and when they expire.
Enjoyed this hands-on deep dive?
Subscribe (for free) for the full series. Code-heavy guides straight to your inbox.
Questions or your own JWT experiments?
Comment below or connect on LinkedIn / X. Let's master secure .NET APIs together.