The Ultimate JWKS Setup for Robust JWT Validation in ASP.NET 10


This article isn't going to be as long as the previous article, but it's going to be just as interesting and powerful.
I'm going to be covering JWKS, that is, a JSON Web Key Set.
Why JWKS matters for scalable API's
In the previous articles, we relied on hard-coded public keys for JWT validation, which works fine for a single, simple API during development. However, as your system grows into a scalable architecture with multiple services, this approach quickly becomes a bottleneck.
That's why we're covering JWKS, which is a straight-forward mechanism that transforms how your API's handle key distribution and verification, making them more robust and easier to maintain.
The way it works is that your authentication server publishes the public keys via standardised, well-known endpoints, allowing any resource API to fetch them on demand.
This decoupling means your protected endpoints can validate JWT in a stateless manner. They rely solely on the token's signature and the latest public key from the authentication server.
That means no more database checks or shared secrets scattered across services. Everything stays self-contained and efficient.
If you think about where we're going with these articles, it's towards a system which has multiple API's talking to each other. It doesn't have to mean a microservices architecture, but JWT authentication works best in backend-to-backend service calls.
If we were talking about microservices, you'd have them containerised and running on Kubernetes (K8s). You can configure K8s to spin up new instances of API's to handle spikes in traffic. It would be perfect if they could just discover and cache the keys required to validate requests without any manual intervention.
That's what JWKS does, and that's why it's such a game-changer when it comes to working with distributed services.
A brief recap
Before I go into the JWKS topic in detail, let's refresh our memories about what we've been doing over the last few articles.
We've exploring the world of JWT tokens by making an API in ASP.NET 10, protected by JWT authentication. Here's a diagram of what we've built so far:
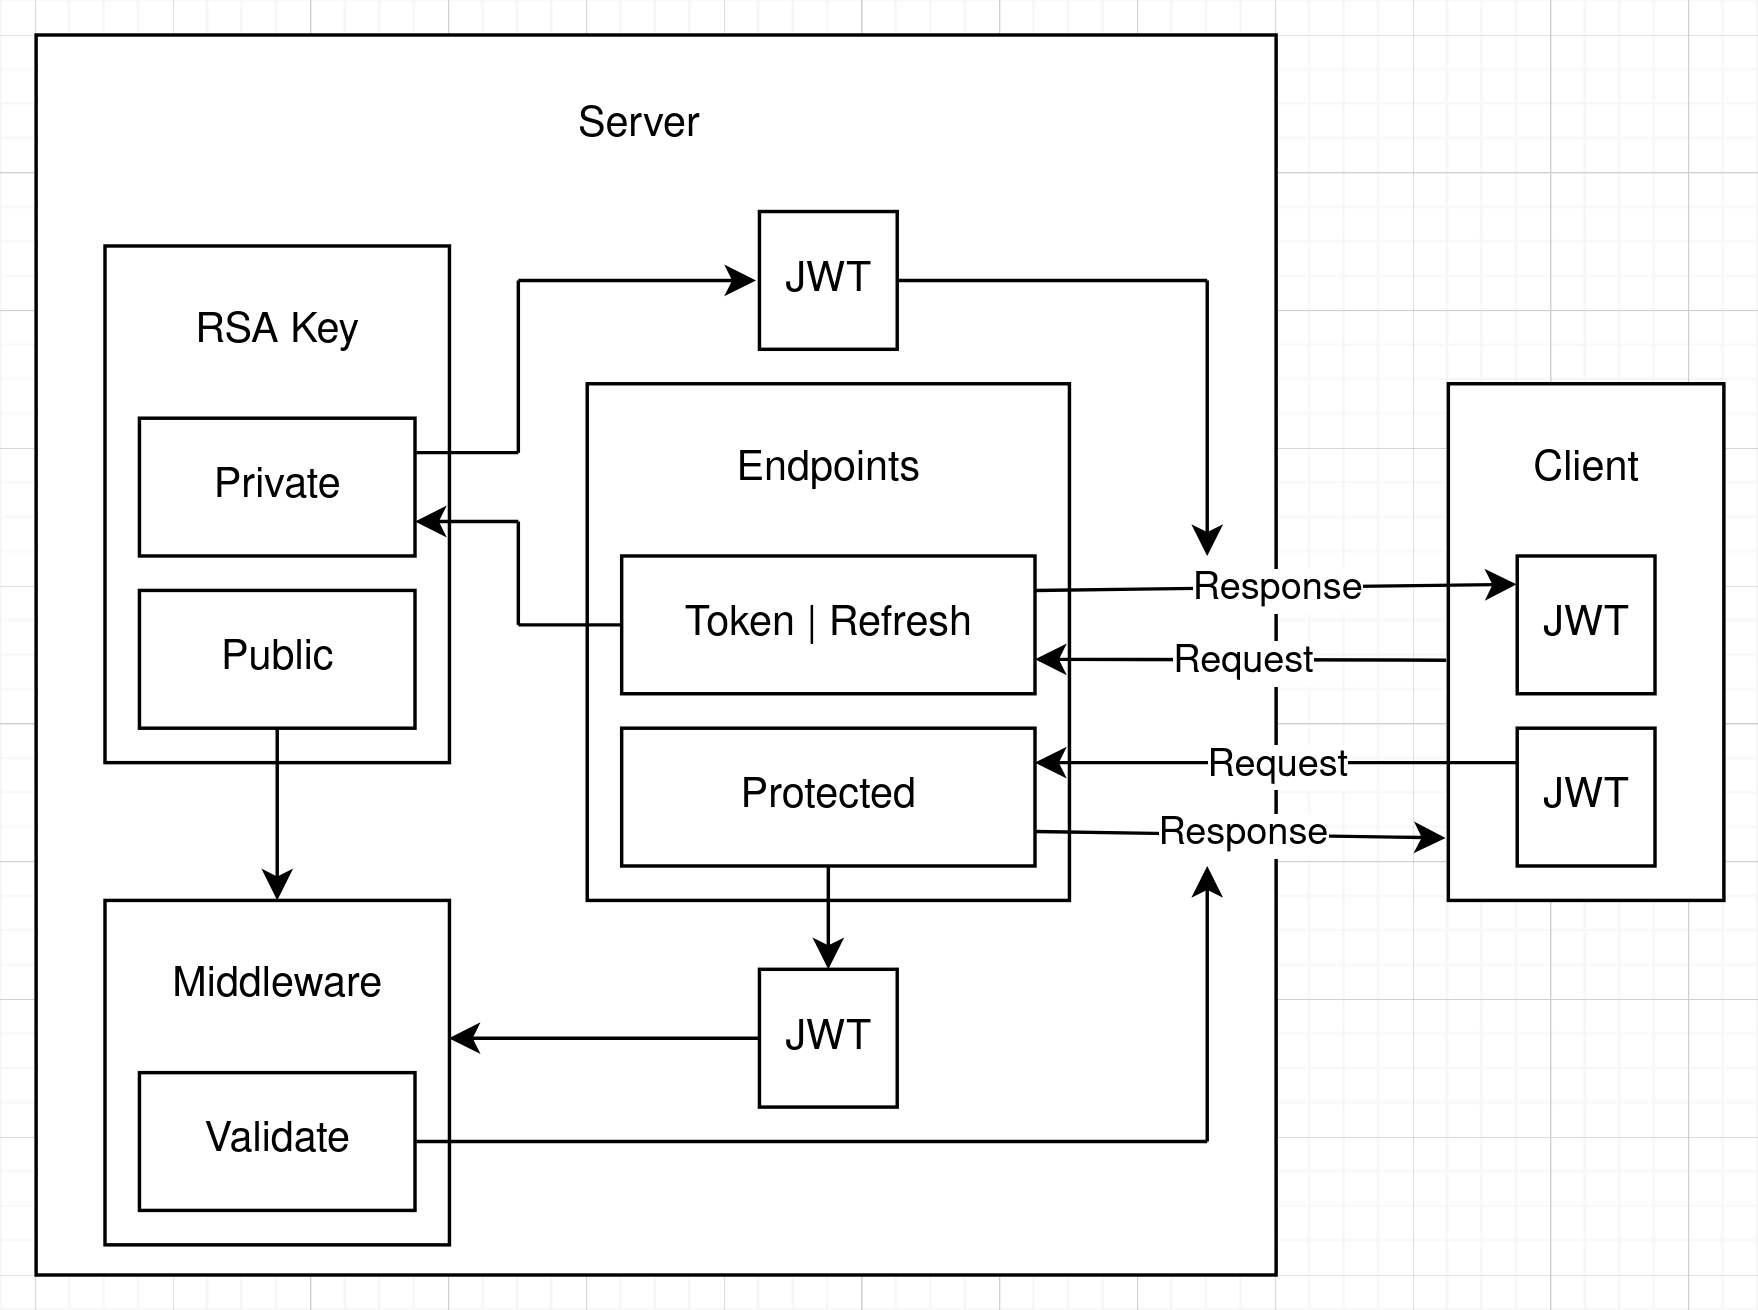
So we've got a Server API and a Client. We actually built another API as a client, but it can be any kind of application that can make HTTP requests. I'll explain the flow, starting at the client request:
- We're ignoring all of the user management stuff that we've done previously, as it's not really relevant to this article, although it is still in the source code that goes with this article.
- The client makes a request to the
/tokenendpoint or the/refreshendpoint to get a JWT. In the OAuth specification, these are actually the same endpoint and you send agrant_typeparameter in the request to say how you want to get your token. In our API, they're separate endpoints to save confusion. - In our API, we're specifying that the JWT is to be signed with the RSA256 algorithm. This is an asymmetric algorithm, so you have a public key and a private key. We're creating and storing the RSA locally. When we get the token request, we create the JWT and sign it with the RSA private key.
- Then we send the JWT back to the client in the response.
- Now the client has the JWT and they can use it to access protected endpoints.
- In all of the code we've written so far, the protected endpoints have also been on the authentication API. When learning about JWT authentication, it makes sense that we'd do so, because it keeps things simple.
- Next, the client calls a protected endpoint and passes the JWT in the request.
- The JWT is sent to the middleware, which we have configured with the RSA public key. The middleware uses the public key to validate that the JWT was signed by the private key.
- If the JWT is validated, a 200 OK response it sent and if not, a 401 Unauthorised response is sent.
That's a perfect way to demonstrate JWT authentication, because it's simple and easy to understand. However, it's not the way things are actually done in the real world.

What a real-world implementation looks like
The authentication server is there to deliver tokens. If you discount the /blacklist endpoint that I was showing you in the previous article, all of the endpoints are going to be unprotected.
The protected endpoints are on the other API's that you create.
Let's think about the kinds of applications we're going to be building in the real world.
For example, we could have an e-commerce application. For that we'd have a front-end, like a website or a mobile app. But we'll also have a Users API, a Products API, an Orders API, a Shipping API, etc. They're all going to operate in coordination to create a workflow for selling products. All of those API's will have endpoints protected by JWT authentication.
This is where the power of JWT authentication really shows. You don't need to check databases or anything to make sure that the client actually has the right to a response from your API.
JWT are self-contained and enable stateless authentication.
As I said in the second article in this series, the JWT is signed with the private key and verified with the public key. So to verify that the JWT is valid, all you need is the public key of the algorithm that signed the JWT in the first place.
And as you can work out from it's name, the public key can be distributed publicly. So you can give it to anybody who wants it and they can verify that the JWT is valid.
But how do we do that?

OpenId Connect
As usual, when it comes to software development and security, there is a protocol. For the discoverability that we're trying to accomplish, the relevant protocol is called OpenId Connect, which is usually shortened down to just OIDC.
It's actually an extension of OAuth, and although in a future article, I'm going to be talking about what all of these protocols mean and how they tie together, for now we're going to be ignoring all of it except the part about JWKS.
Before we get to code, I'm going to show you another diagram of how what we're going to build in this article looks like. It might look awfully complicated, but actually it's not:
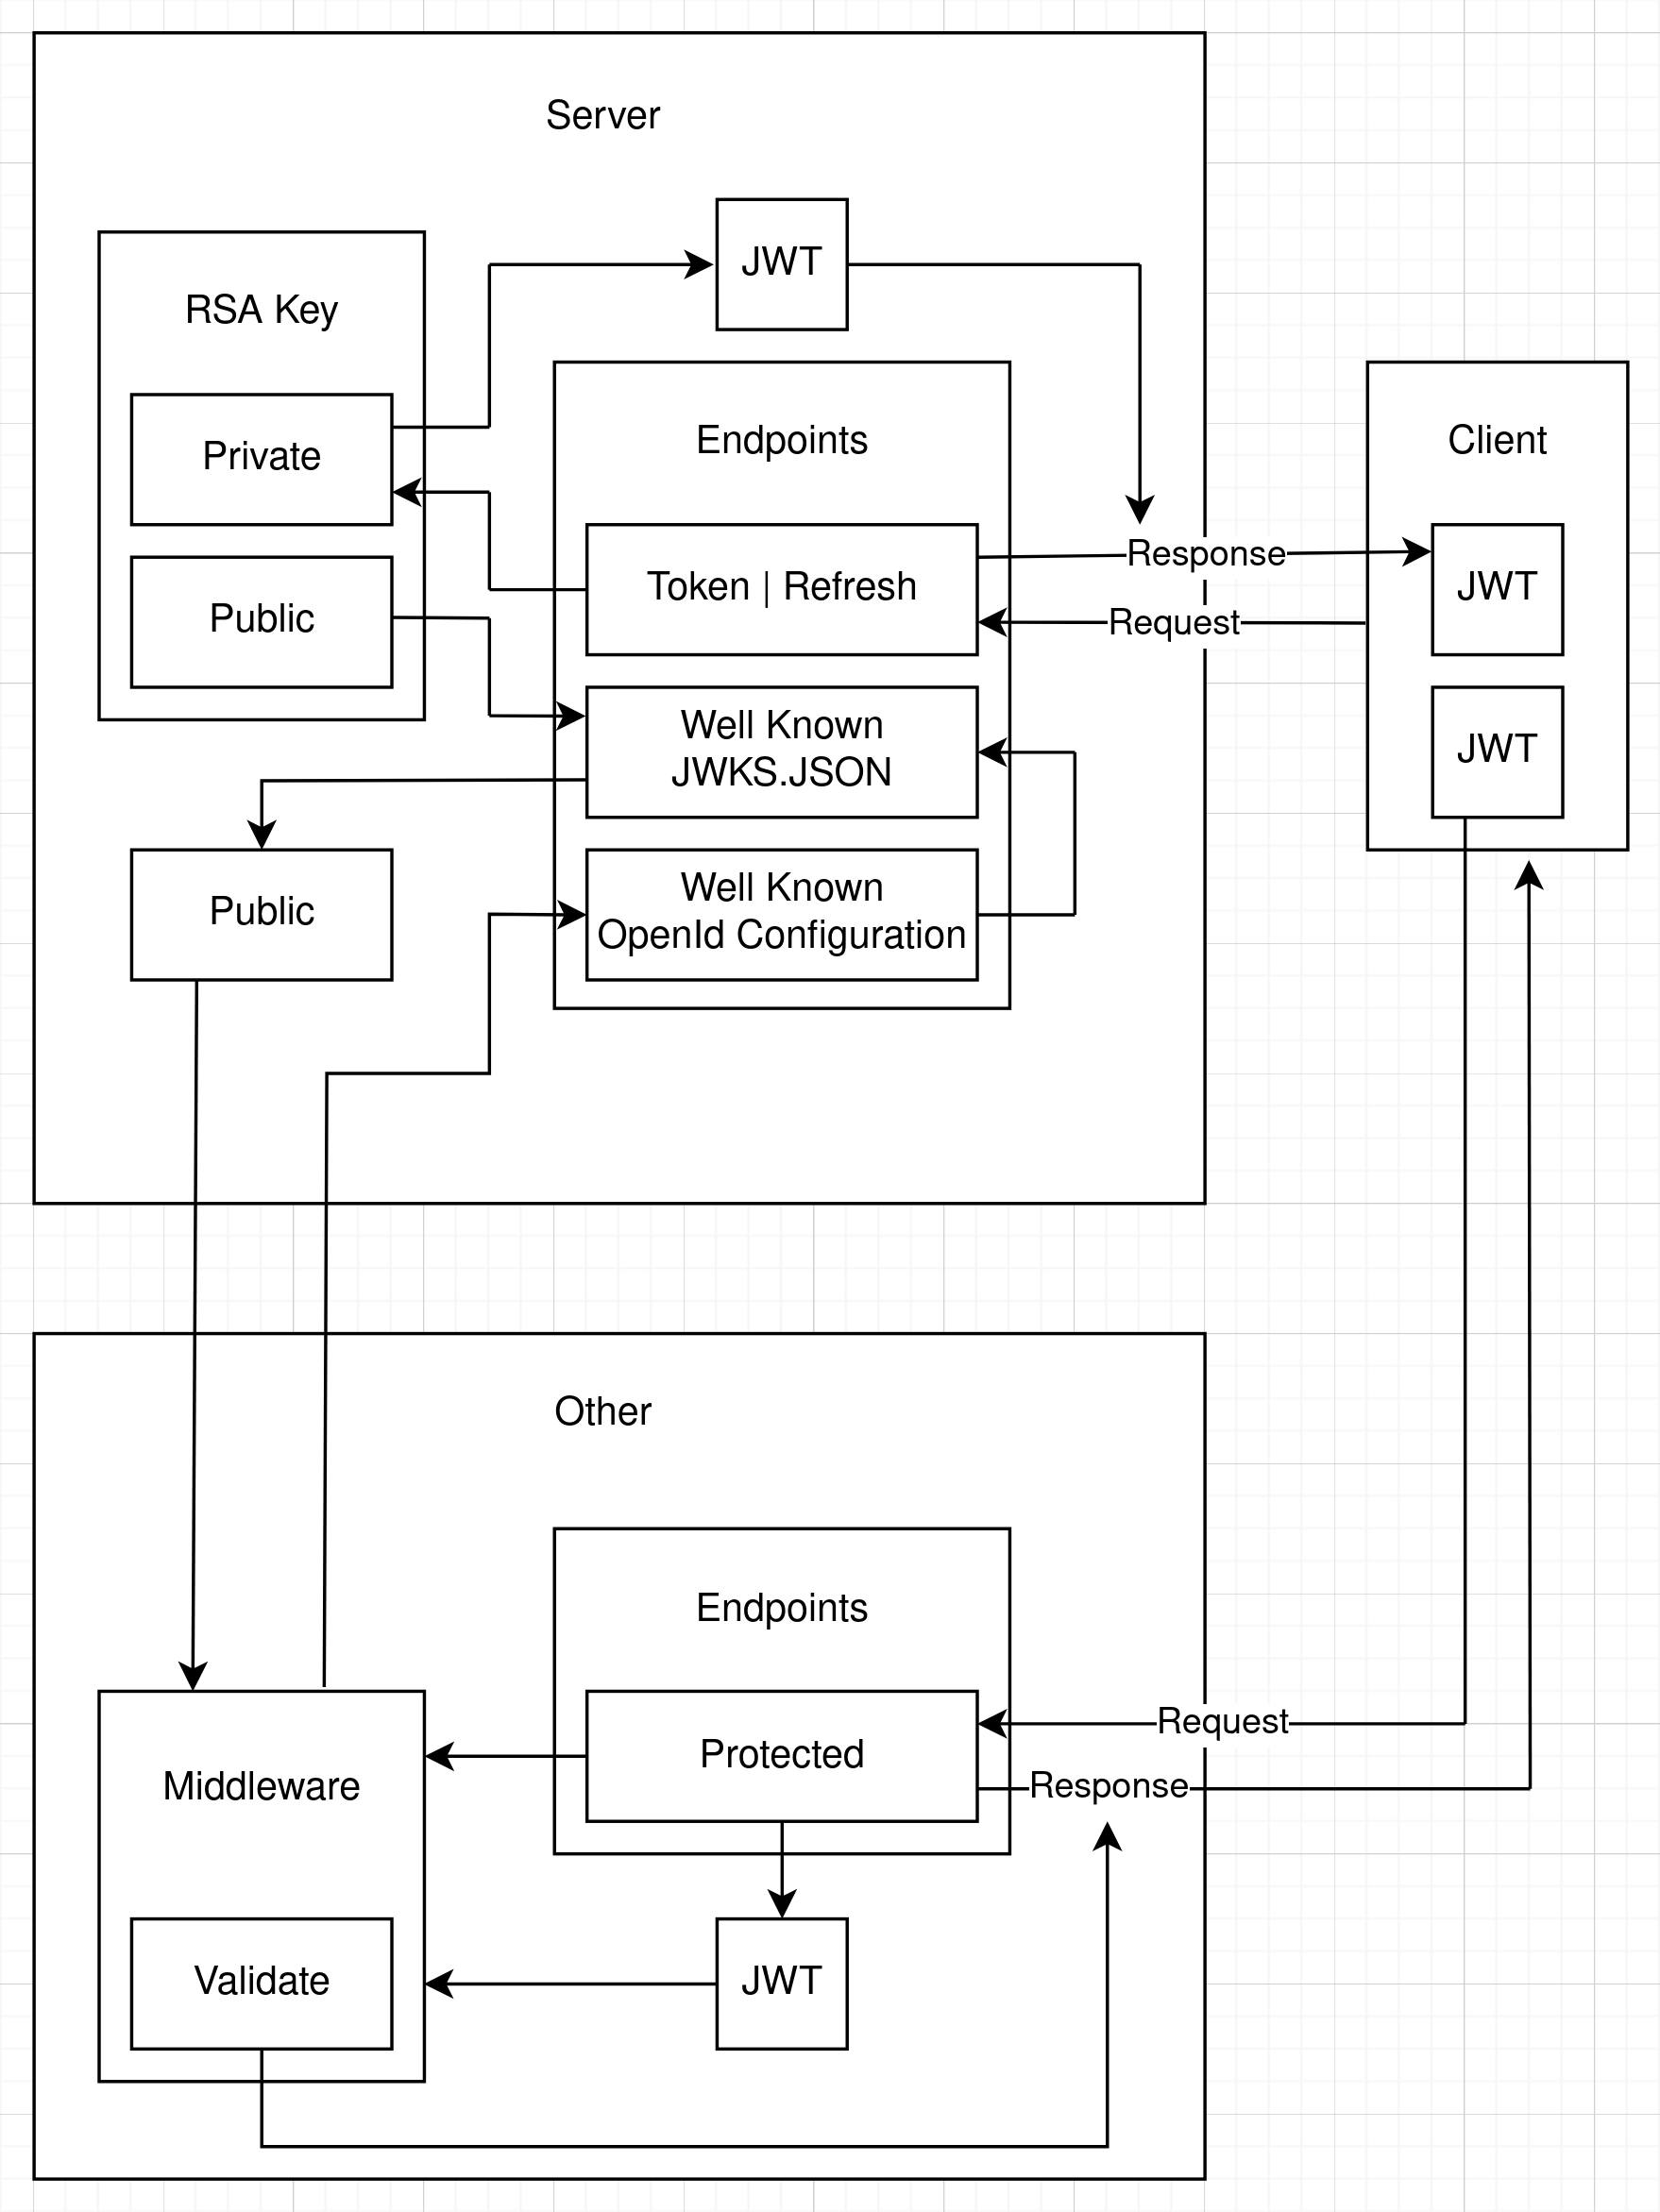
We have the same authentication server and client as before, but now we have an other API. And the client now wants to call a protected endpoint on that other API.
I'll go through the flow so you can see how it works and then I'll show you the code that does the job:
- The client gets the JWT from the authorisation server as before.
- The client sends the JWT in a request to a protected endpoint on the other API.
- The middleware wants to validate the JWT but it doesn't have the RSA keys. They're on the authentication server.
- We've configured the other API to tell it we're going to use OIDC and we've got an authentication server partially set up for OIDC. When I say partially, I mean we've got the server set up for discovery and JWKS. We've told it the URL of the authentication server. In a full implementation of OIDC, other endpoints must also be specified.
- So, the middleware sends a request to the authentication server. It knows there should be two well-known endpoints set up. These are agreed-upon endpoints that must be there for the workflow to be successful.
- We've set up a well-known OpenId Configuration endpoint on the authentication server. The other API's middleware makes a request to that endpoint and it returns a URL which we can call to get the RSA public key.
- The client API's middleware makes a request to that URL, which is a well-known JWKS.JSON endpoint. That returns a bunch of information which can be used to form a public key. For efficiency, the middleware also caches the JWKS so it doesn't need to make a back-channel HTTP request to the JWKS.JSON endpoint every time it needs to validate a JWT.
- The public key is used by the other API's middleware to validate the JWT.
- If the JWT is validated, a 200 OK response it sent and if not, a 401 Unauthorised response is sent.
So it's actually a simple process. Most of it is done by the middleware. All we have to do is make sure we've configured everything properly and it will just work.
I'll show you the code in the next section.

Implementing JWKS discoverability in our API
The full code implementation is available in this GitHub repository for your reference:
https://github.com/aaroncpina/Aaron.Pina.Blog.Article.07
The first thing we're going to do is to take the RSA out of the root of the server's Program.cs, encapsulate it and register it in dependency injection as a singleton service:
public class RsaKeyProvider : IDisposable
{
    private readonly RSA _rsa = RSA.Create(2048);

    public RsaKeyProvider()
    {
        SigningKey = new Lazy<RsaSecurityKey>(() => new RsaSecurityKey(_rsa.ExportParameters(true)));
        PublicKey =  new Lazy<RsaSecurityKey>(() => new RsaSecurityKey(_rsa.ExportParameters(false)));
    }

    public Lazy<RsaSecurityKey> SigningKey { get; }
    public Lazy<RsaSecurityKey> PublicKey  { get; }

    public void Dispose() => _rsa.Dispose();
}
You can see that the service implements the IDisposable interface. That ensures that Dispose() will be called during shutdown by ASP.NET, which will dispose of the RSA's resources.
Normally, to facilitate unit testing you'd create an IRsaKeyProvider interface, register the RsaKeyProvider as an instance of the interface and request the interface in the endpoint parameters, but we're not going to do that here because we're trying to keep things simple.
You'd also normally persist the RSA in a cache or database, because creating a new one every time you run the API will cause inconsistencies with previously issued keys. Again, I'm not going to deal with that right now, but we will address that in the next article.
Lastly, I'm also exposing the RsaSecurityKey for the public key and the signing key as a Lazy<T>, so they're not instantiated if they're not used.
Then we just add the RsaKeyProvider to dependency injection as a singleton. Adding it as a singleton ensures that there is only ever one instance of it, so the same keys are passed to every dependent that requests it:
builder.Services.AddSingleton<RsaKeyProvider>();Then it's a simple matter to add the RsaKeyProvider to the parameters in the /token and /refresh endpoints:
app.MapGet("/token", (RsaKeyProvider rsaKeyProvider, ...) => { ... });Inside both endpoints, where we generate the JWT, we pass the provider in like so:
var accessToken = TokenGenerator.GenerateToken(rsaKeyProvider.SigningKey.Value, ...);Also, inside GenerateToken, we need to ensure that the Issuer is properly defined, including the port. It's a minor, but important change:
public static string GenerateToken(RsaSecurityKey rsaKey, Guid jti, Guid userId, string role, DateTime now, double expiresIn)
{
    var tokenDescriptor = new SecurityTokenDescriptor
    {
        IssuedAt = now,
        Audience = "https://localhost",
        Issuer = "https://localhost:5001",
        Expires = now.AddMinutes(expiresIn),
        Subject = new ClaimsIdentity([
            new Claim("role", role),
            new Claim("jti", jti.ToString()),
            new Claim("sub", userId.ToString())
        ]),
        SigningCredentials = new SigningCredentials(rsaKey, SecurityAlgorithms.RsaSha256)
    };
    var handler = new JwtSecurityTokenHandler();
    var token = handler.CreateToken(tokenDescriptor);
    return handler.WriteToken(token);
}
Staying in Program.cs, we're going to add the two well-known endpoints:. This first one is /.well-known/openid-configuration and this one says who (what URL) is issuing the JWKS and from where one can get it.
app.MapGet("/.well-known/openid-configuration", () => Results.Json(
        new
        {
            Issuer  = "https://localhost:5001",
            JwksUri = "https://localhost:5001/.well-known/jwks.json"
        },
        new JsonSerializerOptions { PropertyNamingPolicy = JsonNamingPolicy.SnakeCaseLower }))
   .AllowAnonymous();
You can see that I'm just creating an anonymous object and serialising it as JSON. The OIDC and OAuth specifications want parameters to be in lower-case Snake case, so every word is split with underscores, like this: jwks_uri
Another thing to mention about this endpoint, is that the OIDC specification requires a lot more fields to be present, including token endpoints, etc. So, if you're looking for a full OIDC implementation, this article is not going to be your reference source, because we're only providing a stripped-down minimal response to facilitate discoverability.
The second endpoint, as you can see from the OpenId Configuration endpoint above, is located at /.well-known/jwks.json and again, it returns a JSON response. However, this time there are some built-in objects that we can use to make sure we're returning the data in the right format:
app.MapGet("/.well-known/jwks.json", (RsaKeyProvider rsaKeyProvider) =>
    {
        var key = rsaKeyProvider.PublicKey.Value;
        var jwk = JsonWebKeyConverter.ConvertFromRSASecurityKey(key);
        jwk.Kid = "2026-key-01";
        jwk.Use = "sig";
        var jwks = new JsonWebKeySet();
        jwks.Keys.Add(jwk);
        return Results.Json(jwks);
    })
   .WithName("JWKS")
   .AllowAnonymous();
As you can see, we're passing the RsaKeyProvider into this endpoint too, but this time we want to get the public key from it, because the middleware in the other API will need it to validate any JWT sent to its protected endpoints.
- The Use parameter that we're setting indicates the purpose of the key. It'll either have a value of "sig", for signing or "enc" for encryption. Since we're using it to validate a signed JWT, we're setting it to "sig".
- The Kid parameter stands for Key Id and it's a unique identifier for a specific key within the JWKS. We're only exposing one JWK in this set, but you can have multiple keys. I won't go into any more depth about it than that, because I'll cover this topic in detail in the next article.
Okay, with those two endpoints defined, we can now turn our attention to configuring the authentication middleware.
You may recall that we were passing the RSA into configuration before and using it like this:
public static Action<JwtBearerOptions> Options(RSA rsa) =>
    options =>
    {
        options.TokenValidationParameters = new()
        {
            ClockSkew = TimeSpan.Zero,
            ValidateIssuer = true,
            ValidIssuer = "https://localhost",
            ValidateAudience = true,
            ValidAudience = "https://localhost",
            ValidateLifetime = true,
            ValidateIssuerSigningKey = true,
            IssuerSigningKey = new RsaSecurityKey(rsa.ExportParameters(false))
        };
        options.MapInboundClaims = false;
        options.Events = new JwtBearerEvents { ... };
    };
Now, we don't need to pass it in at all and we can even get rid of most of it. The new version of the JwtBearerOptions will look like this:
public static readonly Action<JwtBearerOptions> Options = options =>
{
    options.TokenValidationParameters = new TokenValidationParameters
    {
        ClockSkew = TimeSpan.Zero,
        ValidateAudience = true,
        ValidateLifetime = true,
        ValidateIsser = true
    };
    options.MapInboundClaims = false;
    options.RequireHttpsMetadata = false;
    options.Audience = "https://localhost";
    options.Authority = "https://localhost:5001";
    options.Events = new JwtBearerEvents { ... };
};
So you can see that IssuerSigningKey is now totally missing. That's because we're relying on the middleware to discover where to get the public key from using the well-known endpoints.
We're also indicating the location of the Authority, which is the authentication server. This is the place where the well-known endpoints exist and where the public key can be acquired.
Lastly, RequireHttpsMetadata = false is practical for development to avoid problems with local dev certs, but be sure to remove this for production environments, otherwise your API could be prone to Man-In-The-Middle (MITM) attacks.
And actually, that's everything we need to do. I told you it was simple!

Creating the other API to test JWKS
Alright, so like I showed in the second flow diagram above, we're going to create a new API called Other which has just one endpoint on it. It's going to be super simple. I'll show you.
First, just create a new .NET 10 Minimal API project and strip out all of the boiler plate code.
Set the launchSettings.json to run the API on port 5003:
{
  "$schema": "https://json.schemastore.org/launchsettings.json",
  "profiles": {
    "https": {
      "commandName": "Project",
      "dotnetRunMessages": true,
      "launchBrowser": false,
      "applicationUrl": "https://localhost:5003",
      "environmentVariables": {
        "ASPNETCORE_ENVIRONMENT": "Development"
      }
    }
  }
}
Then create a Configuration class that looks like this:
public static class Configuration
{
    public static class JwtBearer
    {
        public static readonly Action<JwtBearerOptions> Options = options =>
        {
            options.TokenValidationParameters = new TokenValidationParameters
            {
                ClockSkew = TimeSpan.Zero,
                ValidateAudience = true,
                ValidateLifetime = true,
                ValidateIsser = true
            };
            options.MapInboundClaims = false;
            options.RequireHttpsMetadata = false;
            options.Audience = "https://localhost";
            options.Authority = "https://localhost:5001";
        };
    }
}
And then our Program.cs looks like this:
var builder = WebApplication.CreateBuilder(args);

builder.Services.AddAuthentication(JwtBearerDefaults.AuthenticationScheme)
                .AddJwtBearer(Configuration.JwtBearer.Options);
builder.Services.AddAuthorization();

var app = builder.Build();

app.UseAuthentication();
app.UseAuthorization();

app.MapGet("/user", (HttpContext context) =>
    {
        var role = context.User.FindFirstValue("role");
        if (role is null) return Results.Unauthorized();
        var sub = context.User.FindFirstValue("sub");
        var parsed = Guid.TryParse(sub, out var userId);
        if (!parsed) return Results.Unauthorized();
        return Results.Ok(new UserResponse(userId, role));
    })
   .RequireAuthorization();

app.Run();
The /user endpoint is a copy and paste of our authentication server endpoint of the same name. Don't forget to add a reference to the Shared project, so we can use the UserResponse record to format the response properly.
Now we're going to test it.

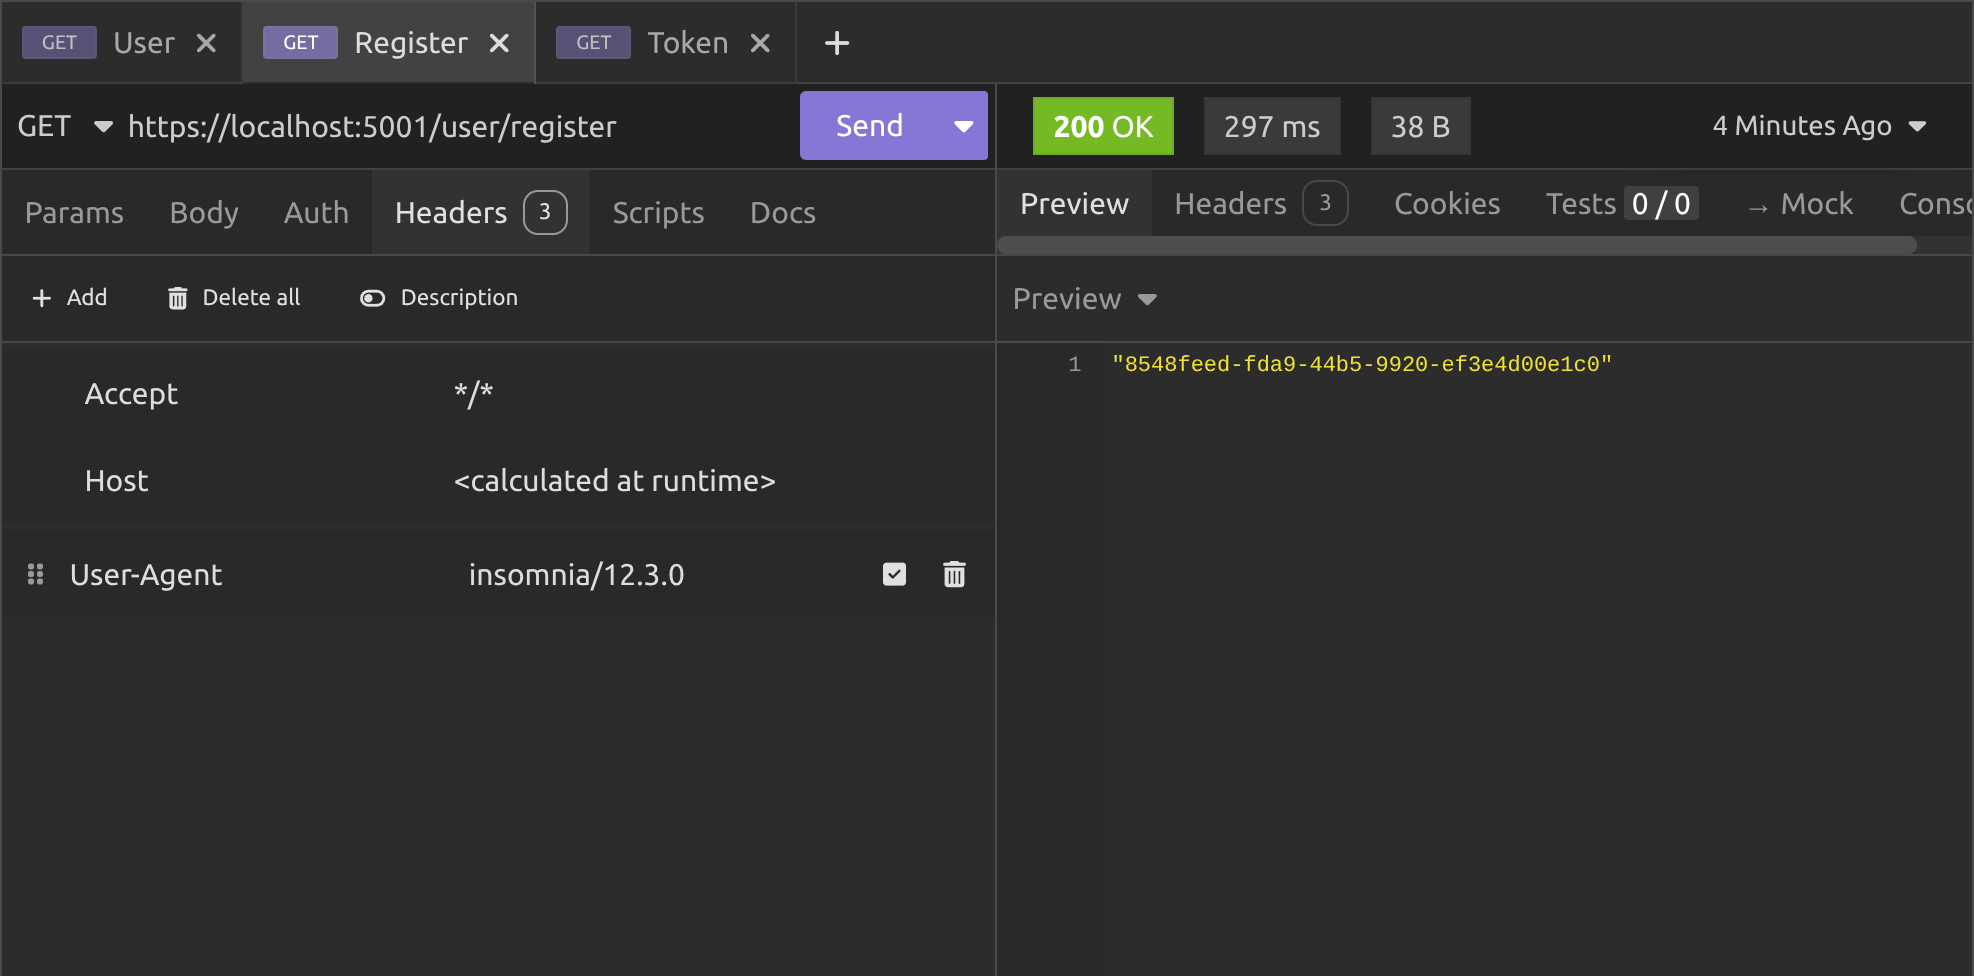
Testing authentication server discoverability
We'll register with the authentication server on port 5001:
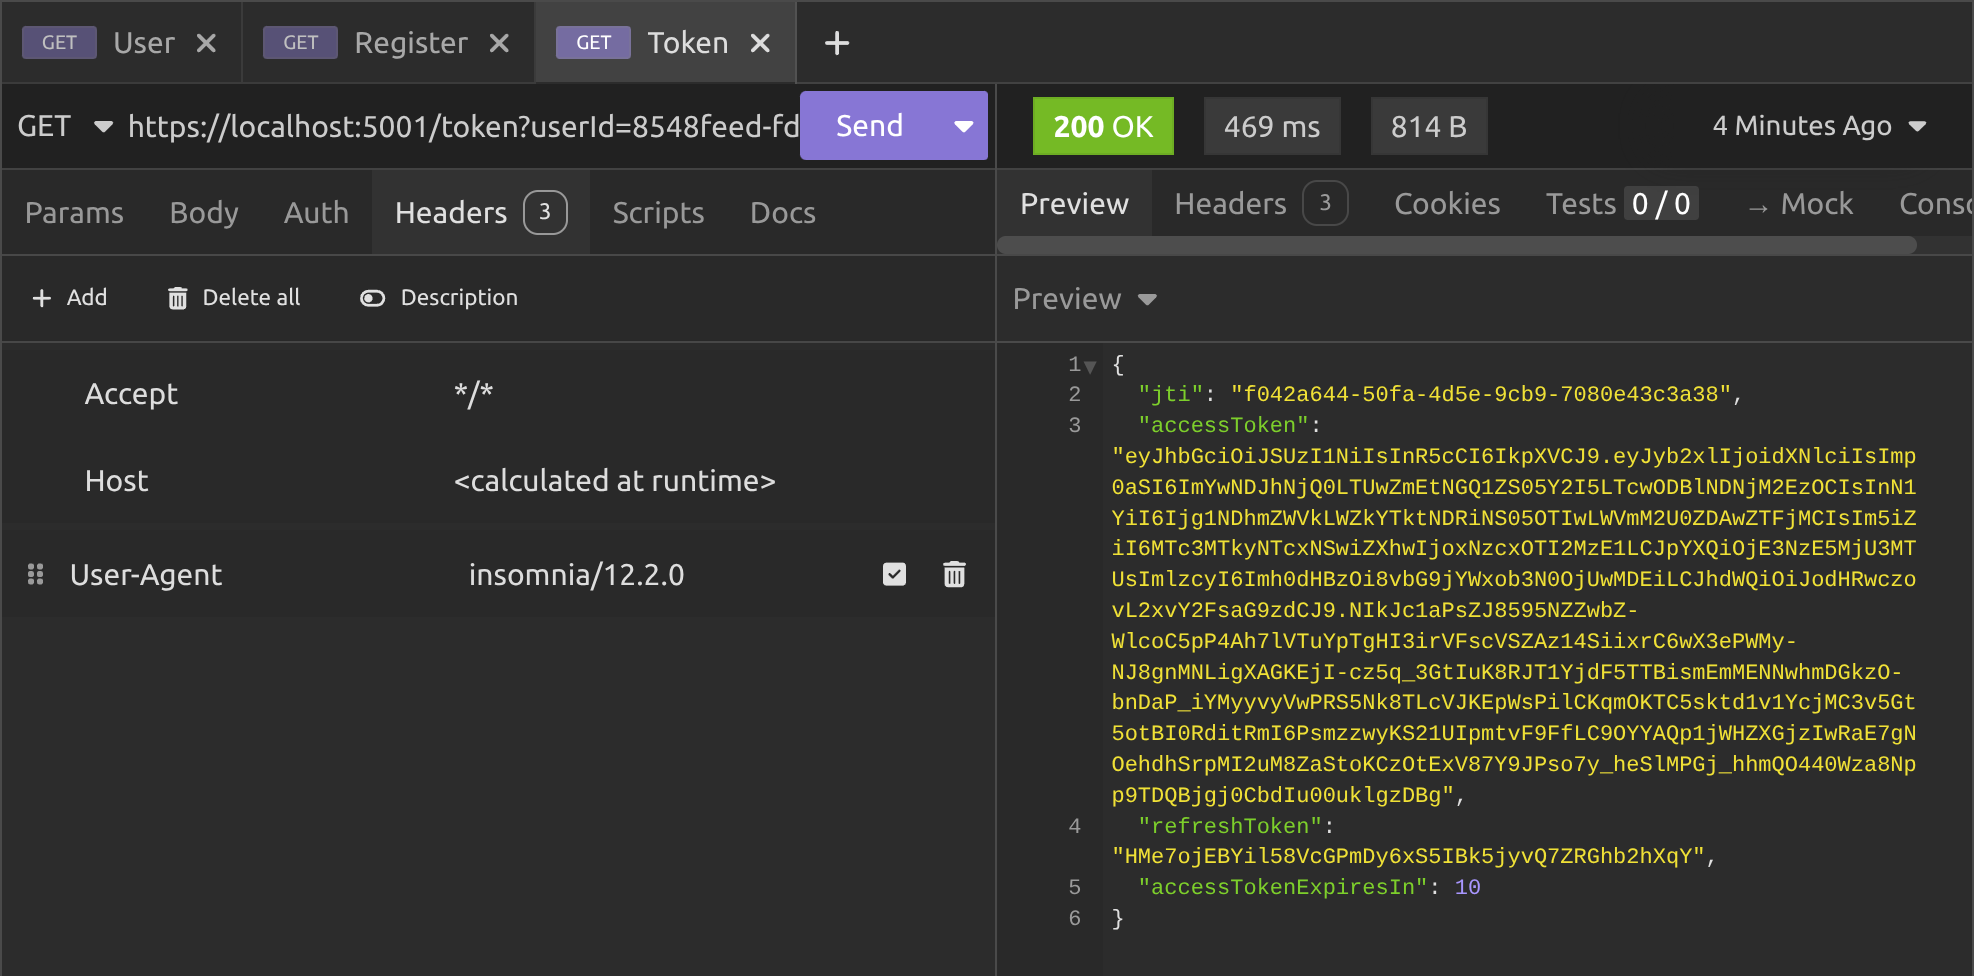
Then we'll get a token from the same server:
Then we'll call the /user endpoint on the Other (port 5003) server:
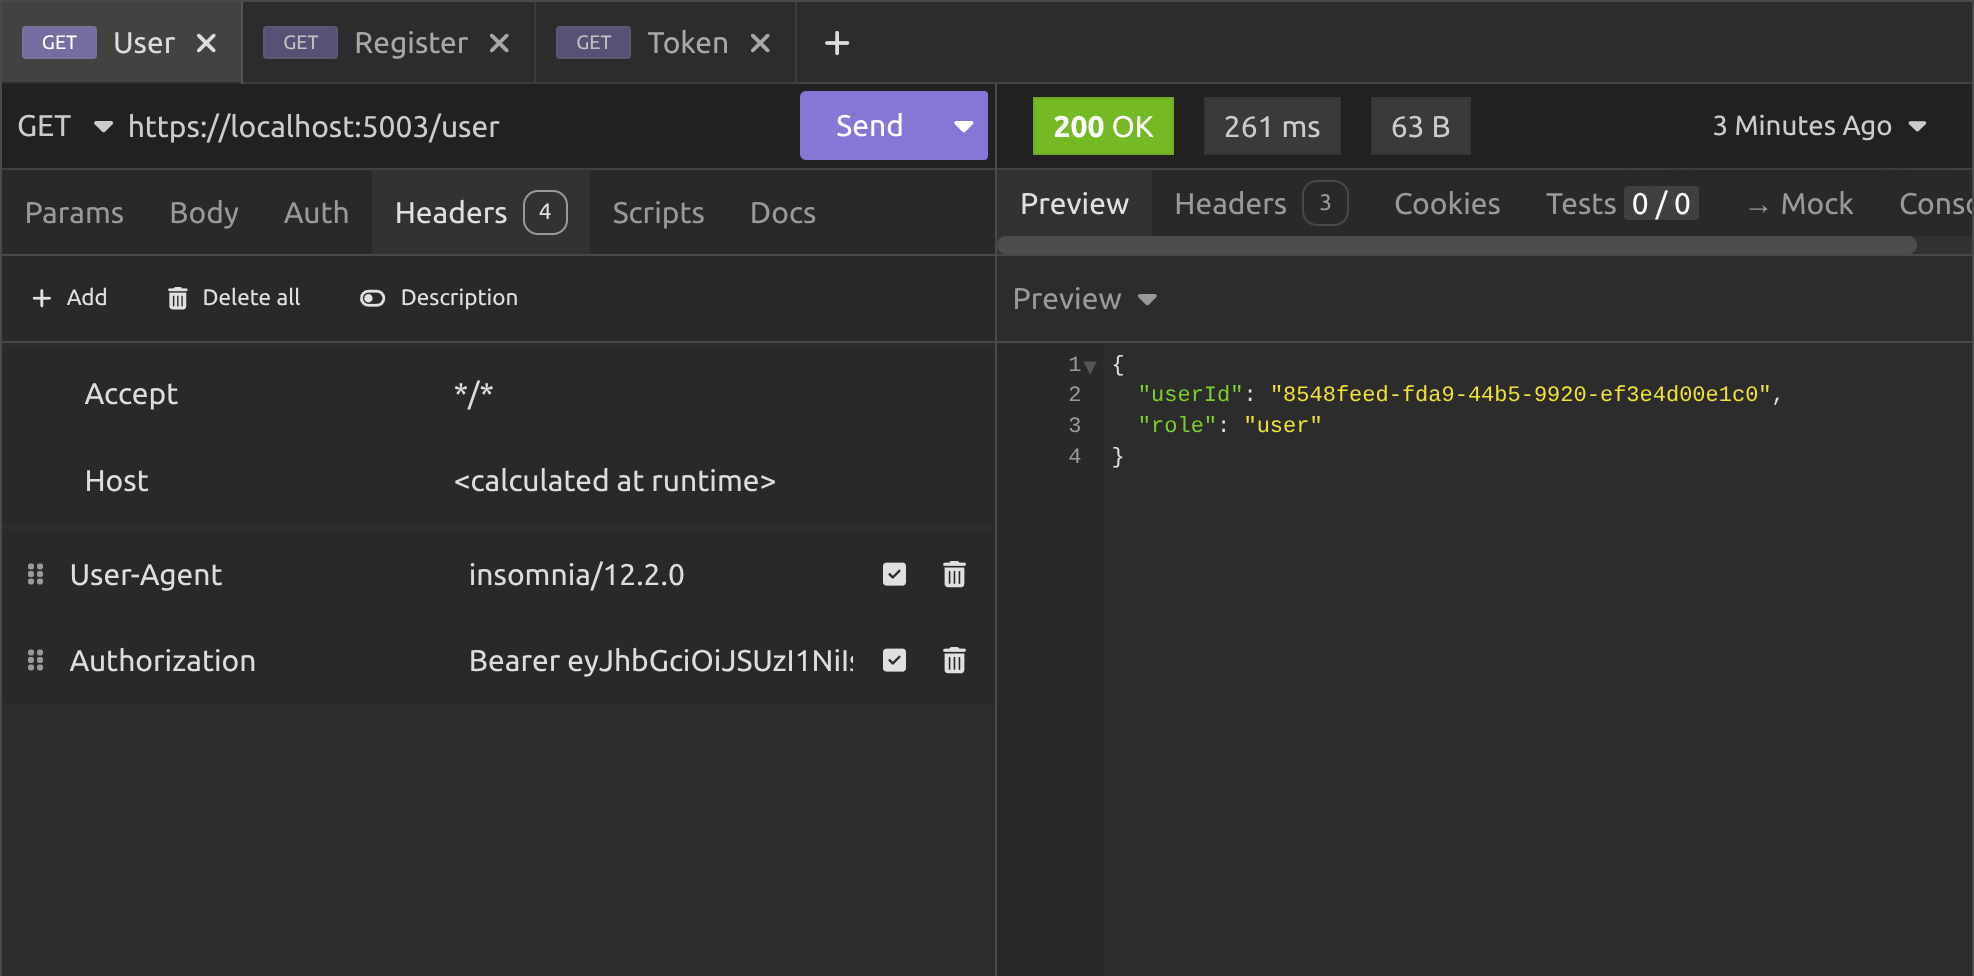
And as you can see, everything worked!
The Other server used discovery and JWKS to get the public key from the authentication server and used it to validate the JWT that we passed along with the request to its protected /user endpoint.
And that's all there is to it. Now you can create as many API's as you like. As long as you configure them properly to point to the authentication server and get your clients to pass JWT from the same server, you can validate all requests coming in simply and easily.
Conclusion
In this article, we delved into the practical implementation of JSON Web Key Sets within an ASP.NET 10 Minimal API. We transitioned from a basic hard-coded key validation to a more dynamic and scalable approach for JWT authentication.
By exploring the setup of well-known endpoints, configuration adjustments in the middleware, and the creation of a separate resource API, you now understand how to decouple key management from individual services, which enables seamless token verification across distributed systems without compromising security or efficiency.
This builds on the foundation from previous articles, showing how JWKS fits into real-world API ecosystems, particularly for backend-to-backend communication.
Whether you're building a simple prototype or scaling to multiple services, the techniques demonstrated here provide a robust framework for handling asymmetric signing in a way that supports growth and maintainability.
Key takeaways
- JWKS allow dynamic public key distribution via standardised endpoints, eliminating the need for hard-coded keys in resource APIs and promoting stateless validation for better scalability.
- Configure the authority URL in
JwtBearerOptionsto enable automatic discovery of metadata and keys, ensuring your middleware fetches and caches JWKS efficiently without manual intervention. - Use asymmetric algorithms like RSA256 with proper issuer and audience claims in token generation to maintain consistency across services, avoiding validation failures in multi-API setups.
- For development, set
RequireHttpsMetadatato false, but always enable it in production to protect against potential security risks during metadata retrieval. - Test with separate APIs on different ports to simulate real distributed environments, verifying that tokens issued by one server validate correctly on others through JWKS.
Okay, thanks for reading!
In the next article, we're going to cover JWKS rotation policies. You will unlock the secrets to effortless key management, keeping your APIs unbreakable and future proof. Then you can scale with confidence and outsmart evolving security challenges like a true master of .NET authentication!
Enjoyed this hands-on deep dive?
Subscribe (for free) for the full series. Code-heavy guides straight to your inbox.
Questions or your own JWT experiments?
Comment below or connect on LinkedIn / X. Let's master secure .NET APIs together.