Inside a JWT: Build Your Own Token from Scratch in .NET


In the last post I used an analogy about authentication being like a passport which identifies you to the resource you're trying to access.
In this post I'm going to show you how to make a JWT from scratch without using the standard .NET libraries, so you can understand how it's composed and built. I'll show you the three different parts that comprise a JWT, how they're combined and give you some code so you can build one from scratch yourself.

The structure of a JWT
A JWT is made up of three parts: The header, the payload and the signature. These are combined with dots, forming the complete token.
The header
The header is a JSON object which identifies the token as a JWT and specifies which encryption method has been used to generate the signature. In C#, you can create it by instantiating an anonymous object and JSON serialising it.
using System.Text.Json;
var header = new
{
    alg = "RS256",
    typ = "JWT"
};
var headerJson = JsonSerializer.Serialize(header);
In the header, the pair with the key typ is an optional identifier indicating the media type of the token and when present, it is almost always JWT (in upper case).
The pair with the key alg indicates the type of encryption algorithm used to sign the token. In this case, it is RS256, which means RSA encryption with SHA256 hashing.
In theory, you can put whatever you like in the JSON, but stick to standards for interoperability. Custom fields work, but libraries expect RFC claims like alg and typ for validation.
In the token, the JSON is Base 64 URL encoded. In .NET 8 and above there is a function in System.Buffers.Text to do it for you, otherwise you'll have to write your own function to do it. I'll explain that later on in the article.
using System.Buffers.Text;
var headerBytes = Encoding.UTF8.GetBytes(headerJson);
var headerEncoded = Base64Url.EncodeToString(headerBytes);
EncodeToString takes a byte[] or a ReadOnlySpan<byte> to save allocations, so you'll need to use Encoding.UTF8.GetBytes first to get a Unicode byte array from the JSON.
That'll give you something like this:
eyJhbGciOiJSUzI1NiIsInR5cCI6IkpXVCJ9The payload
The payload of the token is another JSON object which contains the claims of the user. All of the claims mentioned in RFC 7519 are optional, however in practice, most of the recommended ones are used as a matter of course. We can make one that looks like this:
var initiated = DateTimeOffset.UtcNow;
var expiring = initiated.AddHours(1);
var payload = new
{
    iat = initiated.ToUnixTimeSeconds(),
    exp = expiring.ToUnixTimeSeconds(),
    sub = Guid.NewGuid(),
    name = "Aaron Pina"
};
var payloadJson = JsonSerializer.Serialize(payload);
The iat claim defines when the token was issued (iat means "issued at"), and it's supposed to be in Unix epoch timestamp format, which is the number of seconds that have elapsed since the 1st of January 1970. If you use DateTimeOffset, there is a handy method ToUnixTimeSeconds() which can do it for you.
The exp claim defines when the token is set to expire. This is super important, because if the token never expires, it can be used to access the resource forever. If a bad actor got hold of the token, they could access the resource for as long as they like. So usually it's best to set the expiration to something short like 5-60 minutes, then require the user to request a new token (refreshing tokens will be covered in a future article).
The sub claim defines the subject and is basically something that uniquely identifies the user (usually known as the principal). As you can see, I've defined it as a Guid, but you can use whatever identifier you like. In practice, this identifier is usually used to access some cache or database to get further information about the principal for use in your application's business logic.
The name claim isn't a standard claim and I just added it to prove that you can add claims with whatever keys you like. You're not restricted to what's defined in the RFC.
Often, the payload will include the claims iss (issuer) and aud (audience), which are URLs stating which principal issued the token and for whom it is meant. The aud claim can contain a single URL or an array of URLs.
An example of iss would be "iss": "https://identity.aaronpina.com" and an example of aud would be "aud": "https://api.aaronpina.com" or "aud": ["https://api.aaronpina.com", "https://admin.aaronpina.com"]
Like the header, the payload is also Base 64 URL encoded in the same way:
var payloadBytes = Encoding.UTF8.GetBytes(payloadJson);
var payloadEncoded = Base64Url.EncodeToString(payloadBytes);
That'll give you something like this:
eyJpYXQiOjE3NjY3NTYxNDksImV4cCI6MTc2Njc1OTc0OSwic3ViIjoiMjZkZDk2YTMtNWU1Zi00Zjg3LWJkNzUtYjFkZjkzYjM3YzYzIiwibmFtZSI6IkFhcm9uIFBpbmEifQThe signature
Creating the signature is quite a straight-forward process and follows a set formula:
- Concatenate the Base 64 URL encoded header and the Base 64 URL encoded payload together with a dot. This is the input to be signed.
- Use the SHA 256 algorithm to hash the input. This is called the digest.
- Encrypt the digest with the RSA private key to create the signature.
- Base 64 URL encode the signature.
- Concatenate the input and the Base 64 URL encoded signature together with a dot to create the final JWT.
So here's how you'd create the input:
var input = $"{headerEncoded}.{payloadEncoded}";And this is what it would look like:
eyJhbGciOiJSUzI1NiIsInR5cCI6IkpXVCJ9.eyJpYXQiOjE3NjY3NTYxNDksImV4cCI6MTc2Njc1OTc0OSwic3ViIjoiMjZkZDk2YTMtNWU1Zi00Zjg3LWJkNzUtYjFkZjkzYjM3YzYzIiwibmFtZSI6IkFhcm9uIFBpbmEifQHere's how to create the hash (the digest):
using System.Security.Cryptography;
var inputBytes = Encoding.ASCII.GetBytes(input);
var hash = SHA256.HashData(inputBytes);
The input string only contains basic letters, numbers, and a few symbols (- and _). These are all plain ASCII characters, nothing fancy like accents or emojis.
We use Encoding.ASCII.GetBytes because it turns each character into exactly one byte. This matches precisely what the JWT rules expect when creating the signature.
UTF8 encoding would work too, since it handles ASCII fine, but ASCII is clearer and guarantees no surprises.
I was debating whether to explain the hashing and the padding of the hash that happens before the signing process because I wondered whether it would unnecessarily complicate a subject I'm trying to simplify as much as possible, but I concluded that omitting this information would lessen your understanding of this part of creating the signature.
Hashing turns the ASCII byte array into a number. A very long number, which is actually 32 bytes long. In decimal (base 10), it would look something like this:
104316813589066770223527894097903352620045849499908273494294026615302736940872It's best to view the number in hexadecimal (base 16), because then we can see individual bytes. It would look like something like this:
e6a13961d8c7a7056d3cd8e8e196f4385e36bb5733584d1149dd15a437d18f48That's 64 characters; 32 bytes. Now, the RSA algorithm needs a 256 byte array, so we use a padding method to do this. That's basically adding extra bytes to the 32 byte hash in a specific way to get us up to 256 bytes to be able to create the signature. In the code snippet below, you can see we're using the PKCS v1.5 padding method. It'll pad the hash like this:
00 01 then a bunch of ff (as many as needed) 00 [this is the padding]
30 31 30 0d 06 09 60 86 48 01 65 03 04 02 01 05 00 04 20 [DER sequence]
e6 a1 39 61 d8 c7 a7 05 6d 3c d8 e8 e1 96 f4 38 5e 36 bb etc [the hash]
The DER sequence is a fixed array of bytes identifying the hash as SHA256.
Okay, hopefully that enabled you to visualise what's going on. I'll continue to explain the last steps for creating the signature of the JWT.
To create the signature, we create an RSA object (which contains the public and private key) and use it to sign the digest:
using var rsa = RSA.Create(2048);
var signatureBytes = rsa.SignHash(hash, HashAlgorithmName.SHA256, RSASignaturePadding.Pkcs1);
Note the RSASignaturePadding.Pkcs1 at the end.
Lastly, you Base 64 URL encode the signature:
var signatureEncoded = Base64Url.EncodeToString(signatureBytes);And that will give you something like this:
DR8A24guebRNZqNnhBYuJcQYYUFZwcN8oqzQOEf5fIUXr1Sjh-F3NmRWMTraHsXAWZj631nf3AXPmVVFmHmMYqtBXmG98gUNFw6f5b7L-MxDxkhk6ai1UEf9SVXaNp3lLy68Zpdo3GCQLXUthiCFxu47G0cm_bSX5SQh6bO0eyHPO0BJ2bLTWmg4p4FGcPJeNZYVasj2QA-7ZL68cB2TeUQ1u1Su6eGVY54JP8rTLw0upWQMPXVoNvc--3isqd9-jriCuhQN_uXmI0EpBMszAK7jd7pnJQN_9rr7BsiTFQgC6bjFWI8vCZVi0gmm4YQWkl9QK1tGp8nzasl3lugh4AThen, finally you concatenate the input, a dot and the Base 64 URL encoded signature together and you've got your JWT:
var jwt = $"{input}.{signatureEncoded}";
Putting it together: Encoding, signing and verification
Encoding
I'm sure you've seen Base 64 encoding before as it's used quite a lot in .NET, for example for embedding images in text documents. But what actually is it?
For most systems, binary data is the default and mostly easily digested form of data. However, there are many situations where you can't just store or send binary information and plain text is a more appropriate format.
What Base 64 encoding does is transform binary data into alphanumeric text. That is A-Z, a-z, 0-9, +, / and =. This isn't actually compression and usually increases the size of the data by about 33%. However, is does ensure that data can be transmitted through text-only systems without getting corrupted.
But when we're talking about a JWT, the encoding is done using Base 64 URL encoding, not just Base 64 encoding. So what's the difference and why are we doing it this way?
As I mentioned previously, normal Base 64 encoding includes the characters +, / and = and when you try to put strings that contain those characters into a URL, it will have unexpected consequences, so with Base 64 URL encoding, the process is the same, but the + is replaced with a -, the / is replaced with a _ and the = is ignored completely.
Although it's not the only reason, that makes it easy to put a JWT in a query string, enabling you to examine the request as it comes into your API and pull the JWT from there, like this: https://api.aaronpina.com?token=long_JWT_string
Signing
First a few words on the choice of encryption. I'll be covering this in greater depth in a future article, but it's worth quickly saying here.
You may have noticed that in the examples above I've been using RSA SHA256, which is an asymmetric signing algorithm.
In distributed or public facing systems, asymmetric signing is the preferred way of signing the JWT, as you sign the token with a private key and the public key is used to validate the token. This enables stronger security, but at the cost of higher computational demands, lower speed and a larger key size.
The alternative is a symmetric key such as HMAC SHA256, which uses a single shared key and is more straight-forward and efficient, but is less secure and is therefore only suitable for internal services within a trusted environment.
The second thing to mention about signing the JWT is "why do we even bother to sign it?" Well, the answer to that question is that doing so prevents tampering.
If somebody managed to intercept your JWT and decided to use it for themselves, it is actually quite easy to decode the payload, change one of the claims and re-encode it.
However, once you concatenate the payload to the header, hash, sign and encode the result, you'll find that it doesn't match with the previous signature.
This means that once a principal issues a JWT, it's very easy to know that if that token is passed back in an authentication session, the token will have valid claims.
Verification
To verify that the JWT, the RSA object has a method which does all of the above for you:
rsa.VerifyHash(hash, signatureBytes, HashAlgorithmName.SHA256, RSASignaturePadding.Pkcs1);If you'd like to see a nice visual representation of the different parts of a JWT and a way to validate it, you can visit https://www.jwt.io/ and use the JWT decoder there.
Just pop the entire JWT into the left-hand box and it will show you the header and payload.
If you generate a public key in PEM format using the below code, and paste that into the bottom-right box, you can also verify the signature:
var publicKey = rsa.ExportRSAPublicKeyPem();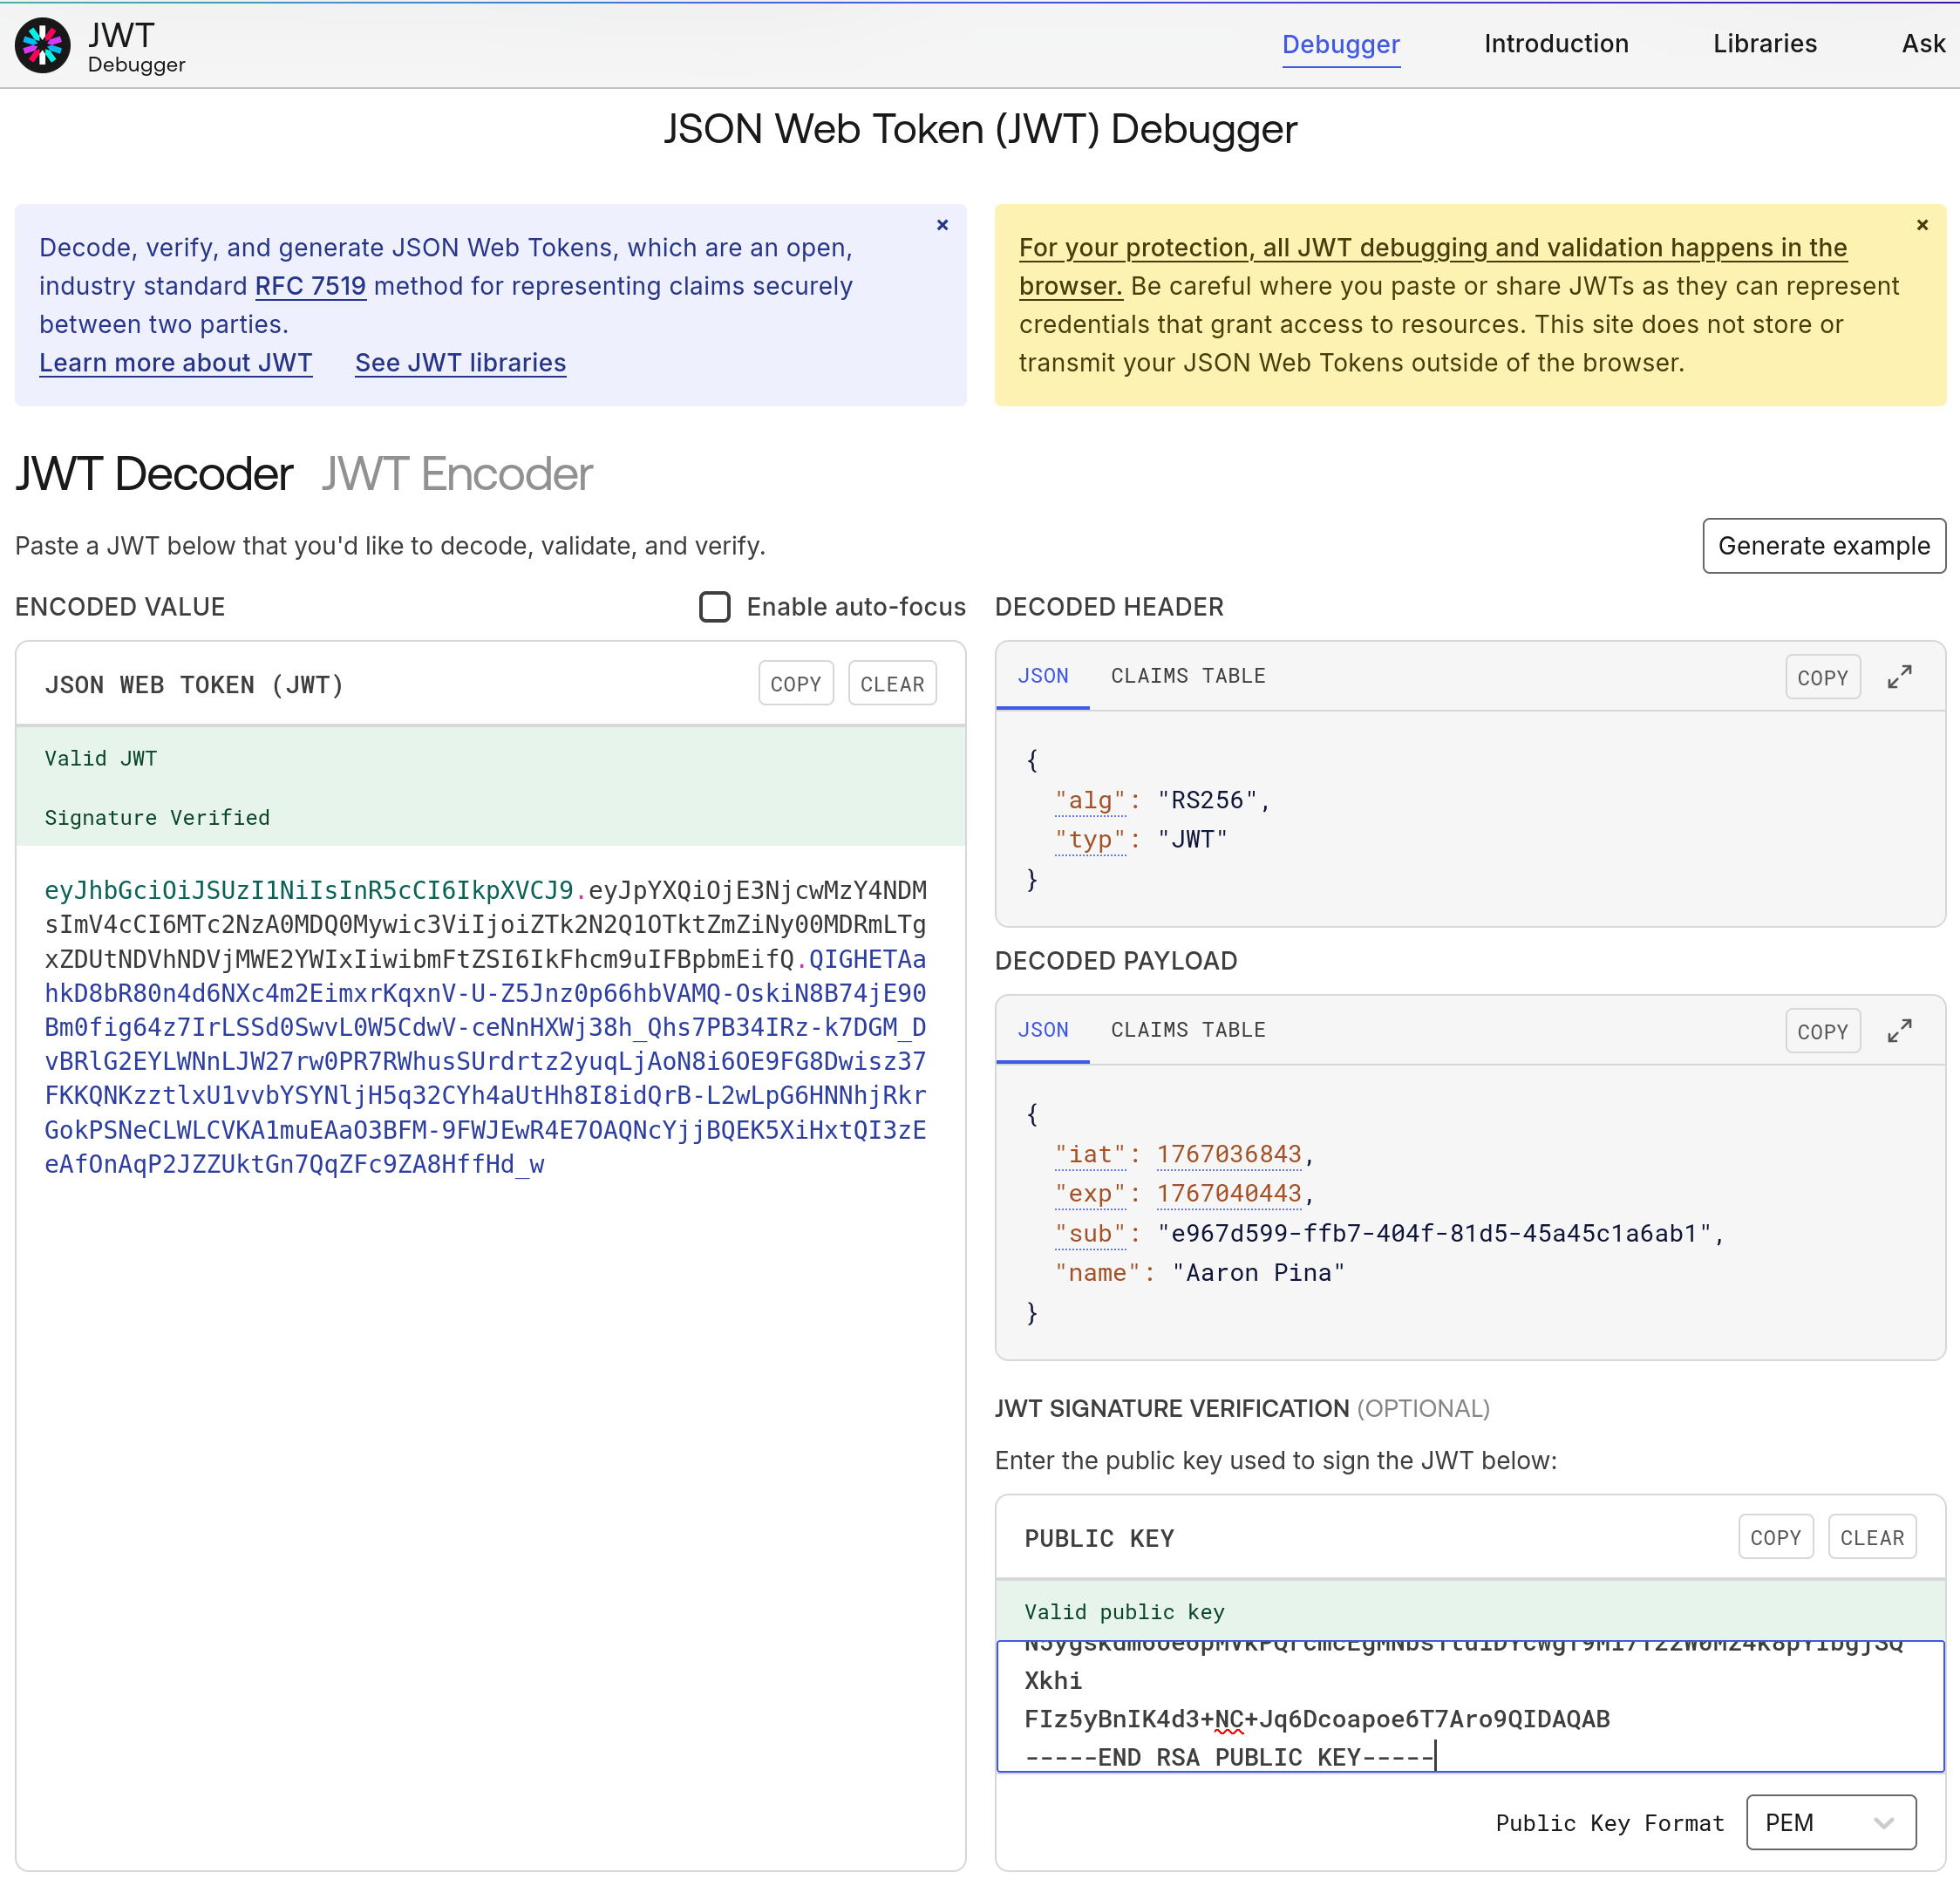
Conclusion
We've now built a JWT entirely from scratch in .NET, dissecting its header, payload, and signature, encoding each part, and seeing how the signature protects against tampering.
I've created a repository on GitHub with all the code in this article:
https://github.com/aaroncpina/Aaron.Pina.Blog.Article.02
Feel free to copy the code, run it and debug it to see what each part is doing.
Key takeaways
- The header declares the algorithm and token type.
- The payload carries your claims (identity data), including essentials like issuance and expiry.
- Base 64 URL encoding makes the parts URL safe, while the signature ensures integrity.
- Changing anything invalidates the token. The security is in the design.
This foundation is crucial for real .NET APIs. However in production, we should always use Microsoft's libraries. I'll cover why next time.
Next post: Validating JWTs securely with AddJwtBearer, including common pitfalls and best practices.
Enjoyed this hands-on deep dive?
Subscribe (for free) for the full series. Code-heavy guides straight to your inbox.
Questions or your own JWT experiments?
Comment below or connect on LinkedIn / X. Let's master secure .NET APIs together.