JWT Authentication in .NET: Creating an OAuth 2.0 Compatible Token Endpoint


Although this blog is focused on the role of JWTs in .NET APIs, when you begin to make a concerted study of the subject, you discover that JWTs are actually part of a wider authentication landscape. They're a central component of OAuth 2.0 and the proposed OAuth 2.1 specification.
Up to now, I've deliberately taken an independent path, explaining JWTs and writing code without specifically adhering to the OAuth specification. I've mentioned throughout, "this comes from OAuth, this comes from OIDC" but not implemented the code exactly as specified in these protocols. My goal was to make it easier for you to understand the core concepts around JWT authentication before bringing in the full standards.
In this article, I'll give a brief overview of OAuth. Then I'll explain the various flows described in the OAuth 2.0 specification and what's changed in the OAuth 2.1 proposal. I'll talk about how our current authentication API matches and diverges from the specification. Then we'll refactor the code to more closely align with OAuth, so that the API finally ends up looking more like the real thing.

What is OAuth really?
OAuth is basically a way to delegate access to resources.
If you look at the definition of "to delegate", the dictionary says:
to give a particular job, duty, right, etc. to someone else so that they do it for you.
In OAuth 2.0, there are four flows (four ways) of doing this. The primary one we've been using in our demo repository is the Client Credentials grant. This is a machine-to-machine flow which involves credentials and tokens.
Client Credentials Grant
If you look at the code for this series of articles, we've basically created three APIs which have relationships to each other:
- The "Other" API, which is a resource API with a protected
/userendpoint. In our case it doesn't have any special information, it's just getting the user data from the authentication session and displaying it. - The "Server" API, which is the authorisation API. The "Other" API trusts the "Server" API to allow or deny access to its resources when third parties request them. So the "Other" API is trusting the "Server" API to authenticate clients and authorise access.
- The "Client" API, which in our case, is part of our family of APIs, but in reality could be an external service which is registered with the "Server" API.
The fact that we have a registered user means that at some point the system has ascertained that the user is trustworthy. For the purposes of this demo we’re faking that with a simple /register endpoint on the Server API.
However, in real machine-to-machine authorisation there is no actual human user. Our registered user is a managed identity that owns the resources in the system and is delegating access to the Client API.
The Server API simply certifies that delegation by issuing the JWT.
We currently haven't implemented the client credentials grant in the proper way. We've made a simplified version of it. But basically, the way it works is:
- The "Client" API is pre-registered with the "Server" API. The "Client" API has a credential (a client id and a client secret) which has been given to it.
- The "Client" API sends its credentials to the "Server" API. The server has a record of the "Client" API's client id and a hash of its client secret. It hashes the provided client secret, compares it with the one it has stored and if they match, it creates a JWT and sends it back in the response.
- The "Client" API then sends the JWT with its request to the "Other" API, which validates it using the public key from the "Server" JWKS endpoint. If the JWT proves to be valid, it allows access to its resources.
Note, that I'm deliberately not providing flow diagrams for these descriptions of the OAuth flows. Whenever I tell people that I'm writing a blog about authentication, they always say "Good, that's a great idea because I can never understand those complicated flow diagrams", so I'm going to explain them verbally with examples instead.
If you still struggle to understand, let me know in the messages below and I'll think about how I can try to explain them even better than I'm currently doing.
Refresh Token Grant
This is actually an optional part of the OAuth 2.0 specification, but is formally accepted as an actual grant type in the OAuth 2.1 specification. OAuth 2.1 is still at the time of writing only a draft specification, but is already widely accepted and implemented despite that.
I've already written two entire articles about refresh tokens. If you want a deep dive, you can refer to those articles:
- Refresh Tokens Done Right: Avoid Common JWT Pitfalls in .NET
- JWT Refresh Tokens Done Right: Proactive Background Refresh + Rotation + Sliding Expiry in ASP.NET Core
It's entirely possible to use the client credentials grant every time you want to get a new access token. However, the use of client id and secret is inherently risky. So, it's best only to use credentials for the initial contact between the third party API and the authorisation API. Thereafter, one can use the refresh token grant to acquire a new access token.
To decrease security risks, the JWT access token that is subsequently used for access to resources is short lived (a matter of minutes only). To facilitate the easy renewal of access tokens, a longer-lived refresh token is sent with each access token in the response. This refresh token can then be sent to the authorisation server to acquire a new access token.
Authorisation Code Grant
We haven't touched this flow at all because it's used entirely for scenarios when an actual human is in the loop.
If we use Google as an example, they have several different services that you have access to, such as Gmail, Google Maps, Google Calendar, YouTube, etc.
Let's also consider some hypothetical AI website that you can sign up for which has the functionality of being your "AI personal assistant". It can read your emails and reply to important messages using guidelines that you define for it.
When you configure your AI personal assistant, you need to give it permission to access the emails in your Gmail account. This is the delegated access.
Google has a centralised authorisation server which all of its services trust to be an authority. It allows or denies access to the protected resources (mail for Gmail, videos for YouTube, etc) that they deliver.
The way it would work in this example, is:
- You click on a button in the AI personal assistant website which says "Get read and write access to Gmail".
- The website redirects your browser to Google's authorisation server, which shows you a login page asking you to enter your username and password.
- You log in, proving who you are and then Google redirects your browser back to the AI personal assistant website with a temporary authorisation code.
- The website sends the authorisation code to Google's token endpoint (without needing the user's involvement) and that returns an access token (a JWT).
- The JWT has scopes which say: "You can read and write the user's emails". I'll explain what they actually look like later in the article.
- The AI personal assistant website then sends a request to the Gmail API and gives it the JWT.
- Gmail checks that the token is valid and gives the website access to your emails.
You've probably done something similar to this yourself hundreds of times and didn't even know you were using OAuth. But this flow is the most common use of OAuth 2.0.
The other grant types
There are two other flows:
- Implicit Grant.
- Resource Owner Password Credentials Grant.
Although these are defined in the OAuth 2.0 specification, they're both made obsolete in the OAuth 2.1 specification. So for that reason, you don't need to know about them.
In the next section of this article, I'm going to explain how the Client Credentials grant and the Refresh Token grant are defined in OAuth 2.0 and 2.1 and how that differs from the code we've actually written so far.
Then, with the aim of understanding how to closer match the specifications, I'll refactor the code so that it is more standardised.

How our demo server code compares to the OAuth specification
I took the demo code from the audience validation article, copied it and modified it to match the snippets in this article, so if you would like to look at the finished code modifications, you can clone this repository from GitHub and refer to it:
https://github.com/aaroncpina/Aaron.Pina.Blog.Article.11
Previously, on the "Server" API, we had three endpoints: /register, /token and /refresh. We'll leave /register as it is for now, but I plan to do some more refactoring on that in the next article.
The /token endpoint currently has this signature:
app.MapGet("/token", async
    (IOptionsSnapshot<TokenConfig> config,
     JwksKeyManager keyManager,
     TokenRepository tokenRepo,
     UserRepository userRepo,
     string audience,
     Guid userId) =>
    {
        ...
        return Results.Ok(response);
    })
   .AllowAnonymous();
Notice that we have an audience parameter, so the client can specify which API they want the JWT to refer to. The endpoint also takes a userId which represents a client identifier. In the next article, we'll change this, but for now we can let it remain.
The /refresh endpoint currently has this signature:
app.MapPost("/refresh", async
    (IOptionsSnapshot<TokenConfig> config,
     JwksKeyManager keyManager,
     TokenRepository tokenRepo,
     UserRepository userRepo,
     HttpContext context) =>
    {
        ...
        return Results.Ok(response);
    })
   .AllowAnonymous();
It receives the same services and configuration from dependency injection, plus the HttpContext (which represents the HTTP request, response and the user session). In this case, we're using the HttpContext to examine the request and get the refresh token from the form field.
In RFC 6749 (the OAuth 2.0 specification), tokens and refresh tokens aren't actually defined as coming from two separate endpoints. This is what it says:
- All tokens are accessed from the
/tokenendpoint. The type of operation is defined by sending agrant_typeparameter such asrefresh_tokenorclient_credentials. - The endpoint should be POST and use the
application/x-www-form-urlencodedformat. - Parameters should be in snake-case, like
this_type_of_parameter.
So that gives us an idea of what we need to do to start refactoring the code.

Refactoring the demo server code to match the OAuth specification
The first (easy) task is to change the /token endpoint to be POST.
Then we need to merge the /refresh endpoint into the /token endpoint.
However, the code for both of those endpoints was already quite chunky, so I think we should create a service and copy the code into that. I'll call it the TokenService:
public class TokenService(
    UserRepository userRepo,
    TokenRepository tokenRepo,
    JwksKeyManager keyManager,
    IOptionsSnapshot<TokenConfig> config)
{
    public async Task<TokenResult> HandleAccessTokenRequestAsync(Guid? userId, string? scope)
    {
        ... // copied code
    }

        public async Task<TokenResult> HandleRefreshTokenRequestAsync(string? refreshToken)
    {
       ... // copied code
    }
You can see the same repositories, service and configuration are copied into the service's constructor from the endpoints. That enables us to allow dependency injection to do its thing and give us the instances we require.
It's added it as a scoped service, so a new TokenService is created for each request:
builder.Services.AddScoped<TokenService>();I'll show you what the /token endpoint looks like after the refactoring and explain that. Then we'll come back to the TokenService and explain the changes that it was necessary to make there. This is the new /token endpoint:
app.MapPost("/token", async
   ([FromForm(Name = "refresh_token")] string? refreshToken,
    [FromForm(Name = "grant_type")] string grantType,
    [FromForm(Name = "client_id")] Guid? userId,
    [FromForm(Name = "scope")] string? scope,
    TokenService tokenService) =>
    {
        if (string.IsNullOrEmpty(grantType)) return Results.BadRequest("invalid_grant");
        var result = grantType switch
        {
            "client_credentials" => await tokenService.HandleAccessTokenRequestAsync(userId, scope),
            "refresh_token"      => await tokenService.HandleRefreshTokenRequestAsync(refreshToken),
            _                    => await Task.FromResult(TokenResult.Fail("invalid_grant"))
        };
        if (result.IsSuccess) return Results.Ok(result.Tokens);
        return Results.BadRequest(result.Error);
    })
   .DisableAntiforgery()
   .AllowAnonymous();
We changed it to a POST endpoint. As you can see, all parameters are now in snake-case and are now coming from the form, as I described in points 2 and 3, above.
However, when you instruct ASP.NET Core to get form data, it automatically adds an Anti-forgery service to the pipeline, which will cause us problems. That service is only really relevant when you're accepting requests from a browser. Since we're making machine-to-machine calls, we don't need it, so I added .DisableAntiForgery() to the endpoint.
We need a grant_type parameter, because that's what tells us whether we're supposed to run the client_credentials flow or the refresh_token flow.
We're accepting refresh_token as a nullable string, because it may or may not be required, depending which flow we're following. The same goes for the client_id, which we're still sending as the userId for now.
What is missing from the previous implementation is the audience. It has been replaced by a scope parameter. You may have noticed that the audience was swapped for a scope in the TokenService.HandleAccessTokenRequestAsync function too.
So, what is going on?

Audiences and Scopes
As we discovered two articles ago, the audience represents the API from which we want to access the protected data. In our demo code, it's usually the "Other" API.
However, OAuth combines the concept of an audience with the permissions that we want to have on the audience API. These are called the scopes. The OAuth 2.0 specification leaves this somewhat to interpretation, but by consensus, they're usually defined like this:
other-api.read other-api.writeSo that's two scopes, both for the "Other" API, with other-api defined as the audience. The permissions that we want to use in our request to the API are read and write.
Since we're not really bothered right now what permissions the client wants, we'll just ignore them for now. However, we still want to extract the audience because we need to set that in the JWT. To facilitate that, I've written a small helper class:
public static class AudienceExtractor
{
    public static bool TryExtractAudience(string scope, out string audience)
    {
        audience = string.Empty;
        if (string.IsNullOrEmpty(scope)) return false;
        var scopes = scope.Split(' ', RemoveEmptyEntries | TrimEntries);
        var audiences = scopes.Select(s => s.Split('.', 2))
                              .Where(p => p.Length == 2)
                              .Select(p => p.First())
                              .Distinct(StringComparer.Ordinal)
                              .ToList();
        if (audiences.Count != 1) return false;
        audience = audiences.Single();
        return true;
    }
}
Scopes are passed to the POST form separated by a white-space character, as I showed above, so we split them by a white-space.
Then we split each scope by a dot, which gives us an IEnumerable<string[]>, where the string[] is a maximum of two elements in length.
Since we know that the first element is the audience, we select that and then make a list of all the distinct audiences in the scope.
If there's only one audience, audiences will be a list with one item in it. In theory, we can ask for scopes for multiple audiences, but to make our API's as secure as possible, scopes should be limited to one audience only.
If we follow the happy path, the helper will return true to indicate success and set the audience out parameter to "other-api".
So that explains everything in the code for the /token endpoint except the object that's returned from the default (_) case in the switch expression.
In the default case, it's setting the result variable as a TokenResult.Fail.
But what is that?

Explaining the TokenResult class
I'll show you what a TokenResult is and why we're using it:
public record TokenResult
{
    public TokenResponse? Tokens { get; init; }
    public string?        Error  { get; init; }

    public bool           IsSuccess => Error is null;

    public static TokenResult Success(TokenResponse tokens) =>
        new() { Tokens = tokens };

    public static TokenResult Fail(string error) =>
        new() { Error = error };
}
A TokenResult is basically a very simple Result object which represents either a success or failure state, each of which has a type. It's quite similar to a discriminated union, if you're familiar with the concept from F# or other functional programming languages.
Since in the happy path for both the /token and /refresh endpoints we were returning a TokenResponse object, that's our success state. If there was some kind of validation problem, we were returning a string error message, so we'll use that as our failure state.
This is the reason we're using a TokenResult: In the previous code, all the logic for validating and creating tokens was in the scope of the endpoints themselves. That meant we could just return an IResult return type like Result.NotFound or a Result.BadResult. Those helpers set the correct response status codes and message or value for you.
But when we shifted this logic to the TokenService, we can't do that anymore. So now, we just need to indicate success (with a TokenResponse) or failure (with a string error message).
Then we map that result to an IResult when it reaches the endpoint scope.
Just as a side-note: I actually wrote and maintain a more generalised and feature-rich results library called QuickResult on Nuget if you want to check it out.

The TokenService revisited
So, now we've simplified and standardised the /token endpoint, let's look at the TokenService again. First the HandleAccessTokenRequestAsync function:
public async Task<TokenResult> HandleAccessTokenRequestAsync(Guid? userId, string? scope)
{
    if (userId is null) return TokenResult.Fail("User id is required");
    if (string.IsNullOrEmpty(scope)) return TokenResult.Fail("Scope is required");
    if (!AudienceExtractor.TryExtractAudience(scope, out var audience)) return TokenResult.Fail("Invalid scope");
    if (!Api.IsValidTarget(audience)) return TokenResult.Fail("Invalid audience");
    var token = tokenRepo.TryGetTokenByUserIdAndAudience(userId.Value, audience);
    if (token is not null) return TokenResult.Fail("An active token exists for this audience");
    var user = userRepo.TryGetUserById(userId.Value);
    if (user is null) return TokenResult.Fail("Invalid user id");
    var jti = Guid.NewGuid();
    var now = DateTime.UtcNow;
    var signingKey = await keyManager.GetOrCreateSigningKeyAsync();
    var refreshToken = TokenGenerator.GenerateRefreshToken();
    var accessToken = TokenGenerator.GenerateToken(
        signingKey, jti, userId.Value, user.Role, audience, scope, now, config.Value.AccessTokenLifetime);
    var response = new TokenResponse(
        jti, accessToken, refreshToken, config.Value.AccessTokenLifetime.TotalMinutes);
    tokenRepo.SaveToken(new TokenEntity
    {
        RefreshTokenExpiresAt = now.Add(config.Value.RefreshTokenLifetime),
        RefreshToken = refreshToken,
        UserId = userId.Value,
        Audience = audience,
        CreatedAt = now,
        Scope = scope
    });
    return TokenResult.Success(response);
}
If you compare it to the previous version of the code, there are five changes:
- We're validating that the
userIdandscopehave actually been set, because we'll need them to generate the JWT. - Anywhere we returned a
Results.BadRequestwith a message, we now return aTokenResult.Failwith the same message. At the end of the function where we returned aResults.Ok<TokenResponse>, now we return aTokenResult.Success. - We use the
AudienceExtractorto extract theaudiencefrom the scope. - We pass the
scopeto theTokenGeneratorso that the recipient of the JWT now knows what permissions have been delegated to the client. - We're saving the
scopeto the database. The reason for this is that when we accept a refresh token, we grab all the claims for the new access token from the database. So, now that we're adding the scope to the JWT, we need to save that in the database alongside the refresh token.
I will show you the HandleRefreshTokenRequestAsync, but it's just copy-pasted from the previous version with the same changes made as above:
public async Task<TokenResult> HandleRefreshTokenRequestAsync(string? refreshToken)
{
    if (string.IsNullOrEmpty(refreshToken)) return TokenResult.Fail("Refresh token is required");
    var token = tokenRepo.TryGetTokenByRefreshToken(refreshToken);
    if (token is null) return TokenResult.Fail("Invalid refresh token");
    if (token.RefreshTokenExpiresAt < DateTime.UtcNow) return TokenResult.Fail("Refresh token has expired");
    var user = userRepo.TryGetUserById(token.UserId);
    if (user is null) return TokenResult.Fail("Invalid user id");
    var jti = Guid.NewGuid();
    var now = DateTime.UtcNow;
    var signingKey = await keyManager.GetOrCreateSigningKeyAsync();
    var newRefreshToken = TokenGenerator.GenerateRefreshToken();
    var accessToken = TokenGenerator.GenerateToken(
        signingKey, jti, token.UserId, user.Role, token.Audience, token.Scope, now, config.Value.AccessTokenLifetime);
    var response = new TokenResponse(
        jti, accessToken, newRefreshToken, config.Value.AccessTokenLifetime.TotalMinutes);
    token.RefreshTokenExpiresAt = now.Add(config.Value.RefreshTokenLifetime);
    token.RefreshToken = newRefreshToken;
    tokenRepo.UpdateToken(token);
    return TokenResult.Success(response);
}
Although it should be obviously what changed, I'll also show you the addition to the TokenEntity that we are using to store the refresh token data in the database:
public class TokenEntity
{
    public Guid     Id                    { get; init; } = Guid.NewGuid();
    public Guid     UserId                { get; init; }
    public string   Audience              { get; init; } = string.Empty;
    public string   Scope                 { get; init; } = string.Empty;
    public DateTime CreatedAt             { get; init; }
    public string   RefreshToken          { get; set;  } = string.Empty;
    public DateTime RefreshTokenExpiresAt { get; set;  }
}
You can see the addition of the Scope property.
Of course, some small changes to the "Client" API will also be required, but I'll leave those as an exercise for you to do. Instead, I'll go on to show you some screenshots of me testing the "Server" API endpoints using CURL.

Testing the consolidated endpoints
Normally, I show each step of the testing process one screenshot per time, but you've seen all of the steps we're going to take before, so I'll condense it into one screenshot:
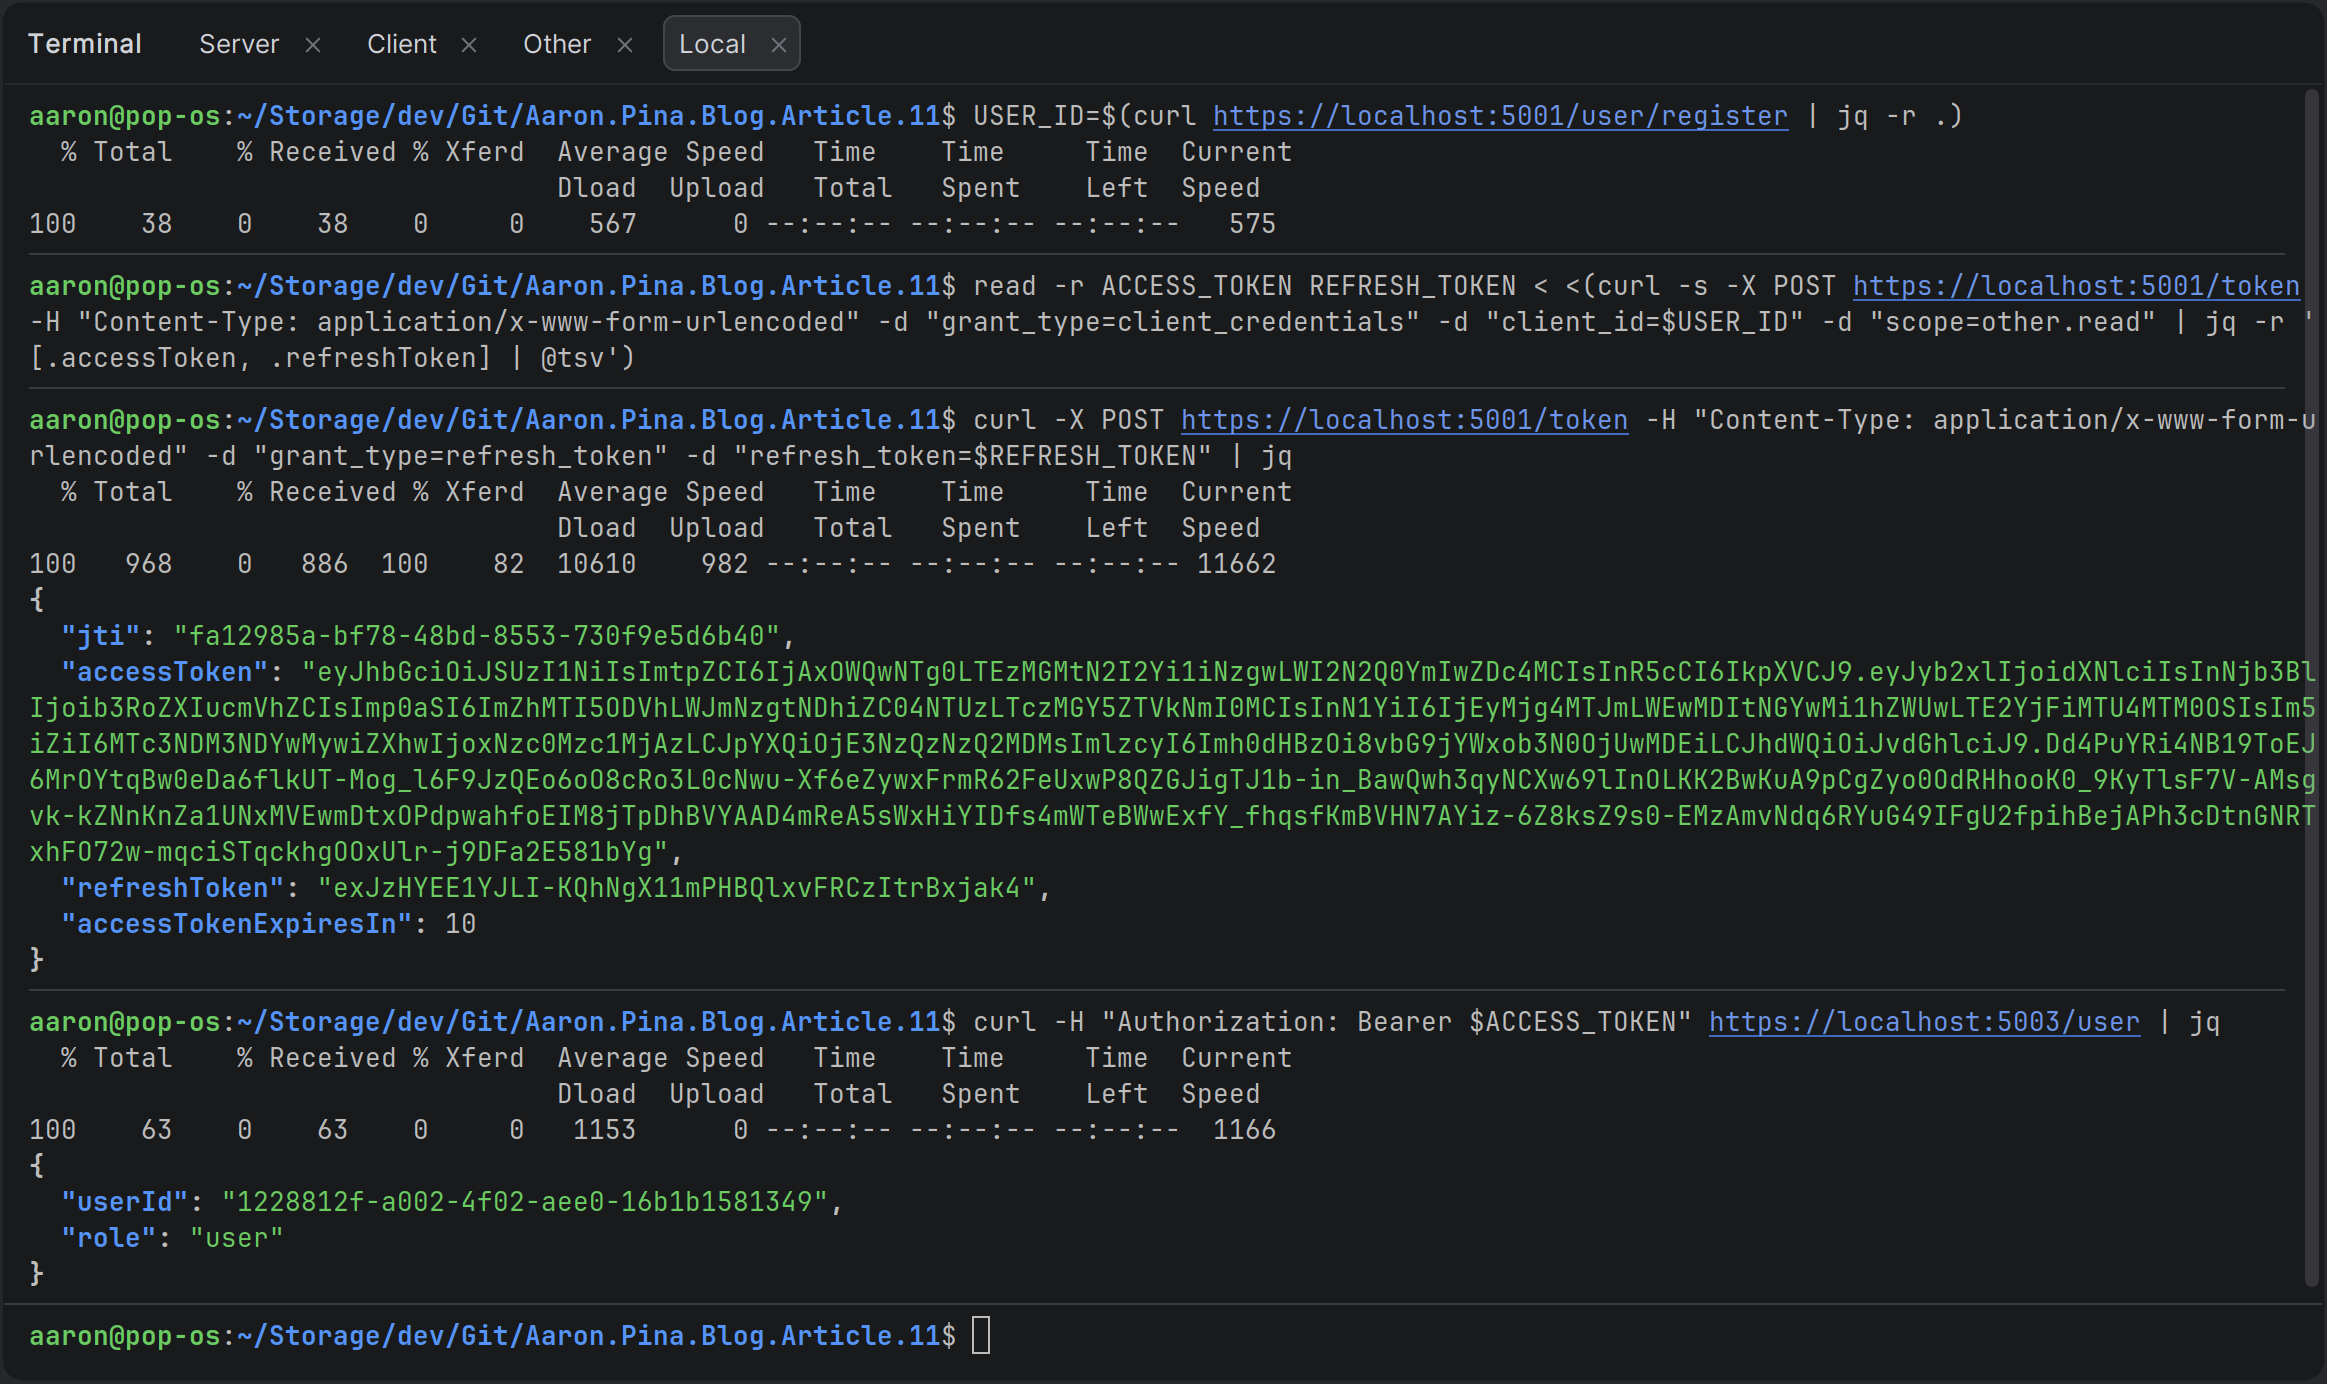
All we've done is changed the /token endpoint from GET to POST, so we use -X POST in CURL to make that distinction.
We're saving the result of the request to the /register endpoint to a USER_ID variable.
We pass the USER_ID into the request to the /token endpoint, making sure to specify form URL encoding and to pass the grant_type and scope.
Then we save the accessToken and refreshToken from the JSON response into the variables ACCESS_TOKEN and REFRESH_TOKEN respectively.
We call the /token endpoint the same way, but this time, we pass refresh_token as the grant_type parameter. We also pass the actual refresh token from the REFRESH_TOKEN variable, which as you can see, returns a JSON representation of the new TokenResponse.
Lastly, we call the /user endpoint on the "Other" API, passing the access token via the ACCESS_TOKEN variable. We successfully get the userId and role back.
So, everything is still working as it was before the refactoring.
Copy and paste CURL commands
Here are the actual BASH / CURL commands that you can copy and paste if you want to test it yourself:
USER_ID=$(curl https://localhost:5001/user/register | jq -r .)read -r ACCESS_TOKEN REFRESH_TOKEN < <(curl -s -X POST https://localhost:5001/token -H "Content-Type: application/x-www-form-urlencoded" -d "grant_type=client_credentials" -d "client_id=$USER_ID" -d "scope=other.read" | jq -r '[.accessToken, .refreshToken] | @tsv')curl -X POST https://localhost:5001/token -H "Content-Type: application/x-www-form-urlencoded" -d "grant_type=refresh_token" -d "refresh_token=$REFRESH_TOKEN" | jqcurl -H "Authorization: Bearer $ACCESS_TOKEN" https://localhost:5003/user | jqSo it looks like everything's working fine! Now we're more or less in line with the OAuth 2.0 specification.
Conclusion
We’ve now taken our custom JWT authentication server from “works for our demo” to “actually looks and behaves like a real OAuth 2.0 token endpoint.” By consolidating everything into a single /token endpoint that respects grant_type, snake_case form parameters, and the official scope convention, we’ve moved significantly closer to the industry standard without adding unnecessary complexity.
The foundation is now solid for the next steps. In the next article we’ll finally tackle proper client registration with client_id and client_secret, start exploring the Authorization Code flow (with PKCE), and begin the transition toward full OpenID Connect support. Until then, you have a clean, working, OAuth-aligned token endpoint that you can start using in real projects today.
Key Takeaways
- OAuth 2.0 is fundamentally about delegated, scoped, and time-limited access rather than sharing credentials.
- A single
/tokenendpoint that works ongrant_typeis the standard way to handle bothclient_credentialsandrefresh_tokenflows. - We replaced custom parameters like
audiencewith the officialscopeparameter and extracted theaudiencefrom it using the commonaudience.permissionconvention. - Always include the granted
scopein the JWTscopeclaim and persist it with the refresh token so new access tokens remain consistent. - Use a simple
TokenResult(or similar result object) when moving validation logic out of Minimal API endpoints: It keeps the handlers thin and the service clean. - You can get surprisingly close to a production-grade OAuth server with very little code once you follow the spec on the token endpoint.
Enjoyed this hands-on deep dive?
Subscribe (for free) for the full series. Code-heavy guides straight to your inbox.
Questions or your own JWT experiments?
Comment below or connect on LinkedIn / X. Let's master secure .NET APIs together.