Revoke JWTs in .NET: Stop Stolen Tokens Dead with Simple Code


In the last article, we finished the topic we started in the article before last, which was refreshing tokens.
We're developing API's that use JWT (JSON Web Tokens) as access tokens to provide a secure, self-contained way of authenticating using a compact URL-friendly format.
All the code in this article is an extension of what we've been building over the last few articles. I'll only be explaining the changes that have been made. You can follow along and type the code into your current implementation yourself, or you can clone the whole finished repository from GitHub. You can find it here:
https://github.com/aaroncpina/Aaron.Pina.Blog.Article.06
As we saw, access tokens only have a limited lifetime. This is a security measure to limit the ability of bad actors to access your protected resources should they intercept your requests and steal the token.
To avoid having to log in with credentials (username and password) every 15-60 minutes (which is the normal lifetime of an access token), we send a refresh token with a long lifetime in the same response with the access token.
That way, we can send the refresh token to the appropriate server API endpoint. The server checks that the refresh token is valid and responds with a new access token and a new refresh token.
This is a very easy and secure way to protect your resources. However, even if your access tokens only have a fifteen minute lifetime, if someone steals them, the thieves still potentially have the ability to access your protected resources for those fifteen minutes.
So are there any further measures we can take to limit the potential damage done by a compromised access token?
The answer is "Yes".
We can revoke the token. I'll show you how in this article.

The token blacklist
The way we revoke tokens is by putting them on a blacklist. After the authentication handler has parsed the token, we hook into the handler and check if the token is on our blacklist. If it is, it's an easy process to fail authentication and return a 401.
The code is really simple. I'll go over it below. I want to talk about how we're going to do it and the additional changes we're going to have to make to do it right.
Using a JTI claim
The first thing we're not going to do is store the entire JWT in the blacklist. Depending on what claims you have in the token's payload, you could end up with quite a long string! Even if you hash it, it's still going to be an unwieldy chunk of data.
So, what we're going to do is create a JTI (meaning JWT ID) claim and add it to every JWT that we create. In the JWT RFC, the JTI claim is specified as optional, but it is the recommended way of identifying the JWT. The specification says:
The identifier value MUST be assigned in a manner that ensures that there is a negligible probability that the same value will be accidentally assigned to a different data object.
So we're going to use a Guid, which is almost guaranteed to be a unique value.

How to store the blacklisted access tokens
There are two good ways of storing and accessing the JTI's that we add to the blacklist.
- Creating a database table.
- Using a cache.
Using a database could be a good idea. We already have our SQLite database set up to store tokens. However, thinking ahead, we're going to want to clean expired tokens from the blacklist. To do that with a database table is going to require another background service and I don't want to overcomplicate things.
So, we're going to use a cache. Specifically, Redis.
Redis is very fast and if we set the record to expire at the same time the JWT is due to expire, the record will automatically be purged, saving us from having to do it manually with a background service.
We have two options to install Redis.
- Install the whole thing.
- Use a Docker container.
In my opinion, both are good options. On my local machine, I have a full Redis install, however, I think you, Dear Reader, are more likely to have Docker installed because it's almost impossible to be a developer nowadays without having some exposure to containerisation (and therefore Docker).
It's easy to pull a Redis image from Docker Hub, spin it up, use it and tear it down again with just a couple of CLI commands. Obviously we could go more in-depth and start creating Docker compose files and stuff, but for now let's keep it simple.
So, download and install Docker for whatever operating system you have. To spin up Redis, use this CLI command:
docker run --name redis-blacklist -p 6379:6379 -d redisAnd when you want to tear it down, use:
docker stop redis-blacklist
Writing the code
To use Redis in our server API, we need to do three things. Firstly, add the Nuget package:
Microsoft.Extensions.Caching.StackExchangeRedis v10.X.X
Secondly, add this to the Configuration static class:
public static class RedisCache
{
    public static void Options(RedisCacheOptions options)
    {
        options.Configuration = "localhost:6379";
        options.InstanceName = "redis-blacklist";
    }
}
And lastly, in the Program.cs, add the cache to the service collection:
builder.Services.AddStackExchangeRedisCache(Configuration.RedisCache.Options);I'll show you the request object we're going to be sending to the /blacklist endpoint:
public record BlacklistRequest(Guid Jti, double AccessTokenExpiresIn);Like I said, JTI is implemented as a Guid for uniqueness. To avoid potential DateTime formatting and deserialisation issues, we're going to take an AccessTokenExpiresIn value that represents how long it is, in seconds before the JWT expires.
Then we can write the new endpoint:
app.MapPost("/blacklist", async (IDistributedCache blacklist, BlacklistRequest request) =>
    {
        var expires = DateTimeOffset.UtcNow.AddSeconds(request.AccessTokenExpiresIn);
        if (expires < DateTimeOffset.UtcNow) return Results.BadRequest("Token already expired");
        await blacklist.SetStringAsync(request.Jti.ToString(), "revoked", new DistributedCacheEntryOptions
        {
            AbsoluteExpiration = expires
        });
        return Results.Ok();
    })
   .RequireAuthorization("admin");
Just to explain what's going on:
- The endpoint is routed to
/blacklistand it's a POST request. The reason being that we're sending aBlacklistRequestDTO to it as JSON in the request body. ASP.NET will automatically deserialise it from JSON into aBlacklistRequestfor you. - We're requesting an
IDistributedCachefrom dependency injection. This is the instantiation of the Redis cache service. - We validate that the token hasn't already expired. If it has, there's no point in blacklisting it.
- Otherwise, we store the JTI as the key and
"revoked"as the value for the cache record. Really, we only care about storing the JTI, but since Redis is a key-value store, we have to put something in there as a value. - We also store when the JWT expiry date, because as I said before, Redis will automatically purge records that pass their expiration date.
The last thing to do is to hook into one of the events called by the JwtBearerHandler.HandleAuthenticateAsync() function in the ASP.NET authentication middleware to fail any request to a protected endpoint if the JWT being used to access it has been revoked.
We can do that in the JwtBearerOptions that we pass to AddJwtBearer when we set up authentication. I'll omit the TokenValidationParameters stuff you've seen before:
public static Action<JwtBearerOptions> Options(RSA rsa) =>
    options =>
    {
        options.MapInboundClaims = false;
        options.TokenValidationParameters = new() { ... };
        options.Events = new JwtBearerEvents
        {
            OnTokenValidated = async context =>
            {
                var jti = context.Principal?.FindFirstValue("jti");
                if (string.IsNullOrEmpty(jti)) return;
                var services = context.HttpContext.RequestServices;
                var blacklist = services.GetRequiredService<IDistributedCache>();
                var val = await blacklist.GetStringAsync(jti);
                if (val != "revoked") return;
                context.Fail("Token has been invalidated");
                var logger = services.GetRequiredService<ILogger<Program>>();
                logger.LogWarning("Token {Jti} has been invalidated", jti);
            }
        };
    };
There are several events you can hook into during HandleAuthenticateAsync; I've seen Anton use OnMessageReceived for this purpose, but that event is called just after the request is received and none of the data that you might be expecting to find and use is yet confirmed to be there.
So, I prefer to hook into the OnTokenValidated event, because at that point, all the validation is done and the important claims have been extracted from the token payload.
So what are we doing in the code?
- We grab the JTI from the claims. I know I've not even shown you the code where we put the JTI in the token yet, but bear with me; I'll show you that below.
- After making sure that the JTI actually has a value, we request the Redis instance from dependency injection.
- We check if the JTI for this JWT is present in the blacklist.
- If the record does exist in Redis, it means the JWT is on the blacklist and we need to ensure that a 401 is returned.
- So, we call
Failon theTokenValidatedContext, which sets theAuthenticationResult. That causes theAuthenticationMiddlewareto return the required response code. By the way, if you don't know what these things are, they're the internal implementations of the authentication and authorisation system. I intend to do a deep-dive into these internal algorithms in a future article, so subscribe to get the article sent to your email when I publish it! - We get a logger from dependency injection and log a warning message saying that authentication failed. I'll show that later when we test the API.

Adding more claims to the JWT
As I already said, we need to add the JTI to the JWT so we have an ID for each access token. Then we can use that ID to blacklist a token if we desire. We also need to add a role claim to the token to identify whether the it belongs to a normal user or an admin user.
So, we just create a Guid:
var jti = Guid.NewGuid();And we modify the TokenGenerator.GenerateToken function to accept it and the role:
public static string GenerateToken(RsaSecurityKey rsaKey, Guid jti, Guid userId, string role, DateTime now, double expiresIn)
{
    var tokenDescriptor = new SecurityTokenDescriptor
    {
        IssuedAt = now,
        Issuer = "https://localhost",
        Audience = "https://localhost",
        Expires = now.AddMinutes(expiresIn),
        Subject = new ClaimsIdentity([
            new Claim("role", role),
            new Claim("jti", jti.ToString()),
            new Claim("sub", userId.ToString())
        ]),
        SigningCredentials = new SigningCredentials(rsaKey, SecurityAlgorithms.RsaSha256)
    };
    var handler = new JwtSecurityTokenHandler();
    var token = handler.CreateToken(tokenDescriptor);
    return handler.WriteToken(token);
}
And that's really it.
In theory, you can stop reading right now and you'll understand everything you need to know to revoke a JWT:
- Create a cache to store the JTI's of access tokens you want to revoke.
- Create a mechanism to do so. In our case it's the
/blacklistendpoint. - Read the access token (the JWT) during the authentication of a request.
- Extract the JTI from the JWT claims and check if it's in the cache.
- If it is, fail the authentication of the request.
I'm going to proceed to show you the full changes to the /token and /refresh endpoints now, however, before I do so, there's one more thing to mention.
At the bottom of the /blacklist endpoint definition, we've used the RequireAuthorization(); extension, as we've seen before. It protects the endpoint by requiring a JWT to be passed in the header of the request, thus enforcing authentication. But this time, there isn't an empty string. Now it's RequireAuthorization("admin");
Why have we added "admin"? What does that mean?

Authorisation
Firstly, if you've not seen Anton Wieslander's YouTube playlist about authorisation in .NET, I highly recommend watching it. However, I refer you to this video; at timestamp 12:11, Anton says:
If you have token revocation endpoints, you actually want to authenticate them.
So that's why we have "admin" here. We're moving out of authentication into authorisation. I plan to go into this in more depth in a later article, but I'll touch on it briefly here.
As I said in the very first article of this series, authentication is about proving who you are and authorisation is about what levels of access you have. As the /blacklist endpoint gives access to privileged functionality, only an admin should have the ability to call it.
So now, we have to have two roles that a user can have: A normal user and an admin. I'll just create a static class with these roles in our Shared library so we can use them later:
public static class Roles
{
    public static string[] ValidRoles { get; } = [ "admin", "user" ];
}
Then we have to configure the ASP.NET authorisation middleware, like this:
builder.Services.AddAuthorization(Configuration.Authorisation.Options);The Configuration class code looks like this:
    public static class Authorisation
    {
        public static void Options(AuthorizationOptions options)
        {
            options.AddPolicy("admin", policy =>
                policy.RequireAuthenticatedUser()
                      .RequireClaim("role", "admin"));
        }
    }
The way authorisation is implemented in ASP.NET is quite intuitive, but let's go over the code quickly:
- We add a named policy. In this case the policy is named
"admin"and this matches what we put on the/blacklistendpoint:.RequireAuthorization("admin"); - The policy requires two things.
- That the user is authenticated, as before.
- That the JWT used to authenticate has a claim with the key
"role"that has a value"admin". We'll add a role to both users, as you'll see later.
So, what that code will do is limit access to the /blacklist endpoint only to admin users. But if we're going to be assigning different users different roles, that also means we need to think more about creating (and storing) users.
I know I said in the first article on refresh tokens that I don't want to spend much time on user management, but unfortunately it's come to the point where that is now somewhat necessary...

User management
For the purposes of this application that we're building, we don't need to go overboard in storing user information. I'm going to do the bare minimum to make sure the code we're writing follows best practices and demonstrates the concepts I'm trying to teach you.
With that in mind, I'm going to start by creating a UserEntity to store the users in the SQLite database:
public class UserEntity
{
    public Guid   Id   { get; init; } = Guid.NewGuid();
    public string Role { get; init; } = string.Empty;
}
Then we're going to rename the TokenDbContext to ServerDbContext (because it's not just tokens anymore) and add a Users table:
public class ServerDbContext(DbContextOptions<ServerDbContext> options) : DbContext(options)
{
    public DbSet<TokenEntity> Tokens => Set<TokenEntity>();
    public DbSet<UserEntity>  Users =>  Set<UserEntity>();
}
Next we'll add a UserRepository to add users to and get users from the database:
public class UserRepository(ServerDbContext dbContext)
{
    public void AddUser(UserEntity user)
    {
        dbContext.Users.Add(user);
        dbContext.SaveChanges();
    }

    public UserEntity? TryGetUserById(Guid userId) =>
        dbContext.Users.FirstOrDefault(u => u.Id == userId);
}
Add we'll make sure dependency injection is set up correctly:
builder.Services.AddScoped<TokenRepository>();
builder.Services.AddScoped<UserRepository>();
builder.Services.AddDbContext<ServerDbContext>(Configuration.DbContext.Options);
Now all that's done, we can go about changing the /register endpoint to take a role:
app.MapGet("/{role}/register", (UserRepository repo, string role) =>
    {
        if (!Roles.ValidRoles.Contains(role)) return Results.BadRequest("Invalid role");
        var user = new UserEntity
        {
            Id = Guid.NewGuid(),
            Role = role
        };
        repo.AddUser(user);
        return Results.Ok(user.Id);
    })
   .AllowAnonymous();
So now, we'll have to call the route /user/register or /admin/register to get a userId back. It'll store the user in the database and in the future, we can look in the database to find out whether a particular user was a user or an admin.
All we have to do now is go over the small changes made to the /token and /refresh endpoints and then we're done with the server API.

Updated server endpoints
I was wondering whether to just show the changes to the endpoints, but I thought that might be confusing, so instead, I'll show the whole implementation on both endpoints and just comment on what has changed.
The /token endpoint:
app.MapGet("/token", (IOptionsSnapshot<TokenConfig> config, TokenRepository tokenRepo, UserRepository userRepo, Guid userId) =>
    {
        var token = tokenRepo.TryGetTokenByUserId(userId);
        if (token is not null)
        {
            return Results.BadRequest(new
            {
                Error = "User already has an active token",
                Message = "Use the /refresh endpoint with your refresh token to get a new token"
            });
        }
        var user = userRepo.TryGetUserById(userId);
        if (user is null) return Results.BadRequest("Invalid user id");
        var jti = Guid.NewGuid();
        var now = DateTime.UtcNow;
        var refreshToken = TokenGenerator.GenerateRefreshToken();
        var accessToken = TokenGenerator.GenerateToken(rsaKey, jti, userId, user.Role, now, config.Value.AccessTokenLifetime);
        var response = new TokenResponse(jti, accessToken, refreshToken, config.Value.AccessTokenLifetime);
        tokenRepo.SaveToken(new TokenEntity
        {
            RefreshTokenExpiresAt = now.AddMinutes(config.Value.RefreshTokenLifetime),
            RefreshToken = refreshToken,
            UserId = userId,
            CreatedAt = now
        });
        return Results.Ok(response);
    })
   .AllowAnonymous();
Okay, this version is only three lines longer than the version in the previous article and all of the action takes place between checking whether there is a token extant and generating a new token.
- Firstly, at the top, in the parameters, we're asking dependency injection to give us an instantiation of the
UserRepositoryso we can check what role the user has. - A few lines down, we try to get the user from the database using their
userId - If the user record isn't found in the database, we return a 400 Bad Request response.
- Otherwise, we generate a JTI and pass it and the role to the
TokenGenerator - We also pass the JTI to the
TokenResponse, as we'll need it to revoke the JWT later.
It should be obvious, but for completeness, here's the modified TokenResponse:
public record TokenResponse(Guid Jti, string AccessToken, string RefreshToken, double AccessTokenExpiresIn);Then the /refresh endpoint has almost exactly the same changes:
app.MapPost("/refresh", (IOptionsSnapshot<TokenConfig> config, HttpContext context, TokenRepository tokenRepo, UserRepository userRepo) =>
    {
        var refreshToken = context.Request.Form["refresh_token"].FirstOrDefault();
        if (string.IsNullOrEmpty(refreshToken)) return Results.BadRequest();
        var token = tokenRepo.TryGetTokenByRefreshToken(refreshToken);
        if (token is null) return Results.BadRequest();
        if (token.RefreshTokenExpiresAt < DateTime.UtcNow)
        {
            return Results.BadRequest(new
            {
                Error = "Refresh token has expired",
                Message = "Please login again to get a new token"
            });
        }
        var user = userRepo.TryGetUserById(token.UserId);
        if (user is null) return Results.BadRequest("Invalid user id");
        var jti = Guid.NewGuid();
        var now = DateTime.UtcNow;
        var newRefreshToken = TokenGenerator.GenerateRefreshToken();
        var accessToken = TokenGenerator.GenerateToken(rsaKey, jti, token.UserId, user.Role, now, config.Value.AccessTokenLifetime);
        var response = new TokenResponse(jti, accessToken, newRefreshToken, config.Value.AccessTokenLifetime);
        token.RefreshTokenExpiresAt = now.AddMinutes(config.Value.RefreshTokenLifetime);
        token.RefreshToken = newRefreshToken;
        tokenRepo.UpdateToken(token);
        return Results.Ok(response);
    })
   .AllowAnonymous();
We're injecting the UserRepository, using it to get the user's role, then putting that plus a generated JTI in the access token and returning the JTI in the TokenResponse.
Alright, that's the server done.
Next, I'm going to show you what changed in the client API.

Changes to the API client to enable revocation
You can run the server API, call the endpoints, copy and paste all of the responses into a text editor and then feed them all back into your server requests if you like, but we built a client API to automate all that. Because of the server changes, we also have to change the client to accommodate them, which is what we're going to do in this section of the article.
If you recall from the first refresh token article, we created a TokenStore to save the tokens for the user, which the client could then use to access the various endpoints on the server.
However, now that we have two users; an admin user and normal user, we're going to have to store the tokens for both. So what can we do? Well, now we need a repository, not just a store.
I thought about whether to do the obvious thing, which is to create another SQLite database for the client API and store all of its token data that way. But we've seen all that before in the server API, so I'm going to implement something which on the face it it, is much simpler and more interesting instead...
That's right, we're going to create a dictionary!
Here's our new TokenRepository:
public class TokenRepository
{
    public Dictionary<string, TokenStore> TokenStores { get; } =
        Roles.ValidRoles.ToDictionary(r => r, _ => new TokenStore());
}
After all, we only really have two users; one for each role; so let's just create a TokenStore for each role. Then we can simply use the role as the key to look up the required TokenStore value.
However, that does lead to some ramifications regarding dependency injection, which I'll talk about in a second.
First we're going to remove the singleton TokenStore service registration and replace it with a TokenRepository service:
builder.Services.AddSingleton<TokenRepository>();This does lead to a minor change to the TokenRefresherService, which is the background service we created to implement the proactive background token refresh in the previous article. I'll briefly show the changes here:
var repository = scope.ServiceProvider.GetRequiredService<TokenRepository>();
foreach (var (_, store) in repository.TokenStores) { ... }
So, just to clarify what changed: Before, we were getting a TokenStore from the service provider, but since we replaced that with a TokenRepository, which is a dictionary of token stores, now we're just looping over the items in the dictionary. The rest of the code is exactly the same.
The complication that I was talking about comes from the implementation of the reactive token refresh handler that we implemented in the first article on refresh tokens.
That's because the TokenRefreshHandler that we created to do that job has a TokenStore injected into it. But which TokenStore do we use? We have one for a user and one for an admin now.
And to make matters worse, the TokenRefreshHandler is created automatically by ASP.NET, so we can't just change it to take a TokenRepository instead, because we'd need to somehow get the role into it in order to be able to choose the correct TokenStore from the repository.
So how do we do it?
With magic, of course!

The token refresh handler factory
Okay, so our problem is getting the correct TokenStore into each TokenRefreshHandler. So, what we need to do is create a factory which does that.
I've defined one below and I've given it a transient lifetime, so a new instance is created every time it's requested:
builder.Services.AddTransient(Configuration.TokenServer.TokenRefreshHandlerFactory);"But what the hell is this Configuration.TokenServer.TokenRefreshHandlerFactory thing? Why are you hiding it?"
Yes, sorry I just like things to be tidy! Here's the implementation:
public static Func<string, TokenRefreshHandler> TokenRefreshHandlerFactory(IServiceProvider provider) =>
    role =>
    {
        var repository = provider.GetRequiredService<TokenRepository>();
        return new TokenRefreshHandler(repository.TokenStores[role]);
    };
So, in dependency injection, we're not registering an actual service, we're registering a function that gives us a service. This is totally possible to do in ASP.NET. So, now we get dependency injection to create a service for us depending on the role that we pass to this factory function.
Now remember, the TokenRefreshHandler is a DelegatingHandler, which is part of the HTTP request pipeline for the named HttpClient that we are using to call the server API endpoints. So, here's the modified code to make that work:
foreach (var role in Roles.ValidRoles)
{
    builder.Services.AddHttpClient($"{role}-server-api", Configuration.TokenServer.HttpClientSettings)
                    .ConfigurePrimaryHttpMessageHandler(Configuration.TokenServer.HttpMessageHandlerSettings)
                    .AddHttpMessageHandler(Configuration.TokenServer.HttpMessageHandlerFor(role));
}
As I said earlier in this article, Roles.ValidRoles is [ "user", "admin" ], so we're adding two named HTTP clients to dependency injection, one called "user-server-api" and one called "admin-server-api". Using the AddHttpMessageHandler extension, we're creating a TokenRefreshHandler pointing to the correct TokenStore for each one. That means that when we try to call a protected endpoint, but our JWT has expired, the handler automatically calls the /refresh endpoint to get new tokens and tries again.
With that in mind, Configuration.TokenServer.HttpMessageHandlerFor(role) is:
public static Func<IServiceProvider, DelegatingHandler> HttpMessageHandlerFor(string role) =>
    provider =>
    {
        var factory = provider.GetRequiredService<Func<string, TokenRefreshHandler>>();
        return factory(role);
    };
So when dependency injection wants to know how to get a TokenRefreshHandler, we ask it for an instance of our factory function. We call the function (passing the role into it), and it returns the correct TokenRefreshHandler, instantiates it and returns it.
Magic!
So now we've done that, what changes do we need to make to the TokenRefreshHandler?
Actually, none!
So, finally we can draw our attention to the changes we have to make to our client API endpoints in order to accommodate requests from users with different roles.

Client endpoints with the addition of roles
Like I did with the server API endpoints, I'm going to show the whole implementation of each endpoint and just chat about the changes. I'm not going to just show you the three or four lines that changed without any context. That would just lead to confusion, which is contrary to my intention in writing these articles. So, prepare for chunky code-blocks!
Here's the /login endpoint, which registers the user, gets tokens and saves them:
app.MapGet("/{role}/login", async (IHttpClientFactory factory, TokenRepository repository, string role) =>
{
    if (!Roles.ValidRoles.Contains(role)) return Results.BadRequest("Invalid role");
    using var client = factory.CreateClient($"{role}-server-api");
    using var registerResponse = await client.GetAsync($"{role}/register");
    if (!registerResponse.IsSuccessStatusCode) return Results.BadRequest("Unable to register");
    var userId = await registerResponse.Content.ReadFromJsonAsync<Guid>();
    if (userId == Guid.Empty) return Results.BadRequest("Unable to parse user id");
    using var tokenResponse = await client.GetAsync($"/token?userId={userId}");
    if (!tokenResponse.IsSuccessStatusCode) return Results.BadRequest("Unable to get token");
    var token = await tokenResponse.Content.ReadFromJsonAsync<TokenResponse>();
    if (token is null) return Results.BadRequest("Unable to parse token");
    var store = repository.TokenStores[role];
    store.AccessTokenExpiresAt = DateTime.UtcNow.AddMinutes(token.AccessTokenExpiresIn);
    store.RefreshToken = token.RefreshToken;
    store.AccessToken = token.AccessToken;
    return Results.Ok("Logged in");
});- The route changed to
/{role}/login; so it'll be/user/loginor/admin/loginand the role will be sent to theroleparameter. Also, as expected, we're not injecting aTokenStorein anymore. Instead it's replaced by aTokenRepositoryinstance. - We're checking whether the role really is user or admin and returning a 400 if not.
- We're creating the corresponding named
HttpClientto call the server endpoints. This will add theTokenRefreshHandlerto the request pipeline. Doing so will pull new refresh tokens and resend the request if the current JWT has expired. - Everything else is the same until we have to decide into which store we want to save the tokens that we get back from server. Once we've done that, nothing else has changed!
Here's the /info endpoint, which gets the user information from the protected endpoint on the server using the tokens we just got:
app.MapGet("/{role}/info", async (IHttpClientFactory factory, TokenRepository repository, string role) =>
{
    if (!Roles.ValidRoles.Contains(role)) return Results.BadRequest("Invalid role");
    using var client = factory.CreateClient($"{role}-server-api");
    if (client.BaseAddress is null) return Results.BadRequest("Unable to get base address");
    var uriBuilder = new UriBuilder(client.BaseAddress) { Path = "user" };
    using var request = new HttpRequestMessage(HttpMethod.Get, uriBuilder.Uri);
    var store = repository.TokenStores[role];
    request.Headers.Authorization = new AuthenticationHeaderValue("Bearer", store.AccessToken);
    using var response = await client.SendAsync(request);
    if (!response.IsSuccessStatusCode) return Results.BadRequest("Unable to get user info");
    var user = await response.Content.ReadFromJsonAsync<UserResponse>();
    if (user is null) return Results.BadRequest("Unable to parse user info");
    return Results.Ok($"User Id: {user.UserId} | Role: {user.Role}");
});
And in this endpoint, the changes are exactly the same as in the previous endpoint.
So let's go on to see some new code. Here is the /blacklist endpoint:
app.MapGet("/admin/blacklist", async (IHttpClientFactory factory, TokenRepository repository) =>
{
    var userStore = repository.TokenStores["user"];
    if (userStore.AccessTokenExpiresAt is null) return Results.BadRequest("User token not yet initialised");
    var handler = new JwtSecurityTokenHandler();
    if (!handler.CanReadToken(userStore.AccessToken)) return Results.BadRequest("Invalid access token");
    var token = handler.ReadJwtToken(userStore.AccessToken);
    var claim = token.Claims.FirstOrDefault(c => c.Type == "jti");
    if (claim is null || !Guid.TryParse(claim.Value, out var jti)) return Results.BadRequest("No jti claim found");
    var expiresIn = userStore.AccessTokenExpiresAt.Value.Subtract(DateTime.UtcNow);
    using var client = factory.CreateClient("admin-server-api");
    if (client.BaseAddress is null) return Results.BadRequest("Unable to get base address");
    var uriBuilder = new UriBuilder(client.BaseAddress) { Path = "blacklist" };
    var adminStore = repository.TokenStores["admin"];
    using var request = new HttpRequestMessage(HttpMethod.Post, uriBuilder.Uri);
    request.Headers.Authorization = new AuthenticationHeaderValue("Bearer", adminStore.AccessToken);
    var json = JsonSerializer.Serialize(new BlacklistRequest(jti, expiresIn.TotalSeconds));
    request.Content = new StringContent(json, Encoding.UTF8, Application.Json);
    var response = await client.SendAsync(request);
    if (!response.IsSuccessStatusCode) return Results.BadRequest("Unable to blacklist token");
    return Results.Ok("Token blacklisted");
});
There are a number of reasons why this might be called, for example:
- If the user logs out, their tokens should be revoked.
- If an administrator is notified of compromised tokens, it could be called from their UI.
- Azure Monitor could might detect an anomaly, such as a token used from a blocked region and trigger the token revocation endpoint.
- Etc...
Anyway, to analyse the code:
- Notice that this is an endpoint meant only for admins.
- We inject the
TokenRepositoryin so we can get theTokenStorewe want. And actually, as you will see, we want both of them. - We grab the JWT from the user's
TokenStore, read it and extract the JTI from it. - We also grab the
expiresAt(date) and turn in into anexpiresIn(seconds). - We create a POST request to the server
/blacklistendpoint. - We grab the admin's JWT from their
TokenStoreand add it to the request'sAuthorizationheader. - We create a
BlacklistRequestwith the user's JTI and expiry time, serialise it into JSON and set the request body to it. - The request is sent off to the server.
- We should get a success response, because we did everything right.
- We give the appropriate response.
In a way, it's all common sense, but it's nice to see it put together.
The last thing I want to do is show you some screenshots of the logs produced when I run the two API's and test them with Insomnia. I won't bother to show you screenshots of Insomnia, because you've seen them before. However, I recommend that since you've gotten this far in the article, clone the repo and try it yourself. To remind you where it is, it's:
https://github.com/aaroncpina/Aaron.Pina.Blog.Article.06

Testing the revocation of the user access token
Alright, so the screenshots you'll see below are just the logs produced by the HttpClient that we use in the client API endpoints to call the server API. I basically just opened two terminal windows; one for each API project and did a dotnet run in each.
This is the result of calling /admin/login:
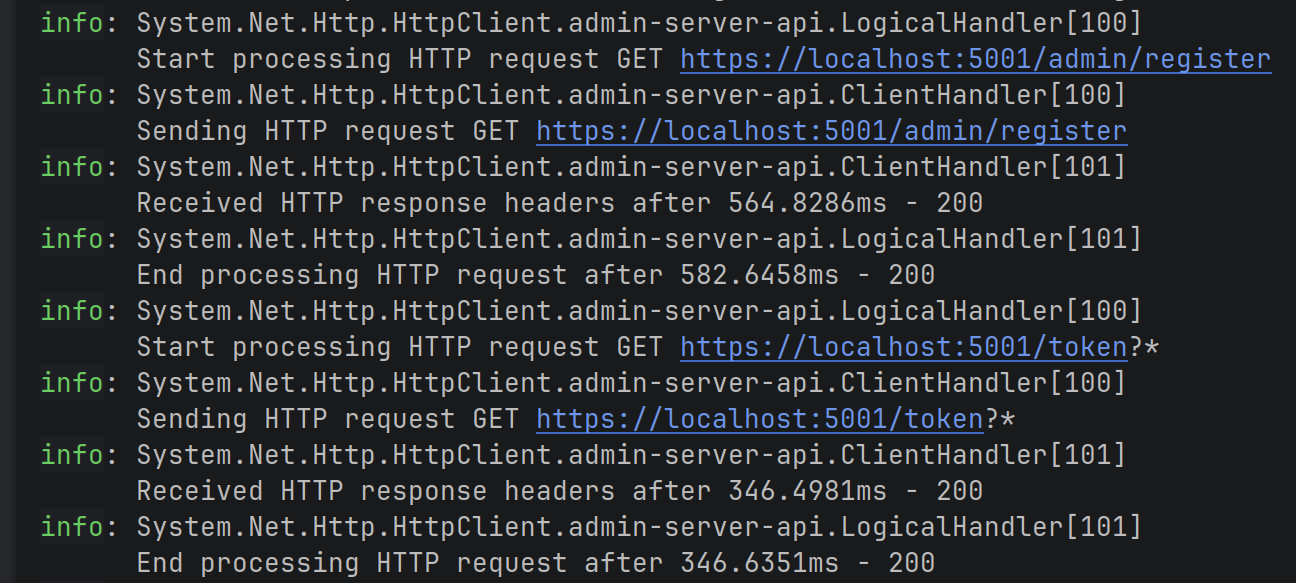
You can see that it registers and gets tokens for the admin user. Notice that we know which HttpClient is being used because it has the client name in the log: admin-server-api
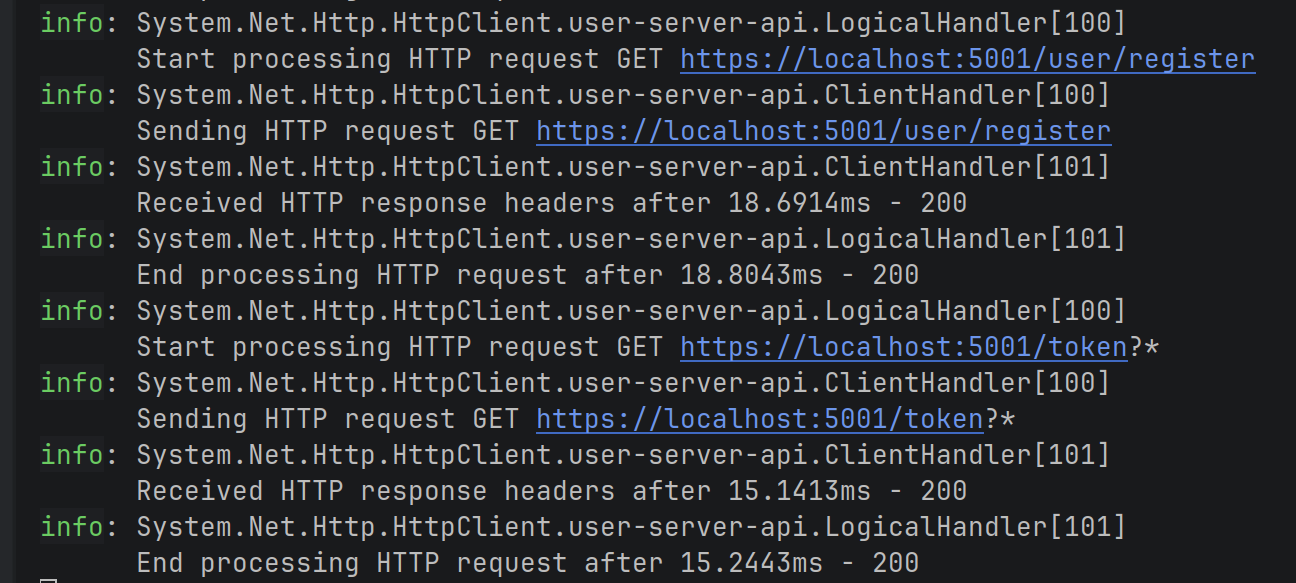
Next, we call the /user/login endpoint which does the same thing. Note the client name is user-server-api, so we know that it's saving the tokens in the correct TokenStore:
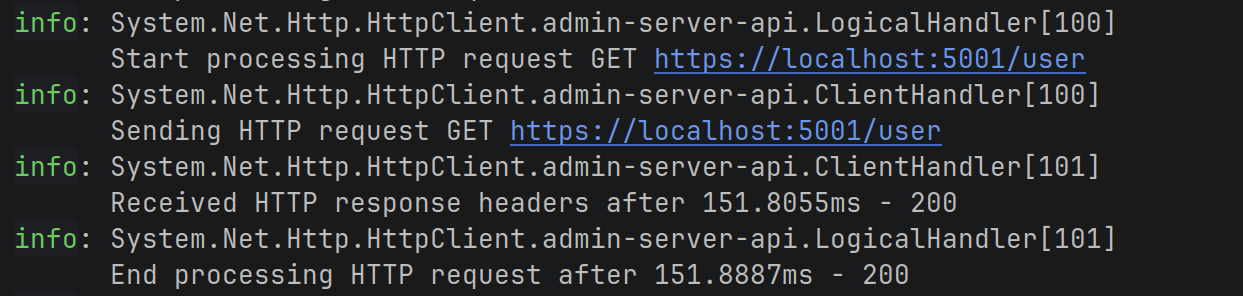
After that, we called the /admin/info endpoint. It returns a 200 OK response:
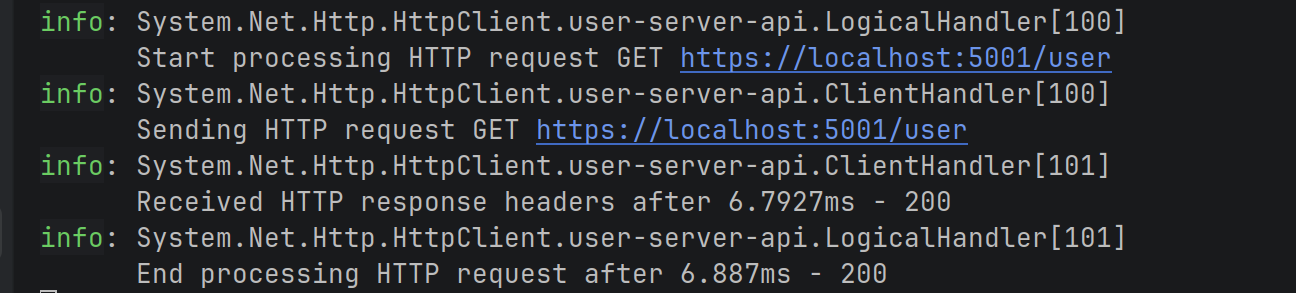
The same with the /user/info endpoint:
Here's where it starts to get interesting. I call the client /admin/blacklist endpoint and it gets the JTI for the user and sends a POST request to the server /blacklist endpoint:
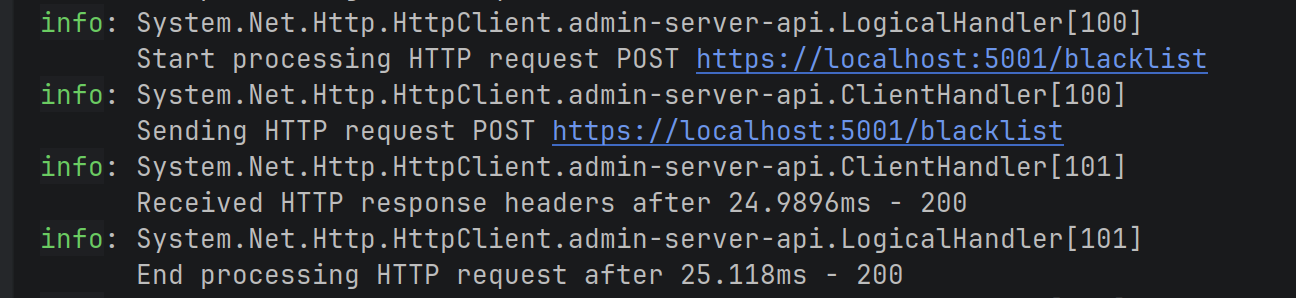
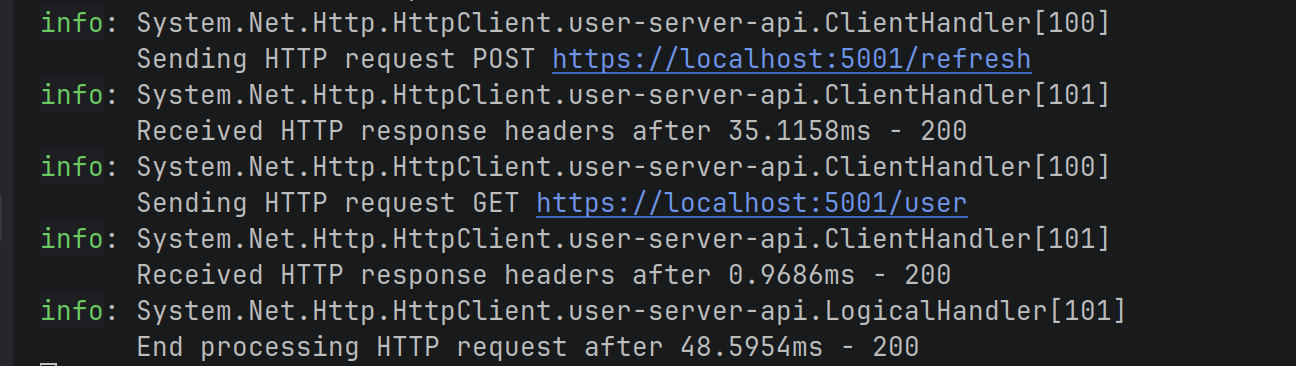
And we finally call the client /user/info endpoint again. However this time, we see that the request fails with a 401 response, because the token had been revoked:

In fact, in the server logs, we can see that:

And then we see that the TokenRefreshHandler kicks in, calls the /refresh endpoint, attaches the new JWT to the request and resends it. We get a 200 OK response back:
Great! Now our client and server are working perfectly!
Conclusion
We've now seen how to revoke JWTs effectively in .NET APIs. By blacklisting the JTI claim in Redis and checking it during validation, we can stop stolen tokens, even before they expire.
This adds a crucial layer of protection without sacrificing the stateless benefits of JWTs.
Combined with short access token lifetimes and refresh tokens from previous posts, you now have a solid, production-ready authentication setup.
Key takeaways
- JWT access tokens should have short lifetimes to limit damage if stolen, but this alone isn't enough for full security.
- Adding a unique identifier like a JTI claim to each token gives us a handle to revoke specific sessions.
- A distributed blacklist (Redis with expiry) lets us invalidate tokens instantly across all API instances.
- Protect the revocation endpoint with proper authorisation (e.g., admin role policy) to prevent abuse.
- Combining short access tokens, refresh tokens, and revocation gives strong security with good user experience.
Next time, we'll explore JWKS, the standard way to share public keys securely for distributed JWT validation.
Enjoyed this hands-on deep dive?
Subscribe (for free) for the full series. Code-heavy guides straight to your inbox.
Questions or your own JWT experiments?
Comment below or connect on LinkedIn / X. Let's master secure .NET APIs together.